Installing a WordPress plugin is a breeze, even for beginners! Just head to your dashboard, click on “Plugins,” then “Add New.” Search for your desired plugin, hit “Install,” and voilà! Your site’s functionality just leveled up—let’s get started!
How to Install a WordPress Plugin? (Beginner’s Guide)
Are you ready to take your WordPress site to the next level? If you’ve been exploring ways to enhance functionality, improve performance, or simply add some fun features, you’re in for a treat! Installing a WordPress plugin might just be the game-changer you need. But if the thought of diving into the world of plugins feels a bit daunting, don’t worry—we’ve got your back! In this beginner’s guide, we’ll walk you through the simple steps to install a WordPress plugin with ease. By the end, you’ll be armed with the knowledge to transform your site effortlessly, all while enjoying the process. So, grab a cup of coffee, roll up your sleeves, and let’s unlock the full potential of your WordPress site together!
Understanding the Importance of WordPress Plugins for Your Site
When it comes to building a successful WordPress site, plugins play a crucial role in enhancing functionality and improving user experience. These powerful tools allow you to customize your website according to your specific needs without needing extensive coding knowledge. Whether you want to optimize for SEO, enhance security, or create beautiful galleries, there’s a plugin that can help.
One of the primary advantages of using plugins is their ability to extend the capabilities of your site. With thousands of options available, you can easily add features such as:
- Contact forms for better communication with your audience.
- SEO tools that help improve your site’s visibility on search engines.
- Social media integration to enhance your reach and engagement.
- Performance optimization for faster loading times and better user experience.
Furthermore, plugins can save you time and resources. Instead of building a feature from scratch, you can simply install a plugin that provides the functionality you need. This not only accelerates the development process but also allows you to focus on other important aspects of your site, such as content creation and marketing.
However, it’s essential to choose plugins wisely. Not all plugins are created equal; some can slow down your site, while others may pose security risks. To help you make informed decisions, consider the following tips:
- Check user reviews and ratings to gauge reliability.
- Look for regular updates to ensure compatibility with the latest version of WordPress.
- Evaluate the support options available in case you encounter issues.
To give you a clearer picture, here’s a simple comparison table highlighting some popular plugins and their primary functions:
| Plugin Name | Key Feature |
|---|---|
| Yoast SEO | On-page SEO optimization |
| Wordfence Security | Website security and firewall |
| WooCommerce | E-commerce capabilities |
| Elementor | Drag-and-drop page builder |
In essence, plugins are indispensable for WordPress users who want to create a robust and engaging website. They not only provide essential features but also enhance your overall site performance. By taking the time to understand the importance of these tools, you can significantly improve your site and deliver a better experience for your visitors.
Choosing the Right Plugin for Your Needs
When diving into the world of WordPress plugins, it’s essential to select the ones that align perfectly with your website’s goals. With thousands of options available, the right choice can significantly enhance your site’s functionality, while the wrong one might lead to poor performance or security issues. Here are some key considerations to help you make an informed decision:
- Understand Your Needs: Before searching for a plugin, outline what specific features or functionalities you require. Are you looking to improve SEO, enhance security, or create a contact form? Knowing your needs will narrow down your options.
- Check Compatibility: Ensure the plugin is compatible with your current WordPress version and theme. An incompatible plugin can cause conflicts, leading to a messy site. Look for plugins that are regularly updated to maintain compatibility.
- Evaluate User Reviews: User feedback is invaluable. Take time to read reviews and ratings to gauge the experience of others. A highly-rated plugin is often a reliable choice.
- Support and Documentation: Good support can make all the difference. Check if the plugin developer offers comprehensive documentation and responsive customer support. This can save you time and frustration in the long run.
Another crucial factor is the plugin’s performance impact. Some plugins can bog down your website, slowing down load times and affecting user experience. Use tools like GTmetrix or Pingdom to test your site’s speed before and after installing a plugin to see if it’s worth keeping.
Additionally, consider the security implications of the plugins you choose. Poorly coded or outdated plugins can be a gateway for hackers. Stick to plugins from reputable sources with a proven track record of security. Regularly check for updates and vulnerabilities to keep your site safe.
If you find yourself overwhelmed with choices, here’s a simple comparison table to help you visualize some popular plugin categories and their use cases:
| Plugin Type | Purpose | Examples |
|---|---|---|
| SEO | Improve search engine rankings | Yoast SEO, All in One SEO |
| Security | Protect against threats | Wordfence, Sucuri |
| Performance | Enhance site speed | WP Super Cache, W3 Total Cache |
| E-commerce | Set up an online store | WooCommerce, Easy Digital Downloads |
Ultimately, the key to choosing the right plugin lies in balancing functionality with performance and security. By taking the time to evaluate your options carefully, you’ll find plugins that not only meet your needs but also contribute positively to your WordPress site’s overall success.
Where to Find Reliable WordPress Plugins
When you’re on the hunt for reliable WordPress plugins, it’s essential to steer clear of the overcrowded digital marketplace and focus on trusted sources. Here are some key places to explore:
- WordPress Plugin Directory: This is the official repository for WordPress plugins. Every plugin here has been vetted for quality and security, making it a reliable source. You can browse plugins based on categories, popularity, or newness.
- Premium Plugin Marketplaces: Websites like CodeCanyon and Mojo Marketplace offer premium plugins that come with dedicated support and regular updates. Look for top-rated plugins with positive reviews.
- Developer Websites: Many reputable plugin developers maintain their own websites where they offer direct downloads. This can often provide more information about the plugin and its features. Always check for user testimonials and a clear support policy.
- WordPress Community Forums: Engaging with forums like the WordPress Support Forum can provide insights into which plugins are highly recommended by fellow users. You might discover hidden gems that are not widely advertised.
While exploring these sources, pay attention to some vital indicators of a trustworthy plugin:
| Indicator | What to Look For |
|---|---|
| User Ratings | 4 stars and above |
| Last Updated | Within the last 6 months |
| Active Installations | Thousands of active users |
| Support Response | Timely responses in forums |
Furthermore, consider seeking recommendations from trusted blogs or YouTube channels dedicated to WordPress development. These resources often provide in-depth reviews and tutorials that can help you make an informed choice.
Ultimately, the key to finding reliable WordPress plugins is to do your homework. Take the time to read reviews, check update history, and even test plugins on a staging site before deploying them on your main site. This diligence can save you from headaches down the line and ensure your website runs smoothly.
Step-by-Step Guide to Installing Your First Plugin
Installing your first plugin can feel like a huge leap into the world of WordPress, but it’s easier than you might think! Follow these straightforward steps to enhance your site with powerful features.
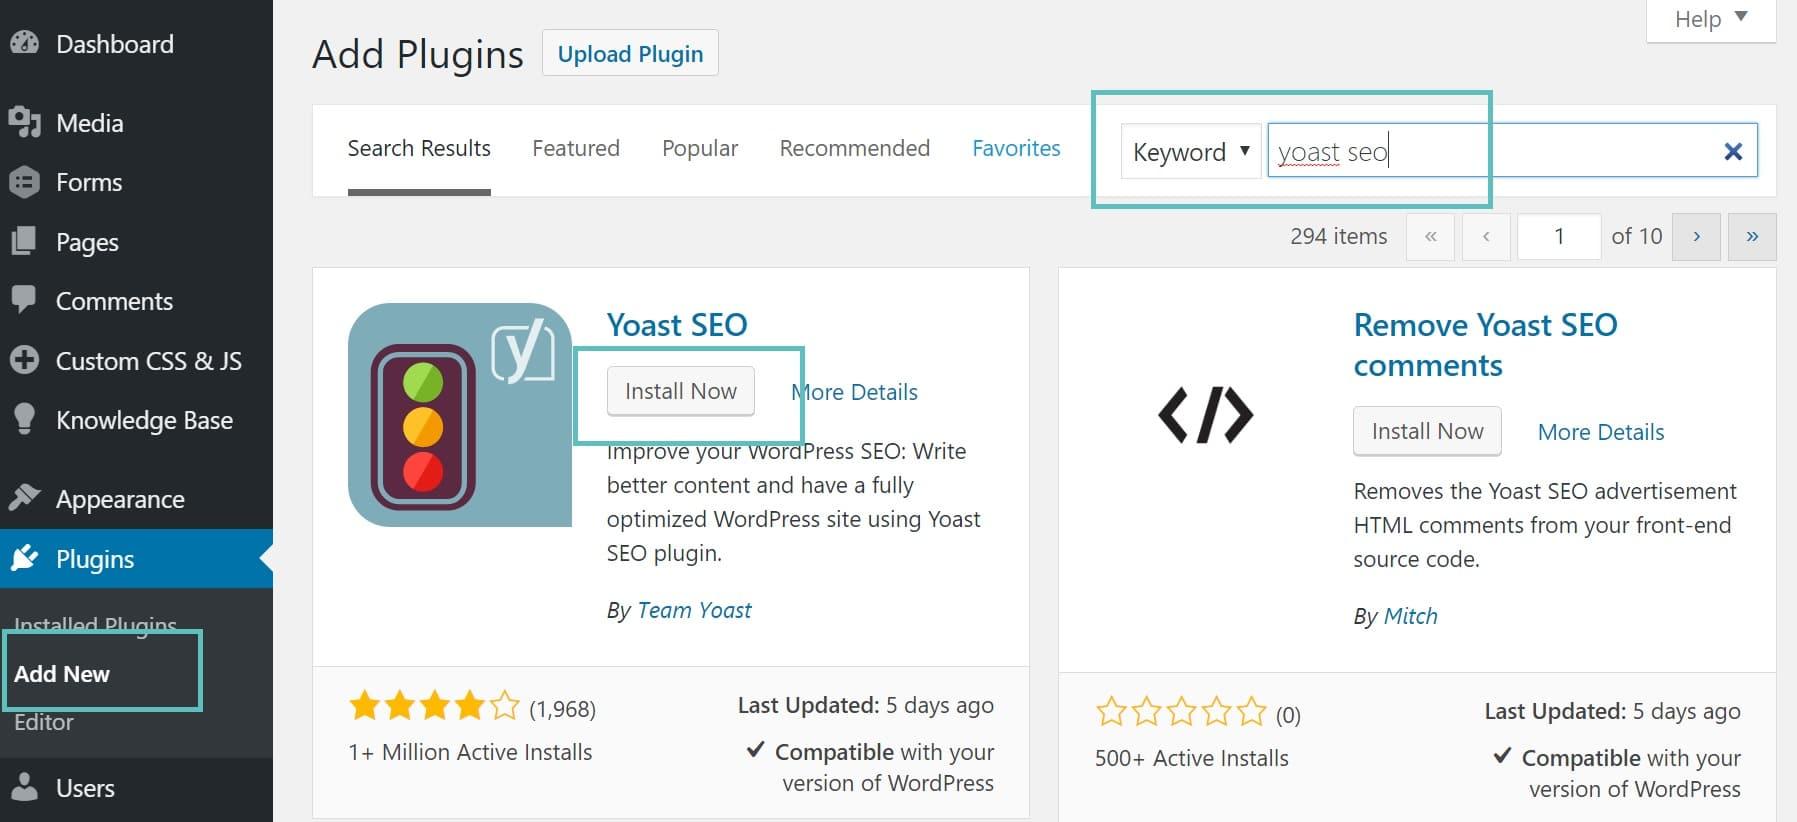
- Log in to Your WordPress Dashboard: Start by accessing your WordPress admin panel by entering your website URL followed by
/wp-admin. Use your username and password to log in. - Navigate to Plugins: On the left sidebar, locate and click on Plugins. This will take you to the plugins management page, where you can view all installed plugins.
- Add New Plugin: Click on the Add New button at the top of the page. This opens the plugin repository where you can search for various plugins.
- Search for a Plugin: Use the search bar to enter keywords related to the functionality you need. For example, if you want to improve SEO, type “SEO” and hit enter.
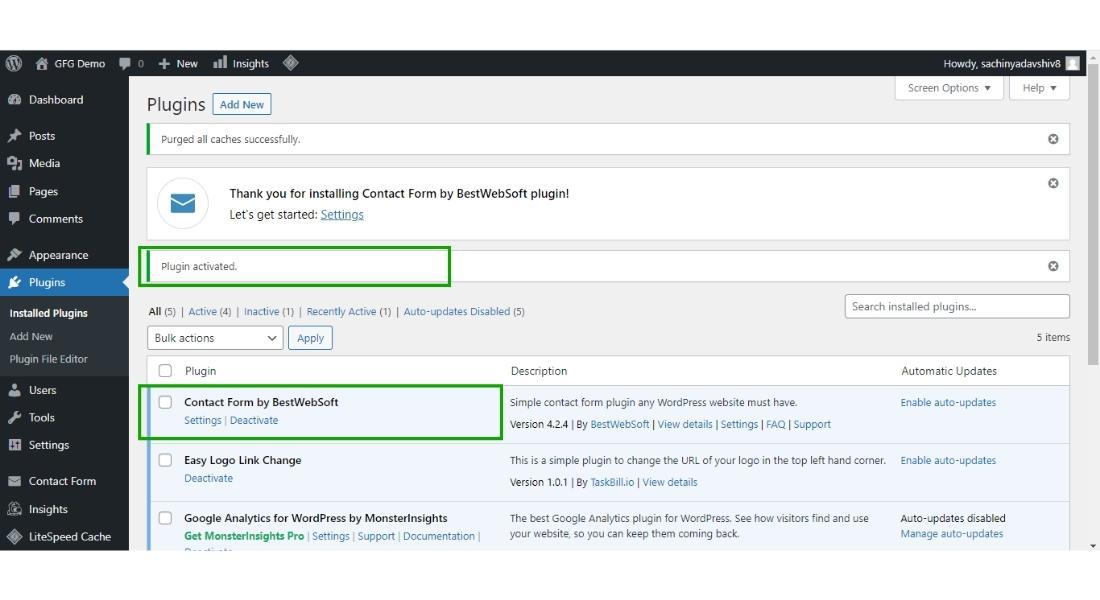
- Install the Plugin: Once you find the desired plugin in the search results, click the Install Now button next to it. This will download and install the plugin on your site.
- Activate the Plugin: After installation, the button will change to Activate. Click on it to enable the plugin and start using its features right away.
To give you a better idea of popular plugins, here’s a quick overview of some top choices:
| Plugin Name | Purpose | Rating |
|---|---|---|
| Yoast SEO | Search Engine Optimization | ★★★★☆ |
| WooCommerce | E-commerce Solutions | ★★★★★ |
| Elementor | Page Builder | ★★★★★ |
| Akismet | Spam Protection | ★★★★☆ |
After the plugin is activated, you may need to configure its settings. Look for the new menu item added to your dashboard, usually appearing in the sidebar. Click on it to access the settings and customize the plugin to fit your needs.
And there you have it! Installing a plugin is just the beginning of enhancing your WordPress site. Each plugin has its own unique features and settings, so don’t hesitate to explore and make your site truly your own!
Configuring Your Plugin Settings for Optimal Performance
After successfully installing your WordPress plugin, it’s crucial to ensure that it’s configured correctly for optimal performance. This not only enhances the functionality of your website but also improves user experience and site speed. Here are some key settings and practices to consider:
- Review Default Settings: Most plugins come with default settings that may not suit your site’s specific needs. Take the time to familiarize yourself with these options.
- Optimize for Performance: Look for features that allow you to cache data or minimize loading time. Enabling caching options can significantly speed up your website.
- Customize for Your Audience: Tailor the plugin settings according to your target audience’s preferences and behaviors. This ensures a more engaging and relevant user experience.
- Enable Only Necessary Features: Many plugins offer a variety of features, but enabling every option can slow down your site. Choose only what you need.
It’s also essential to keep your plugins updated. Outdated plugins can lead to security vulnerabilities and performance issues. WordPress will typically notify you when updates are available, so make a habit of checking these notifications regularly.
Additionally, consider the compatibility of your plugins with one another. Some plugins may conflict, causing functionality issues on your site. If you notice any problems, try disabling plugins one by one to identify the culprit. Document your findings to streamline future troubleshooting.
| Plugin | Purpose | Key Settings |
|---|---|---|
| Yoast SEO | Improve SEO | Focus Keyword, Meta Description |
| WP Super Cache | Enhance Speed | Cache Delivery Method, Expiry Time |
| WooCommerce | eCommerce Functionality | Currency, Payment Methods |
| UpdraftPlus | Backup and Restore | Backup Schedule, Cloud Storage Options |
don’t forget to test your website after making changes to your plugin settings. Use tools like Google PageSpeed Insights or GTmetrix to analyze your site’s performance, and make adjustments as necessary. A well-optimized plugin setup can significantly improve your site’s functionality, making it a pleasure for your visitors to navigate.
Common Plugin Issues and Their Solutions
As you dive into the world of WordPress plugins, you may encounter various issues that can disrupt your site’s functionality. Don’t worry—most of these problems are common and have straightforward solutions. Here are some prevalent plugin issues and how to resolve them:
- Plugin Compatibility Issues: Sometimes, a plugin may not work well with your current theme or other plugins. Always check for compatibility information in the plugin description before installation. If you face issues, consider:
- Updating all plugins and themes to their latest versions.
- Deactivating other plugins to identify any conflicts.
- Performance Slowdowns: After installing a new plugin, you might notice that your website is running slower. This could be due to heavy resource usage. To tackle this, try:
- Using performance optimization plugins to cache your site.
- Limiting the number of active plugins; deactivate and delete those that are unnecessary.
- White Screen of Death: If your site suddenly goes blank, it can be alarming. This often occurs due to a malfunctioning plugin. To regain access, follow these steps:
- Access your website via FTP or your hosting provider’s file manager.
- Navigate to the
/wp-content/plugins/directory and rename the problematic plugin’s folder. - This will deactivate the plugin, allowing you to regain access to your admin dashboard.
In some cases, you might need to address plugin-specific settings that are causing issues. Here’s a quick reference table of solutions for common plugin problems:
| Issue | Solution |
|---|---|
| Plugin won’t activate | Check for compatibility and update your WordPress version. |
| Errors after update | Roll back to an earlier version of the plugin until a fix is available. |
| Missing settings page | Clear your browser cache and refresh the page. |
| Broken functionality | Look for conflicts with other plugins and adjust accordingly. |
Remember, ensuring that your WordPress plugins are up-to-date and regularly maintained can prevent many of these issues. If you run into trouble, don’t hesitate to seek help from the plugin’s support forums or community resources. With a little patience and problem-solving, you can keep your site running smoothly!
Keeping Your Plugins Updated for Security and Stability
When it comes to maintaining your WordPress site, keeping your plugins updated is essential. With the digital landscape constantly evolving, developers regularly release updates to enhance functionality, improve performance, and patch security vulnerabilities. Neglecting these updates can expose your site to various risks, including malware infections and potential data breaches.
Here are a few reasons why staying on top of your plugin updates is crucial:
- Enhanced Security: Many updates contain crucial security patches that protect your site from recent threats. By updating regularly, you minimize the risk of exploits.
- Improved Performance: Updates often include performance enhancements, meaning your site can run smoother and faster, providing a better user experience.
- Compatibility: As WordPress itself receives updates, older plugins may become incompatible. Regular updates ensure your plugins work seamlessly with the latest version of WordPress.
To streamline the updating process, it’s important to regularly check for updates. You can do this directly from your WordPress dashboard:
- Go to the Plugins section.
- Look for any plugins that show an Update Available notification.
- Click on Update Now for each plugin needing an update.
Tip: Always back up your site before performing any updates. This ensures that you can restore your site to its previous state if something goes awry during the update process.
If you manage multiple sites, consider using a management tool that can automate updates and monitor security across all your websites. This not only saves time but also helps maintain consistent security standards.
neglecting plugin updates can lead to significant issues down the line. By prioritizing regular updates, you are investing in the security, stability, and overall success of your WordPress site.
Exploring Must-Have Plugins for Every WordPress Site
When it comes to enhancing your WordPress site, choosing the right plugins can make all the difference. A well-selected plugin can improve your site’s functionality, boost performance, and even enhance security. Here are some must-have plugins that every WordPress site should consider:
- Yoast SEO: This plugin is essential for optimizing your content for search engines. With features like keyword analysis, readability checks, and automated sitemaps, Yoast SEO helps you climb the search rankings effortlessly.
- WooCommerce: If you’re planning to sell products or services online, WooCommerce is the go-to plugin. It provides a comprehensive e-commerce solution, enabling you to manage inventory, payments, and shipping seamlessly.
- Wordfence Security: Keeping your site secure is paramount. Wordfence offers robust firewall protection, malware scanning, and login security features to keep hackers at bay.
- Contact Form 7: This simple yet powerful plugin lets you create and manage multiple contact forms. It’s easy to customize and integrates well with other plugins, making it a favorite among users.
To help you further in your plugin journey, let’s break down a simple comparison of these plugins:
| Plugin | Primary Function | Key Features |
|---|---|---|
| Yoast SEO | SEO Optimization | Keyword analysis, Readability check, Automated sitemaps |
| WooCommerce | E-commerce | Product management, Payment processing, Shipping options |
| Wordfence Security | Security | Firewall, Malware scanning, Login security |
| Contact Form 7 | Form Management | Customizable forms, Spam filtering, Multi-form support |
Choosing the right plugins can seem overwhelming with the multitude of options available. However, focusing on specific needs—whether that’s enhancing SEO, securing your site, or improving user engagement—will guide you in making the best choices. Always ensure the plugins you select are updated regularly and compatible with your current WordPress version to avoid any conflicts.
Incorporating these plugins not only enhances your site’s performance but also enriches the user experience, leading to higher engagement and conversions. Remember, the right tools can transform your WordPress site from good to great!
Maximizing the Benefits of Plugins without Overloading Your Site
When it comes to enhancing your WordPress site, plugins are your best friends. They can add powerful features and functionalities with just a few clicks. However, it’s essential to strike a balance between leveraging these tools and maintaining optimal site performance. Here are some strategies to maximize the benefits of plugins without overwhelming your website.
Choose Wisely: Not all plugins are created equal. Before installing, consider the following:
- Necessity: Does the plugin serve a critical function that enhances user experience or site management?
- Reviews and Ratings: Always check user feedback to gauge reliability and support.
- Compatibility: Ensure the plugin works seamlessly with your current theme and other plugins.
Limit Your Plugin Count: While it might be tempting to install several plugins, fewer can often be better. Each added plugin can slow down your site. Aim to keep your plugin list to a minimum by:
- Consolidating Functions: Look for plugins that combine multiple features in one package.
- Regular Audits: Periodically review and remove plugins that you no longer need or use.
Optimize Performance: To ensure that your plugins don’t hinder performance, consider implementing caching solutions and optimizing your images. A well-optimized site can handle more plugins without significant slowdowns. Here’s a simple table showing some popular caching plugins and their features:
| Plugin Name | Key Features | Free Version |
|---|---|---|
| WP Super Cache | Static HTML files, Easy setup | Yes |
| W3 Total Cache | Page caching, Minification | Yes |
| WP Rocket | One-click setup, Lazy loading | No |
Keep Everything Updated: Regular updates not only keep your plugins functioning correctly but also mitigate security vulnerabilities. Make it a habit to check for updates and apply them promptly. This practice ensures your plugins are optimized for performance and security.
Monitor Site Performance: After installing a new plugin, always test your site’s performance. Use tools like Google PageSpeed Insights or GTmetrix to analyze load times. If you notice a significant dip in performance, reconsider the plugin choice or look for alternatives.
Tips for Troubleshooting Plugin Conflicts and Errors
When working with multiple plugins, conflicts and errors can sometimes arise, causing your site to behave unexpectedly. Here are some practical tips to help you navigate through these frustrating issues.
First, it’s crucial to identify the source of the conflict. Start by deactivating all plugins and then reactivate them one by one. This method allows you to pinpoint which plugin is causing the issue. Once you identify the conflicting plugin, you can either look for an alternative or reach out to the plugin developer for support.
If deactivating plugins does not resolve the issue, consider these additional steps:
- Check for Updates: Ensure all your plugins and themes are up to date. Developers frequently release updates to fix bugs and compatibility issues.
- Switch Themes: Temporarily switch to a default WordPress theme, like Twenty Twenty-One, to see if the issue stems from your active theme.
- Enable Debugging: Add the following line to your wp-config.php file to enable debugging mode:
define('WP_DEBUG', true);. This will help you identify PHP errors that might be causing conflicts.
Another common issue is JavaScript errors, which can often be seen in the browser console. To diagnose these:
- Right-click on your webpage and select “Inspect.”
- Click on the “Console” tab to view any script errors.
- Look for messages that highlight conflicts and address them accordingly.
In some cases, it might be beneficial to consult the documentation or support forums for the plugins you are using. Many times, other users have experienced similar issues and found effective solutions. You can also check for known issues in the plugin’s changelog or support threads.
If none of the above methods work, consider creating a staging site. This will allow you to test plugin changes without affecting your live site. Once on the staging site, you can experiment freely to find a resolution.
Lastly, if you’re still facing challenges, don’t hesitate to reach out to professionals. Sometimes, a fresh set of eyes can quickly spot an issue you might have overlooked.
Frequently Asked Questions (FAQ)
Q&A: How to Install a WordPress Plugin? (Beginner’s Guide)
Q1: What is a WordPress plugin, and why do I need one?
A: Great question! A WordPress plugin is basically a piece of software that adds specific features or functionality to your WordPress site. Think of it as an app for your website. Want to add a contact form, improve your SEO, or speed up your site? Plugins make all of that possible! Trust me, once you start exploring plugins, you’ll wonder how you ever managed without them.
Q2: Is installing a plugin really that easy?
A: Absolutely! If you can navigate a few menus, you can install a plugin. WordPress has made it super user-friendly, so even if you’re a total newbie, you’ll have no trouble. I promise you’ll feel like a tech wizard in no time!
Q3: How do I find the right plugin for what I need?
A: Finding the right plugin is like searching for a treasure! You can visit the WordPress Plugin Directory directly from your dashboard or search online for recommendations. Just make sure to check the reviews and ratings; they can give you a good insight into how well the plugin works. And remember, there are thousands of plugins out there, so take your time to find the perfect fit!
Q4: Can you walk me through the installation process?
A: Of course! Here’s how to do it:
- Log into your WordPress dashboard.
- Click on “Plugins” in the left-hand menu, then select “Add New.”
- Use the search bar to find your desired plugin.
- Once you find it, click the “Install Now” button.
- After installation, hit “Activate” to start using it right away. Voila! You’re all set!
Q5: Do I need to configure my plugin after installation?
A: Often, yes! Many plugins come with their own settings that you may want to configure to suit your needs. Look for a new menu item in your dashboard or check the plugin’s documentation for guidance. Take a little time to tweak the settings, and you’ll get the most out of your new plugin!
Q6: Are all plugins free?
A: Not all, but many are! There are tons of free plugins available that can meet most of your needs. However, some premium plugins offer advanced features and support for a price. It really depends on what you want to achieve with your site. If you find a plugin that fits your needs perfectly, it might be worth the investment!
Q7: What if I want to uninstall a plugin?
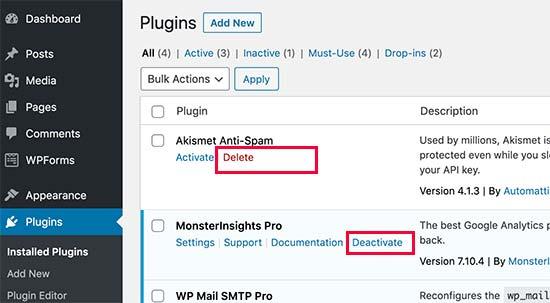
A: No problem! Uninstalling a plugin is just as easy as installing one. Go to your “Plugins” section, find the plugin you want to remove, and click “Deactivate” first. Once it’s deactivated, you’ll see an option to “Delete.” Just click that, and it’s gone! Easy-peasy!
Q8: Any tips for managing plugins effectively?
A: Definitely! Keep your plugins updated to ensure security and functionality. Regularly review your plugins and remove any that you’re not using. Too many plugins can slow down your site, so it’s a good practice to keep it tidy. And remember, back up your site before making any big changes, just in case!
Q9: Where can I learn more about plugins?
A: The WordPress Codex and forums are fantastic resources for diving deeper into plugins. You can also find numerous online tutorials, courses, and blogs dedicated to WordPress. The more you learn, the more confident you’ll become in managing your site!
Q10: Ready to get started?
A: Absolutely! Now that you’re armed with this knowledge, it’s time to jump in and start exploring plugins. Your WordPress site is about to get a serious upgrade! Happy plugin hunting!
In Conclusion
And there you have it! Installing a WordPress plugin is not just a task for tech whizzes; it’s something that anyone can master with just a little bit of guidance. By following the steps we’ve outlined, you’re well on your way to enhancing your website’s functionality, improving user experience, and making your site truly your own.
So why wait? Dive into the world of plugins and start experimenting! Whether you’re looking to boost your site’s performance, add eye-catching features, or optimize for SEO, the right plugin can make all the difference. Remember, every big journey starts with a single step, and this is yours.
If you have questions or run into any hiccups along the way, don’t hesitate to reach out. The WordPress community is vast and friendly, and there are plenty of resources available to help you. Happy plugin hunting, and here’s to building a fantastic website that stands out from the crowd!


