Struggling with pesky image links in your WordPress posts? You’re not alone! Removing them can enhance your site’s aesthetics and improve user experience. Let’s dive into simple steps to clean up your images and keep your content looking sharp!
How to Remove Image Links in WordPress
Are you tired of those pesky image links cluttering your WordPress posts? You’re not alone! Many WordPress users encounter the same frustration, as those links can detract from the overall aesthetics and functionality of your site. Whether you’re aiming for a cleaner look or simply want to streamline your content, removing image links can make a significant difference. In this article, we’ll walk you through easy-to-follow steps to eliminate those links without breaking a sweat. So, grab a cup of coffee, and let’s dive into the world of WordPress customization together! Your perfectly polished posts are just a few clicks away.
Understanding Image Links in WordPress and Why They Matter
When you upload images to your WordPress site, they often come with links that direct visitors to either the media file itself or the post where the image is used. While these links can enhance navigation, they can also clutter your content or lead to distractions. Understanding how to manage these image links is crucial for maintaining a clean and user-friendly website.
Here are a few reasons why managing image links is important:
- User Experience: Links that lead away from your content can disrupt the flow of reading. Removing unnecessary links helps keep your audience engaged.
- SEO Benefits: Search engines prioritize quality content over excessive linking. Reducing image links can improve your site’s overall SEO performance.
- Site Speed: Fewer links and media requests can lead to faster loading times, enhancing user satisfaction and retention.
To remove image links, you have several options within the WordPress editor. You can:
- Use the Block Editor to select the image block, then adjust the settings in the right-hand sidebar to unlink the image.
- For older posts, switch to the Classic Editor and manually remove the link from the image.
- Utilize a plugin designed to manage image links in bulk, saving you time if you have many images to update.
| Method | Description |
|---|---|
| Block Editor | Easily unlink by selecting the image and changing settings in the sidebar. |
| Classic Editor | Manually edit each image’s link in the text editor. |
| Plugin | Install a plugin to manage and remove links from images in bulk. |
Paying attention to image links is not just about aesthetics; it’s about creating an optimal user experience. By taking control of how your images link, you ensure that visitors focus on your content without unnecessary distractions. This strategic approach will not only improve usability but can also give your site a competitive edge.
Identifying the Different Types of Image Links You Might Encounter
When managing your WordPress site, you may come across various types of image links. Understanding these distinctions is crucial for maintaining an organized and efficient site, especially when you’re looking to remove outdated or unnecessary image links.
Here are some common types of image links you might encounter:
- Direct Links: These are URLs that point directly to an image file, such as a .jpg or .png. They can be found in your media library or from external sources.
- Embedded Links: These links are used to incorporate images from other sites or services, often using HTML tags. They are great for showcasing images without hosting them on your server.
- Thumbnail Links: Thumbnails are smaller versions of your images, usually created automatically by WordPress when you upload a larger image. They are useful for galleries but can clutter your media library if not managed properly.
- Attachment Links: Each upload in WordPress creates an attachment page. These links lead to a standalone page for the image, which can be useful for SEO but may need removal if not necessary.
- External Links: These point to images hosted on other websites. While handy for reducing your hosting load, they can break or slow down your site if the external source goes down.
Identifying these image link types is essential for effective management. For instance, if you notice many external links, consider replacing them with your uploaded images to improve loading speed and reliability. Similarly, attachment links can be cleaned up to streamline your media library.
To help visualize these differences, here’s a simple table summarizing the characteristics of each type:
| Image Link Type | Characteristics | Usage |
|---|---|---|
| Direct Links | Points directly to image files | Media library uploads |
| Embedded Links | Uses HTML to display images | Showcasing external content |
| Thumbnail Links | Smaller versions of images | Galleries and previews |
| Attachment Links | Standalone pages for images | SEO optimization |
| External Links | Links to images on other sites | Reducing hosting load |
Once you can identify these types, it’s easier to determine which ones need to be removed or updated. This proactive approach not only keeps your site clean but also enhances user experience and site performance.
Step-by-Step Guide to Removing Image Links from Your Media Library
Removing image links from your media library in WordPress can streamline your site and enhance user experience. Whether you’re cleaning up old posts or simply managing your media more effectively, following a clear process can make all the difference. Here’s a straightforward approach to get the job done:
- Access Your Media Library: Start by logging into your WordPress dashboard. Navigate to the Media section, where you’ll find all your uploaded images.
- Select Images: Browse through your library to identify the images with links you want to remove. Click on an image to open its attachment details.
- Remove the Link: In the attachment details, look for the URL field. Simply delete the URL if it exists. This removes the link but keeps the image intact in your library.
- Update Changes: After removing the link, make sure to click the Update button to save your changes. This step is crucial; otherwise, your edits won’t be stored.
For bulk operations, consider using a plugin designed for media management. This can save you time and effort if you have numerous images to edit. Some popular plugins include:
| Plugin Name | Features |
|---|---|
| Media Cleaner | Identifies unused media files and lets you remove links easily. |
| Enhanced Media Library | Improves media categorization and allows batch editing of links. |
| Media Library Assistant | Offers advanced management options for links and attachments. |
After you’ve successfully removed links, consider optimizing your images for better performance. This can involve resizing or compressing them, ensuring your website loads quickly and provides an excellent experience for visitors.
don’t forget to preview your posts or pages after making changes to verify that everything looks good. A clean and organized media library not only boosts site performance but also enhances your ability to manage content efficiently. Enjoy the process of decluttering, and watch how it positively impacts your WordPress site!
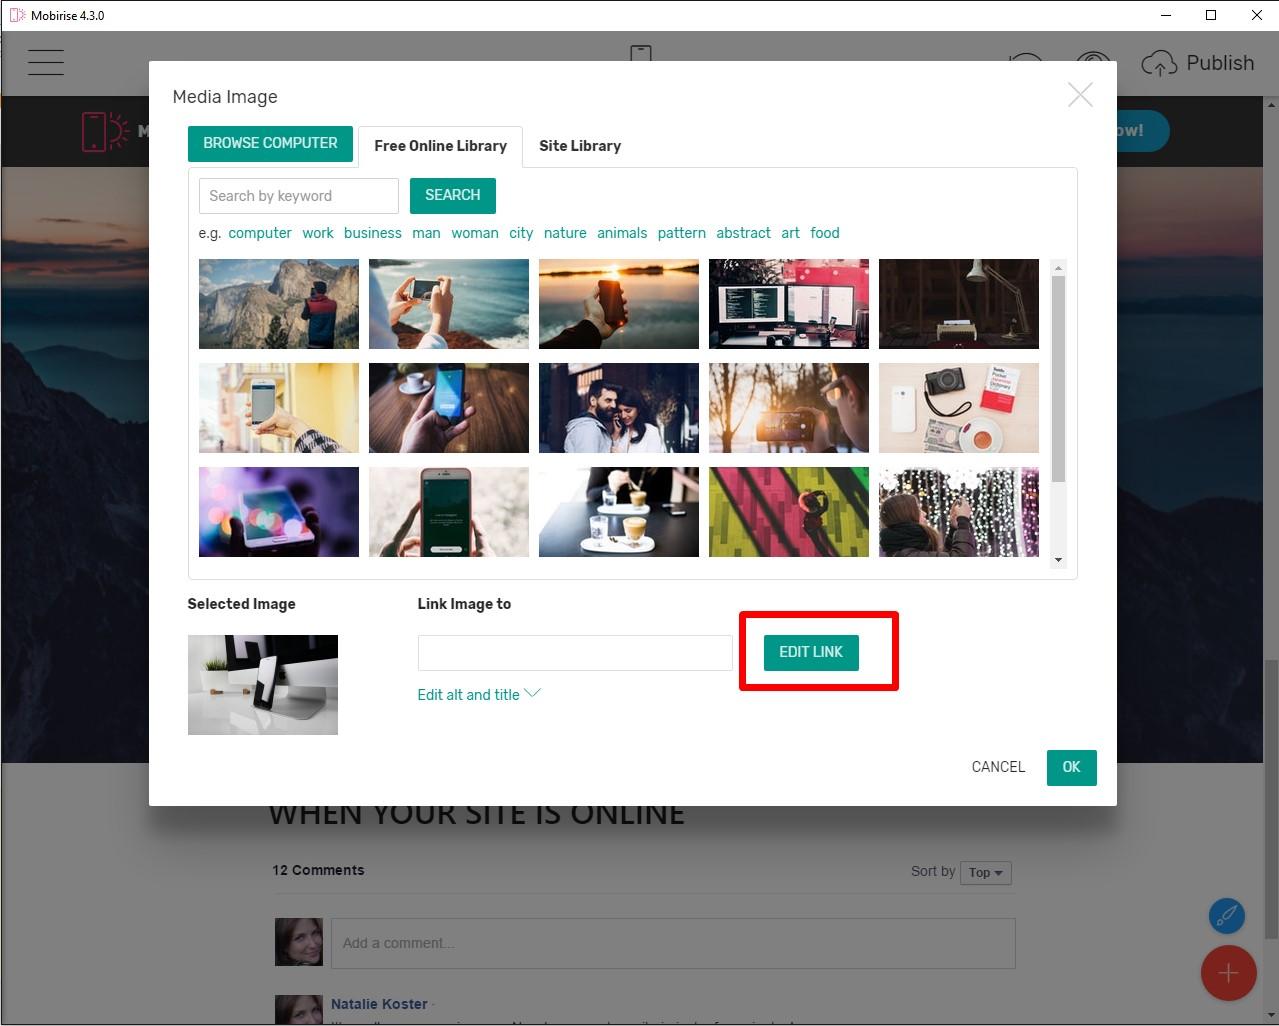
Using the WordPress Editor to Eliminate Unwanted Image Links
When working with the WordPress editor, removing unwanted image links can transform the user experience on your site. Whether those links are accidental or simply outdated, taking a few steps can help you maintain a polished and professional appearance. Here’s how you can effectively eliminate those pesky links.
First, navigate to the post or page where the image is located. Click on the image within the editor, and you’ll see a toolbar appear. This is where the magic begins. Here’s what you should do:
- Click on the image: This will highlight the image and activate the settings.
- Select the pencil icon: This opens the image settings, allowing you to adjust various attributes.
- Remove the link: Look for the link option in the settings panel. Either select “None” or simply delete the URL present there.
After you’ve removed the link, make sure to save your changes. It’s a small step, but it can significantly enhance how users interact with your images. Users will appreciate a more seamless browsing experience when images aren’t unintentionally leading them away from your content.
If you’re managing multiple images at once, the Block Editor can streamline this process. You can easily select multiple images and apply changes across them. Here’s how:
- Use the “List View”: Access the block navigation by clicking on the icon in the top left. This allows you to see all your blocks in a single view.
- Shift-click to select: Choose multiple image blocks at once.
- Adjust settings in bulk: Once selected, you can modify the link settings for all chosen images simultaneously.
For those who prefer a more visual approach, the Classic Editor offers a straightforward method. Simply switch to the HTML view, search for the href attributes associated with the image links. Here’s a simple example:
| Before | After |
|---|---|
 | |
Remember, keeping your images free of unwanted links not only enhances your site’s aesthetic but also improves SEO and user engagement. By utilizing the WordPress editor effectively, you can ensure that your content shines without unnecessary distractions.
Exploring Plugins that Simplify Image Link Removal
When it comes to managing your WordPress website, the ability to remove image links can significantly enhance user experience and streamline your content. Luckily, there’s a plethora of plugins specifically designed to help you achieve this with minimal effort. Let’s dive into some of the most effective options.
1. Remove Image Links: This lightweight plugin does exactly what its name suggests. With a simple activation, it automatically strips all image links from your posts and pages. No configuration is required, making it perfect for those who prefer a hands-off approach. Just install and let it do the heavy lifting!
2. WP Remove Image Links: A bit more robust, this plugin offers additional customization options. You can choose to remove links from specific post types or on a case-by-case basis. The intuitive settings allow you to target exactly where you want the links removed, giving you full control over your content.
3. SEO Friendly Images: Not only does this plugin help in removing image links, but it also optimizes your images for search engines. By replacing links with alt tags, it enhances your SEO efforts while ensuring that your images aren’t clickable. This dual function makes it a valuable tool for bloggers and businesses alike.
| Plugin Name | Key Features | Ease of Use |
|---|---|---|
| Remove Image Links | Automatically removes all image links | Very Easy |
| WP Remove Image Links | Custom options for specific posts | Moderate |
| SEO Friendly Images | Removes links and optimizes images | Easy |
4. Custom Code Snippets: For those who are comfortable with a bit of coding, adding a custom function to your theme’s functions.php file can also be a solution. This method allows you to target specific images or conditions under which links should be removed, offering a tailored experience without the need for an additional plugin.
5. Final Thoughts: With these plugins and techniques at your disposal, removing image links in WordPress can be a simple task. Whether you prefer a plugin for convenience or you enjoy tinkering with custom code, there’s a solution that fits your workflow. Start simplifying your image links today and watch your user engagement soar!
Best Practices for Managing Your Images Without Links
Managing your images efficiently in WordPress is crucial for both SEO and user experience. To keep your content engaging without relying on image links, consider these best practices:
- Optimize Image Sizes: Before uploading images, ensure they are compressed and sized appropriately to avoid slow loading times.
- Use Descriptive Filenames: Name your image files with relevant keywords to improve search engine visibility and accessibility for screen readers.
- Implement Alt Text: Always add descriptive alt text for each image. This not only boosts SEO but also enhances accessibility for visually impaired users.
- Organize Your Media Library: Use folders and categories to keep your images organized, making it easier to manage and retrieve them when needed.
- Regularly Audit Your Media: Periodically review your media library to remove unused or outdated images, keeping your site tidy and efficient.
Another effective strategy is to leverage the WordPress block editor to embed images directly in your posts. This eliminates the need for external links while ensuring your visuals are seamlessly integrated into your content. Here’s how to do it:
| Step | Description |
|---|---|
| 1 | Select the image block in the editor. |
| 2 | Upload your image or choose from the media library. |
| 3 | Customize the image settings, including alignment and caption. |
| 4 | Publish your post with the images embedded directly. |
Additionally, consider using plugins that enhance your image management capabilities. Some popular options offer features such as automated alt text generation, bulk image compression, and advanced galleries—all without needing to create links. This can save you time and effort while improving the overall quality of your site.
remember that visuals are a powerful way to engage your audience. Combining compelling imagery with thoughtful placement within your content can tell a story that resonates with your readers. Embrace these practices to elevate your WordPress site and make the most of your images!
Preventing Image Links from Reappearing in Future Posts
To ensure that image links do not reappear in your future posts, follow these essential practices that will help maintain a clean and professional appearance for your WordPress site.
First, regularly audit your media library. It’s easy for unused images and their corresponding links to linger in your library, potentially leading to accidental re-insertion. Take a moment to remove any images that are no longer relevant. You can do this by navigating to your Media Library and selecting the images you wish to delete. This simple step can significantly minimize the risk of unwanted image links cropping up again.
Next, when you’re editing posts, be mindful of the source of your images. If you’re pulling from other sites, consider whether you truly need to link back to the image host. Instead, upload images directly to your WordPress media library and use those copies to avoid any future linking issues. This practice not only reduces clutter but also helps in maintaining control over your site’s content.
Additionally, consider using the Block Editor’s settings to your advantage. When you insert an image, ensure that you check the alignment and link options. You can select “None” under the link settings to prevent any hyperlink from attaching to your images. This ensures that your images remain as standalone visuals, enhancing the user experience without unnecessary distractions.
To further streamline the process, utilize a plugin designed to manage media settings. There are several plugins available that can help you configure how images and links are handled site-wide. Look for features that allow you to set default behaviors for image links, enabling you to customize how your images appear without having to adjust settings for each individual post.
Here’s a quick summary of best practices for preventing image links from reappearing:
| Best Practice | Description |
|---|---|
| Audit Media Library | Regularly remove unused images to prevent clutter. |
| Source Awareness | Upload images directly to avoid linking back to other sites. |
| Block Editor Settings | Select “None” for link options on images. |
| Use Plugins | Implement plugins that help manage image link settings. |
Lastly, ensure that all users who have access to your WordPress site are informed about these practices. Create a guideline document that outlines how to handle images correctly. Incorporating a team-wide understanding of the importance of clean image linking will foster a more cohesive and professional approach to content management.
By taking these proactive steps, you can keep your WordPress posts free from unwanted image links and focus on delivering great content without distractions.
Troubleshooting Common Issues When Removing Image Links
Removing image links in WordPress can sometimes lead to unexpected issues. It’s not uncommon to encounter problems that can frustrate even the most seasoned users. Here are some common issues and how to troubleshoot them effectively.
Broken Links After Removal
One of the most frequent issues you might face is broken links. When you remove image links, ensure that you also update any references to those images in your posts. Here are steps to check for broken links:
- Use a plugin like Broken Link Checker to find any broken links on your site.
- Manually review posts that contained the image links to ensure all references are updated.
- Consider replacing the links with alternative content or images.
Image Placeholder Issues
Sometimes, after removing an image link, you may be left with placeholders or empty spaces on your page. To fix this:
- Check your theme settings to adjust the layout for posts without images.
- Refresh your cache to see the updated changes on your live site.
- If using a page builder, ensure that the sections are updated correctly to remove any empty containers.
Impact on SEO
Removing image links can also affect your SEO. Google may penalize your site if it finds excessive broken links. To mitigate this risk:
- Redirect any removed image links to relevant pages using a plugin like Redirection.
- Update your sitemap to reflect the changes and resubmit it to Google Search Console.
- Regularly monitor your site’s performance using analytics tools to assess any impact.
Visual Inconsistencies
Visual issues can arise from removing image links, especially if your theme relies heavily on images for design. To resolve this:
- Adjust your CSS to handle sections without images, ensuring a cohesive look.
- Consider using a placeholder image or a default graphic to maintain uniformity.
- Test across different devices to ensure a consistent user experience.
By addressing these common issues, you can ensure a smoother experience when managing image links in WordPress, ultimately enhancing the overall functionality and aesthetics of your site.
Enhancing Your Sites Performance by Cleaning Up Image Links
When it comes to optimizing your WordPress site, cleaning up image links can have a significant impact on performance. Over time, your media library can become cluttered with unused or broken image links that not only slow down your site but also affect its overall user experience. Here are some effective strategies to tidy up your image links and enhance your site’s performance.
First, consider using a plugin designed to help manage and remove unused images. Plugins like Media Cleaner or WP-Sweep can scan your media library for orphaned files—those that are no longer linked to any post or page—and help you delete them with just a few clicks. This not only clears up space but also reduces the number of requests made to your server, resulting in faster load times.
Another essential practice is to regularly audit your existing images. Check for any broken links or missing images that may disrupt your site’s aesthetics and functionality. To do this manually, you can:
- Use tools like Google Search Console to identify broken image links.
- Access your Media Library and look for images flagged as missing.
- Replace or remove any broken links to improve user experience.
Additionally, implementing proper naming conventions and alt text for your images can boost your SEO efforts while keeping your media library organized. Optimize your image file names to be descriptive, and ensure you fill out the alt text field to help search engines understand your images better. This not only enhances your site’s accessibility but can also contribute to better rankings in search results.
Here’s a simple table to illustrate the impact of well-optimized images versus unoptimized ones:
| Image Type | File Size | Load Time | SEO Benefits |
|---|---|---|---|
| Optimized Image | 50 KB | 0.5 seconds | Improved rankings |
| Unoptimized Image | 300 KB | 3 seconds | Decreased visibility |
don’t forget to back up your images before performing any cleanup. Utilizing WordPress backup plugins like UpdraftPlus can ensure that if anything goes wrong, you have a safety net to restore your site to its previous state. Regular backups not only preserve your media but also give you peace of mind as you clean up your image links.
By following these steps, you’ll create a more efficient WordPress site that not only loads faster but also offers a better experience for your visitors. Embracing these practices will set the stage for a well-maintained and high-performing website, ultimately leading to improved engagement and conversion rates.

Final Thoughts: Keeping Your WordPress Site Link-Free and User-Friendly
When it comes to crafting a seamless user experience on your WordPress site, eliminating image links is a crucial step. Here are some key points to keep in mind:
- Enhance User Engagement: By removing unnecessary links from images, you reduce distractions, allowing visitors to focus on your content and engage more deeply.
- Boost Site Performance: Fewer links mean faster loading times and improved site performance, which is essential for retaining visitors and reducing bounce rates.
- Achieve a Clean Aesthetic: A link-free environment contributes to a more professional appearance, fostering trust and credibility with your audience.
Moreover, simplifying your image use can have a positive impact on your site’s SEO. Search engines favor sites that offer a straightforward browsing experience. By avoiding excessive linking, you help search engines index your content more effectively, potentially elevating your visibility in search results.
To better illustrate the importance of managing image links, consider the following table showcasing common issues and their solutions:
| Issue | Solution |
|---|---|
| Images redirect to irrelevant pages | Remove links or replace with clear, relevant CTAs |
| High bounce rates due to distracting links | Focus on content-first design; minimize links |
| Poor mobile experience due to excessive links | Optimize images and reduce links for better mobile usability |
Incorporating these practices not only enhances usability but also aligns with modern web design principles, which prioritize user experience. Less clutter on your site allows for clearer navigation and a more enjoyable browsing experience.
Ultimately, keeping your WordPress site link-free is not just about aesthetics; it’s about fostering a richer, more engaging environment for your visitors. As you implement these changes, you will likely see increased interaction and satisfaction from your audience, translating into a loyal following and better overall site performance.
Frequently Asked Questions (FAQ)
Q&A: How to Remove Image Links in WordPress
Q: Why would I want to remove image links from my WordPress site?
A: Great question! Removing image links can enhance the user experience by reducing distractions and ensuring that visitors focus on your content. It also helps with SEO, as unlinked images can improve page load times and reduce bounce rates.
Q: Is it possible to remove links from images without affecting the images themselves?
A: Absolutely! You can remove links from images while keeping them intact on your site. This way, your images remain visible and engaging, but your visitors won’t be redirected elsewhere when they click on them.
Q: How can I quickly remove image links in the WordPress editor?
A: If you’re using the WordPress Block Editor (Gutenberg), simply click on the image block to select it. Then, in the block settings on the right, find the ’Link To’ option and choose ‘None.’ This will remove the link while preserving the image.
Q: What if I have multiple images linked across different posts? Is there a faster way?
A: Yes! If you have many images to unlink, consider using a plugin like “Remove Image Links.” These plugins can help you bulk-remove links from all images on your site in just a few clicks, saving you time and effort.
Q: Are there any risks involved in removing image links?
A: The main risk is losing an opportunity for visitors to navigate to related content. However, if the links don’t add value to your site, it’s usually better to remove them. Always ensure your site has other clear navigation paths for users to explore.
Q: Can I remove image links in the Classic Editor as well?
A: Yes, you can! Simply switch to the ‘Text’ tab in the Classic Editor, locate the image link code (it will look something like ), and delete the link portion while keeping the image tag intact.
Q: After removing image links, should I be concerned about SEO?
A: Removing unnecessary links can actually help your SEO! By streamlining your content and ensuring that your images are relevant and non-disruptive, you can improve your site’s overall user experience, which search engines love.
Q: What if I change my mind after removing the links?
A: No worries! If you ever want to add links back to your images, you can easily do so by following the same steps in reverse. Just make sure you have a clear purpose for the links you add back.
Q: Any final tips for managing images and links in WordPress?
A: Definitely! Regularly review your images and links to ensure they serve your site’s goals. Use descriptive alt text for all images, as this benefits accessibility and SEO. And remember, simplicity is key — keep your site clean and user-friendly!
By following these tips, you can effectively remove image links from your WordPress site, enhancing both user experience and SEO. Happy editing!
In Summary
And there you have it! You’re now equipped with all the tools you need to remove image links in WordPress like a pro. Whether you’re sprucing up your blog or just tidying up a few posts, taking control of your image links not only enhances your site’s aesthetics but also improves user experience.
Remember, a clean and organized website keeps your readers engaged and encourages them to come back for more. So why not give it a try? Dive into your WordPress dashboard, and start applying these techniques today.
If you have any questions or run into any hiccups along the way, don’t hesitate to reach out. The WordPress community is full of helpful folks who are just as passionate about building great sites as you are. Happy blogging, and may your images shine—link-free!
New Providers
Enjoy The Speed Of Downloading & Uploading With 1GBPS Port
Affordable Dedicated Servers & Colocation Services. Services: Dedicated Servers Colocation Private Cabinet Colocation DDoS Protection
Up to 85% off hosting + website builder
Latest News
- 9 Best AI Logo Makers Compared: Design Like A ProJune 17, 2026 12
- How to Turn on WordPress Error Log (Using Debug Mode)June 17, 2026 12
- Best WordPress Shopping Cart PluginsJune 16, 2026 15
- Search Engine Optimization Landing Page: The Complete GuideJune 16, 2026 15
- How to Build an eCommerce Website from Scratch? (Easy Guide 2026)June 16, 2026 23


We specialize in providing Web hosting reviews. Where you can search for potential hosts.