Ready to launch your website? Installing WordPress is easier than you think! In this complete beginner’s guide, we’ll walk you through every step, making the process smooth and hassle-free. Let’s dive in and get your site up and running today!
How to Install WordPress: Complete Beginner’s Guide
How to Install WordPress: Complete Beginner’s Guide
Are you ready to dive into the exciting world of blogging or website creation? If you’ve ever dreamed of sharing your passion, promoting your business, or showcasing your creativity online, then you’ve probably heard of WordPress. This powerful platform is a favorite among beginners and seasoned pros alike, thanks to its user-friendly interface and endless customization options. But wait—before you can start crafting your digital masterpiece, there’s one crucial step: installing WordPress!
Don’t worry if the thought of installation feels daunting. This complete beginner’s guide is here to walk you through the entire process, step by step. By the end of this article, you’ll be equipped with all the knowledge you need to set up your very own WordPress site with confidence. So, grab a cup of coffee, roll up your sleeves, and let’s get started on your journey to creating an online presence that reflects your unique voice and vision!
Choosing the Right Hosting Provider for Your WordPress Site
When it comes to launching your WordPress site, selecting the appropriate hosting provider is essential for your site’s performance, security, and scalability. With so many options available, it can be overwhelming to determine which provider aligns best with your needs. Here are some factors to consider that will help you make the right choice.
Performance and Speed: The loading speed of your website plays a significant role in user experience and SEO rankings. Look for hosting providers that utilize SSD (Solid State Drives) for faster data retrieval, as well as Content Delivery Networks (CDNs) to enhance global accessibility. Here are some performance indicators to keep in mind:
- Uptime Guarantee: Aim for 99.9% uptime to ensure your site is always accessible.
- Server Locations: Choose a provider with servers in locations close to your target audience.
- Scalability Options: Make sure they offer plans that can grow with your site.
Security Features: WordPress sites are frequent targets for hackers, so robust security is paramount. Look for hosting services that provide:
- Free SSL Certificates: This encrypts data transmitted to and from your site.
- Daily Backups: To restore your site quickly in case of an emergency.
- Malware Scanning: Regular checks to keep your site safe from threats.
Customer Support: A responsive and knowledgeable support team can save you countless headaches. Ensure the hosting provider offers:
- 24/7 Live Chat: Instant support whenever you encounter issues.
- Comprehensive Knowledge Base: Helpful articles and tutorials to assist with common problems.
- Dedicated Account Management: Especially useful for larger sites or businesses.
Pricing and Plans: While it can be tempting to go for the cheapest option, consider the overall value. Here’s a quick comparison of what to look out for:
| Hosting Provider | Starting Price | Key Features |
|---|---|---|
| Provider A | $3.99/month | Free SSL, 24/7 Support, Daily Backups |
| Provider B | $5.99/month | SSD Storage, CDN, 99.9% Uptime |
| Provider C | $7.99/month | Managed WordPress, Malware Scanning, Staging Site |
By weighing these factors—performance, security, support, and pricing—you can find a hosting provider that not only meets your needs today but also supports your growth in the future. Investing time in research now will pay off with a smoother, more successful WordPress experience down the road.
Understanding Domain Names and How to Register Yours
Choosing the right domain name is a crucial first step in establishing your online presence. It’s more than just an address; it’s your brand, your identity, and it plays a significant role in how visitors perceive your website. When selecting a domain name, aim for something that is memorable, relevant, and easy to spell. Consider these tips:
- Keep it short and sweet — aim for under 15 characters.
- Use keywords that reflect your business or niche.
- Avoid using numbers or hyphens to prevent confusion.
- Choose the right domain extension; .com is the most recognized, but others like .net or .org can also work.
Once you’ve settled on a domain name that resonates with your brand, the next step is to register it. Domain registration is a straightforward process, but it can be a bit overwhelming if you’re new to it. Here’s a simple breakdown of the steps involved:
| Step | Action |
|---|---|
| 1 | Choose a domain registrar (e.g., GoDaddy, Namecheap). |
| 2 | Search for your desired domain name using their search tool. |
| 3 | Add the domain to your cart and proceed to checkout. |
| 4 | Provide your registration details and payment information. |
| 5 | Confirm your registration and keep an eye on your email for confirmation. |
After successfully registering your domain name, it’s essential to keep it secure. Consider enabling domain privacy protection to shield your personal information from public view. This measure not only protects your privacy but also reduces the risk of spam and unsolicited contacts.
Lastly, remember that domain names are typically registered on an annual basis, so be sure to stay on top of renewals to prevent losing your domain. Setting up automatic renewals with your registrar can save you the hassle of remembering deadlines, ensuring that your online identity remains intact. With your domain name registered and secured, you’re well on your way to launching your WordPress site!
Step-by-Step Guide to Installing WordPress with One Click
Installing WordPress has never been easier, thanks to one-click installations offered by many web hosting providers. This method streamlines the process and ensures that even those with limited technical skills can get their website up and running in no time. Here’s how you can do it effortlessly.
First, choose a reliable hosting provider. This is crucial since your hosting will determine the performance and security of your website. Look for providers that offer:
- One-click WordPress installations
- 24/7 customer support
- Fast loading speeds
- SSL certificates for security
Once you’ve signed up for your hosting, log in to your control panel (often cPanel). Locate the WordPress installer that your host provides. It’s typically found under the Software or Website section. Look for a button that says Install WordPress.
Click on the installer, and you’ll be prompted to fill in some basic information:
| Field | Description |
|---|---|
| Site Name | Your website’s title |
| Admin Username | Choose a secure username |
| Password | Create a strong password |
| Email Address | For admin notifications |
Fill in these fields, and don’t forget to use a strong password to keep your site secure. After that, hit the Install button. The installation process usually takes just a few moments. You’ll then receive a confirmation that WordPress has been successfully installed.
Now, you can log into your new WordPress site using the admin username and password you created. Typically, the admin login URL will be yourdomain.com/wp-admin. From here, you can start customizing your website, installing themes, and adding plugins to enhance functionality.
With just a few simple steps, you’ve transformed your hosting account into a fully functional WordPress website. Remember, the possibilities with WordPress are endless, so take your time to explore all its features and capabilities!
Exploring the WordPress Dashboard: Your New Best Friend
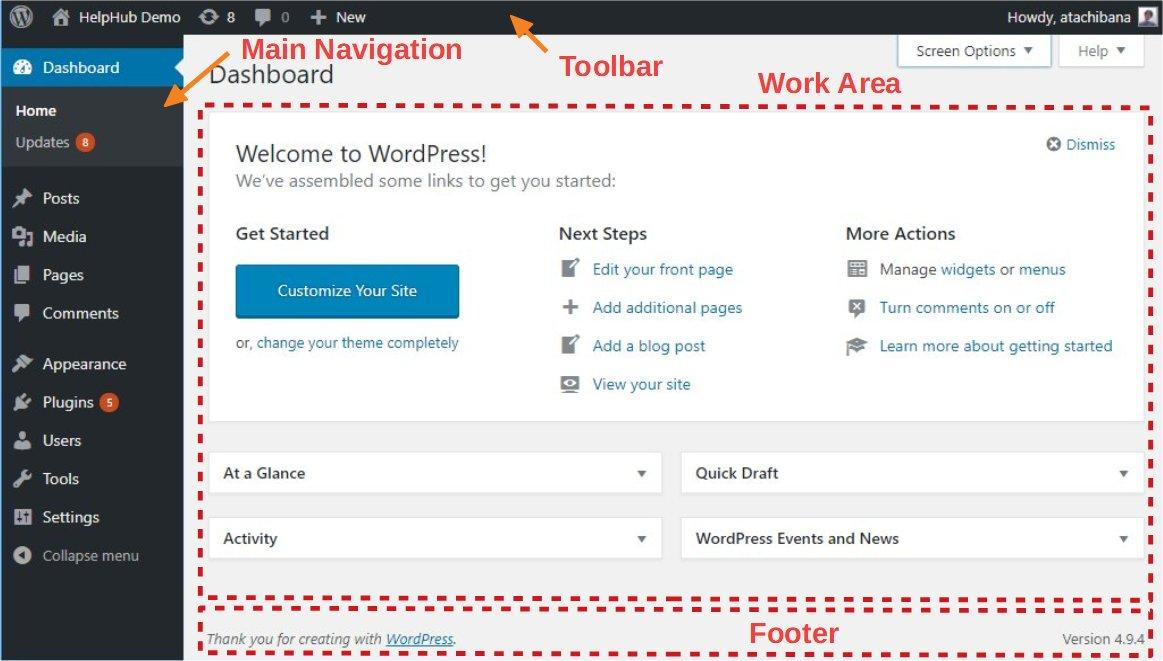
Once you’ve successfully installed WordPress, you’ll land directly on the Dashboard—your new best friend in the world of website management. This user-friendly interface is your command center, enabling you to customize your site, create content, and track performance with ease. Let’s dive into the essential components that make up this powerful tool.
Key Sections of the Dashboard
The WordPress Dashboard is divided into various sections, each serving a unique purpose. Here are some primary areas you’ll frequently interact with:
- Posts: Here, you can create, edit, and manage blog posts. It’s where the magic happens when it comes to content creation.
- Pages: Use this section to add static pages, like ‘About Us’ or ‘Contact,’ that don’t change frequently.
- Media: Manage all your images, videos, and other files. You can easily upload new media and organize your existing files.
- Appearance: Customize your site’s look by selecting themes, managing menus, and customizing widgets.
- Plugins: Extend the functionality of your site by installing various plugins. This is where you can make your site do more than just display content.
Understanding Widgets and Menus
Within the Appearance section, you’ll find widgets and menus, integral for site navigation and layout. Widgets allow you to add elements like recent posts or a search bar to your sidebar or footer. Menus, on the other hand, help you organize your navigation links, guiding visitors through your site’s structure.
Utilizing the Customizer
The Customizer is a fantastic tool found under the Appearance menu. It offers a live preview of any changes you make, allowing you to tweak colors, fonts, and layouts in real-time. This instant feedback loop helps you align your vision with the actual look and feel of your website.
Keeping Track with Analytics
To ensure your site is performing optimally, monitoring your traffic is crucial. The Analytics section, often available through plugins, provides valuable insights. You can see how visitors interact with your site, which pages are popular, and where your traffic is coming from. This data is key in making informed decisions to enhance user experience and content strategy.
Table of Essential Dashboard Shortcuts
| Shortcut | Function |
|---|---|
| + New | Create new posts, pages, or media. |
| Updates | Check for updates on themes, plugins, and WordPress itself. |
| Comments | Manage user comments on your posts. |
| Settings | Adjust your general site settings, including title and timezone. |
The WordPress Dashboard is not just a control panel; it’s a tool that empowers you to shape your online presence. Embrace its features, explore its depths, and you’ll soon find that it becomes an invaluable ally in your blogging journey.

Selecting the Perfect Theme to Make Your Site Shine
Choosing the right theme for your WordPress site is a pivotal step that can significantly influence its appearance and functionality. A well-selected theme not only enhances your site’s aesthetics but also helps in providing a better user experience. Here are some key factors to consider when making your choice:
- Purpose and Goals: Determine what you want your website to achieve. Is it a blog, an online store, or a portfolio? Your theme should align with your site’s objectives.
- Responsive Design: Ensure the theme is mobile-friendly. A responsive design adjusts seamlessly to various screen sizes, making your site accessible to all users.
- Customization Options: Look for themes that offer customization features. You want the flexibility to tweak colors, fonts, and layouts to reflect your brand’s personality.
- Support and Updates: Choose a theme from a reliable developer who provides regular updates and support. This ensures your site remains secure and compatible with the latest WordPress version.
- Performance Optimization: Select a theme that is lightweight and optimized for speed. A fast-loading site enhances user experience and can improve your search engine ranking.
To further assist you, consider this simple comparison table that highlights some popular WordPress themes and their standout features:
| Theme Name | Best For | Customization | Mobile Friendly |
|---|---|---|---|
| Astra | General Purpose | High | Yes |
| Divi | Visual Builders | Very High | Yes |
| GeneratePress | Performance | Moderate | Yes |
| OceanWP | E-commerce | High | Yes |
Don’t forget to preview themes before making a decision. Most themes allow you to see how they would look on your site in real-time. This is a great opportunity to test different layouts and features to find the best fit. Additionally, read user reviews and ratings to get insights into the experiences of other site owners.
remember that your theme is just the beginning. While it sets the stage, the content you create will truly bring your site to life. Choose a theme that complements your vision and lets your unique voice shine through. Each decision you make brings you one step closer to building a stunning online presence!
Essential Plugins Every WordPress Beginner Should Install
As a newcomer to the WordPress world, setting up your website can feel daunting. However, equipping your site with the right tools is essential for functionality and growth. Here are some essential plugins that every beginner should consider installing to elevate their website’s performance and user experience.
Must-Have Plugins
- Yoast SEO – This plugin is a game-changer for optimizing your content. It offers real-time suggestions for improving your on-page SEO, ensuring your posts are search-engine friendly.
- Wordfence Security – Protecting your website from threats is crucial. Wordfence provides comprehensive security features, including firewall protection and malware scanning, to keep your site safe.
- WooCommerce – If you plan to sell products or services, WooCommerce transforms your WordPress site into a fully functional online store. It’s user-friendly and highly customizable.
- Contact Form 7 – Communication is key. This plugin allows you to set up simple and effective contact forms, making it easy for visitors to get in touch with you.
Enhancing Functionality
Beyond the essentials, there are plugins that enhance your website’s functionality and aesthetic appeal. Here are a few more you might find useful:
- Elementor – A drag-and-drop page builder that enables you to design your pages visually. With its intuitive interface, you can create stunning layouts without touching a line of code.
- UpdraftPlus – Backing up your website is a must. UpdraftPlus simplifies the backup process and allows you to restore your site effortlessly in case of any mishap.
- Smush – Image optimization is crucial for maintaining fast loading times. Smush compresses your images without losing quality, helping improve your site’s speed and performance.
Plugin Comparison
| Plugin | Functionality | Free/Premium |
|---|---|---|
| Yoast SEO | SEO Optimization | Free with Premium options |
| Wordfence Security | Website Security | Free with Premium options |
| WooCommerce | E-commerce | Free with add-ons |
| Contact Form 7 | Contact Forms | Free |
By integrating these plugins into your WordPress site, you’ll not only enhance functionality but also improve user engagement and security. Take the time to explore each one and see how they can streamline your site’s operations and create a better experience for your visitors.
Customizing Your Site’s Appearance without Any Coding
One of the most appealing features of WordPress is how easy it is to customize your site’s appearance without needing to write a single line of code. Whether you want to change your site’s layout, colors, or typography, WordPress offers a variety of user-friendly tools that make the process a breeze.
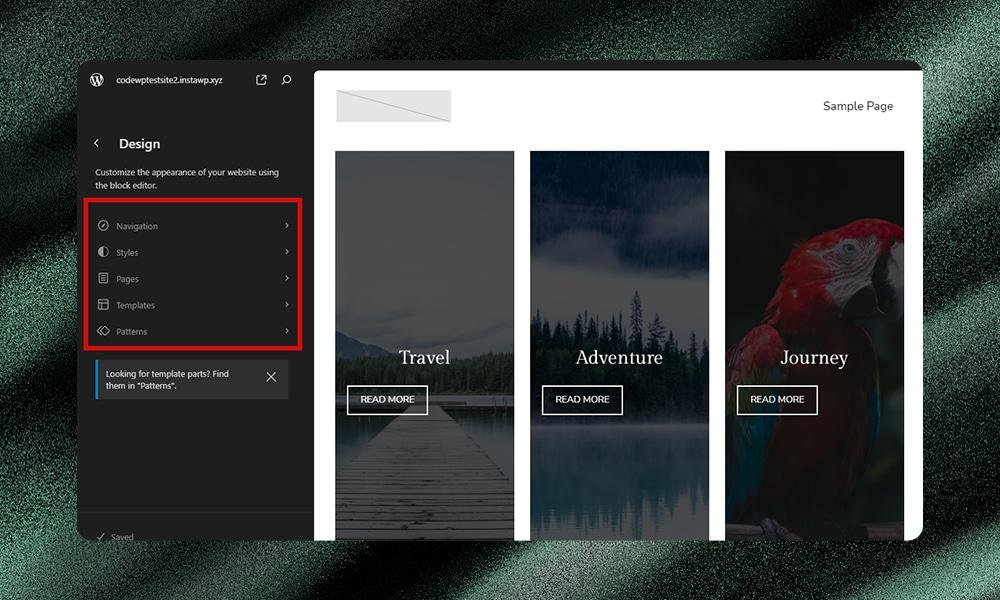
Start by exploring the WordPress Customizer. Located under Appearance > Customize, this powerful tool allows you to tweak various aspects of your site in real-time. You’ll find options to:
- Change your site’s title and tagline
- Upload a custom logo and favicon
- Select a color scheme that reflects your brand
- Adjust the header image or background
- Manage menus and widgets
With just a few clicks, you can see how your changes will look before publishing them live, which is perfect for anyone who wants to avoid the hassle of coding.
The next step is choosing the right WordPress theme. There are thousands of free and premium themes available, designed for different purposes and styles. You can browse and install themes by going to Appearance > Themes. Look for themes that offer:
- Responsive design for mobile optimization
- Customization options in the theme settings
- Regular updates and support
Once you’ve found a theme you love, you can further personalize it through theme settings. Many themes come with built-in options for adjusting layouts, colors, and fonts. If your theme supports it, you can also use page builders like Elementor or Beaver Builder. These drag-and-drop editors empower you to create stunning page layouts without touching any code.
| Customization Type | Options Available |
|---|---|
| Header | Logo, Title, Tagline |
| Colors | Primary, Secondary, Background |
| Fonts | Google Fonts Integration, Custom Fonts |
| Layouts | Sidebar Position, Full Width, Grid |
Don’t forget about plugins! There are numerous plugins designed specifically for customization. Plugins like SiteOrigin CSS or Yellow Pencil enable you to visually customize your site elements with an intuitive interface. This means that even the smallest details, like button styles or font sizes, can be adjusted easily.
customizing your WordPress site’s appearance is not only straightforward but also enjoyable. With the right tools and themes, you can create a unique online presence that perfectly aligns with your brand vision, all without any coding skills. Dive in, explore your options, and watch your website transform into something truly special!

Creating Engaging Content That Keeps Visitors Coming Back
To truly captivate your audience and ensure they keep coming back for more, it’s essential to focus on delivering valuable, high-quality content. When it comes to installing WordPress, your readers are looking for clarity and actionable insights. Break down your instructions into easily digestible steps, using simple language that even the most novice user can understand.
Consider enhancing your content with visual aids. Screenshots, infographics, and video tutorials can significantly increase engagement. For instance, a step-by-step screenshot guide showing the installation process can make your post much more relatable and easier to follow. Ensure that your visuals are well-placed, complementing your text rather than overwhelming it.
Another effective strategy is to incorporate interactive elements. Quizzes or polls related to WordPress features or preferences can keep your audience engaged. Encourage them to share their results or opinions in the comments section, fostering a community feel and prompting discussions that can lead to repeat visits.
Consider adding a FAQ section at the end of your guide to address common concerns or questions that beginners might have. This not only provides additional value but also positions you as an expert who understands the needs of your audience. Here’s a simple table format you can use to highlight some frequently asked questions:
| Question | Answer |
|---|---|
| Is WordPress free? | Yes, WordPress itself is free. You may need to pay for hosting and a domain. |
| Can I customize my WordPress site? | Absolutely! WordPress offers thousands of themes and plugins for customization. |
| How often should I update my plugins? | Regularly, to ensure security and functionality. |
Lastly, remind your readers to subscribe to your blog or follow you on social media for updates. Building a mailing list can be a game-changer for maintaining engagement. You can offer exclusive content, tips, or even free resources to your subscribers, making them feel special and appreciated.
By creating content that is not only informative but also interactive and visually appealing, you can cultivate a loyal audience eager to return for your insights and updates on WordPress and beyond.
Tips for Securing Your WordPress Site from the Start
When diving into the world of WordPress, security should be at the forefront of your mind. A secure website not only protects your content but also builds trust with your audience. Here are some essential strategies to help you lock down your site from day one:
- Choose a Strong Password: Avoid simple passwords. Combine uppercase and lowercase letters, numbers, and special characters. For example, instead of “password123”, go for something like “P@55w0rdSecure!”
- Update Regularly: Keep your WordPress version, themes, and plugins up to date. Developers regularly release updates to patch vulnerabilities. Set reminders or enable automatic updates if possible.
- Limit Login Attempts: To prevent brute force attacks, use plugins like Wordfence or Limit Login Attempts Reloaded. This way, if someone tries to guess your password multiple times, they will be temporarily locked out.
Another critical step is getting a reliable hosting provider. Not all hosting services offer the same level of security, so choose one that prioritizes safety. Look for features such as:
| Feature | Description |
|---|---|
| SSL Certificate | Encrypts data between your server and users to secure sensitive information. |
| Daily Backups | Ensures you can restore your site in case of data loss or hacking. |
| Firewalls | Blocks malicious traffic before it reaches your site. |
Moreover, consider using security plugins that add an extra layer of protection. Popular options include:
- iThemes Security: Offers over 30 ways to secure your WordPress site.
- Sucuri Security: Provides malware scanning and security hardening features.
- All In One WP Security & Firewall: User-friendly interface for enhanced security measures.
Lastly, always remember to keep a backup of your website. This way, if anything goes wrong, you can quickly restore your site to its previous state. Regular backups will save you time and stress in the long run.
Maintaining Your WordPress Site for Long-Term Success
Once you’ve successfully installed WordPress, the journey doesn’t end there. To ensure your site flourishes over time, you need a solid maintenance plan. It’s crucial to keep your website in top shape, as neglecting it can lead to issues that could affect user experience, security, and even search engine rankings.
Here are some essential practices to keep your WordPress site running smoothly:
- Regular Updates: Always update your WordPress core, themes, and plugins. Developers frequently release updates to patch security vulnerabilities and improve functionality. Neglecting these updates can leave your site open to attacks.
- Backups: Implement a regular backup schedule. Use reliable backup plugins to ensure that your data is safe. In case of an emergency, you can quickly restore your site to its previous state.
- Optimize for Speed: Slow loading times can deter visitors. Utilize caching plugins and optimize images to enhance your site’s performance. Regularly check your website speed using tools like Google PageSpeed Insights.
- Security Measures: Install security plugins to monitor your site for potential threats. Consider implementing two-factor authentication and using strong passwords to bolster your defenses.
Another important aspect of maintenance is managing your content. Keep your site fresh and engaging:
- Regular Content Updates: Post new content consistently. This not only keeps your audience engaged but also signals to search engines that your site is active.
- Remove Unused Themes and Plugins: Uninstall themes or plugins that you no longer use. They can pose security risks and slow down your site.
- Engage with Your Audience: Monitor comments and feedback to foster a community. Respond promptly to queries to build trust with your visitors.
Lastly, consider the following table for a quick reference to your maintenance tasks:
| Maintenance Task | Frequency |
|---|---|
| Update WordPress Core | As needed (check monthly) |
| Backup Site | Weekly |
| Check Site Speed | Monthly |
| Review Plugins/Themes | Quarterly |
By dedicating time and effort to these maintenance tasks, you’re setting your WordPress site up for long-term success. With a well-maintained site, you not only improve user experience but also ensure a secure and efficient online presence for your brand.
Frequently Asked Questions (FAQ)
How to Install WordPress: Complete Beginner’s Guide – Q&A
Q1: Why should I choose WordPress for my website?
A1: Great question! WordPress is one of the most popular content management systems (CMS) out there, powering over 40% of all websites. It’s user-friendly, highly customizable, and has a vast community that supports it. Whether you’re starting a blog, a business site, or even an online store, WordPress offers the flexibility and tools you need to create a beautiful site that fits your goals. Plus, it’s free! Who doesn’t love that?
Q2: Do I need technical skills to install WordPress?
A2: Not at all! One of the best things about WordPress is that it’s designed for everyone—whether you’re a complete novice or a seasoned pro. The installation process is straightforward, and with this guide, you’ll be walking through it step-by-step. You won’t need to know how to code; just follow the instructions and you’ll be up and running in no time!
Q3: What do I need to get started with WordPress installation?
A3: You’ll need two main things: a domain name and web hosting. Your domain is your website’s address (like www.yoursite.com), and hosting is where your website lives online. There are many hosting providers that offer one-click WordPress installations, making the process even easier! Once you’ve got those set up, you’re ready to install WordPress.
Q4: Can I install WordPress on my own computer?
A4: Absolutely! If you want to experiment before going live, you can install WordPress locally on your computer. You’ll need software like XAMPP or MAMP to set up a local server. This is a great way to learn and play around with WordPress without making it public just yet.
Q5: What are the steps to install WordPress?
A5: Here’s a quick rundown of the steps:
- Choose a Hosting Provider: Pick a reliable hosting service.
- Get Your Domain: Register a domain name that reflects your brand.
- Install WordPress: Use the one-click installation feature from your hosting provider or download WordPress and upload it manually.
- Configure Settings: After installation, you’ll have a basic WordPress site. Customize settings, choose a theme, and add plugins for extra functionality.
- Start Creating Content: Now comes the fun part! Start adding posts, pages, and all the content that will make your site shine.
Q6: How long does the installation process take?
A6: It usually takes anywhere from 10 to 30 minutes. If you’re using a one-click installation, it could be even faster! Just make sure to take your time to follow each step carefully, and don’t hesitate to refer back to our guide if you get stuck.
Q7: What should I do after installing WordPress?
A7: After installation, it’s all about personalization! Choose a theme that resonates with your style, install essential plugins (like Yoast SEO for search optimization and Akismet for spam protection), and start crafting your content. Don’t forget to set up your permalinks for better SEO, and create essential pages like About, Contact, and Home.
Q8: Is there support available if I run into issues?
A8: Definitely! The WordPress community is huge, and there are countless resources available. You can find support forums, tutorials, and even local meetups. Plus, your hosting provider usually has support teams ready to help with any installation issues you might encounter. You’re never alone on this journey!
Q9: Can I change my theme or plugins after installation?
A9: Yes, and that’s one of the best features of WordPress! You can change your theme or add/remove plugins at any time to keep your site fresh and aligned with your goals. Just remember to back up your site regularly, especially before making significant changes!
Q10: Why should I trust this guide to help me?
A10: Because I’ve been where you are! I know how daunting it can be to start something new, especially with technology. This guide breaks everything down into simple, manageable steps, and I’ve included tips and tricks from my own experience to ensure your success. Plus, once you see how easy it is to install WordPress, you’ll wonder why you didn’t start sooner!
Ready to dive in? Let’s get your WordPress site up and running today! You’ve got this!
To Conclude
And there you have it! Installing WordPress might seem daunting at first, but as we’ve walked through the steps together, I hope you’re feeling more confident and excited to start your own website. Whether you’re looking to share your passions, create a blog, or launch a business, WordPress is an incredibly powerful tool that puts you in control.
Remember, every expert was once a beginner, and the more you explore and experiment, the more comfortable you’ll become. Don’t hesitate to dive into the vast world of themes, plugins, and customizations—these features are what make WordPress so versatile and fun!
If you run into any bumps along the way, the WordPress community is a fantastic resource filled with helpful folks ready to lend a hand. So, go ahead and unleash your creativity! Your new site is just a few clicks away, and I can’t wait to see what you create. Happy blogging, and welcome to the wonderful world of WordPress!

