Ready to supercharge your WordPress site? Setting up Cloudflare is a game-changer for speed and security! In this step-by-step tutorial for 2025, we’ll guide you through the essentials to keep your site running smoothly and safely. Let’s dive in!
How to Set Up Cloudflare for WordPress (Step-by-Step Tutorial for 2025)
Are you looking to supercharge your WordPress site’s performance and security? If so, you’re in the right place! In today’s digital landscape, having a robust online presence isn’t just a luxury; it’s a necessity. Enter Cloudflare – a powerful content delivery network (CDN) and security service that can take your website to new heights. Whether you’re a seasoned web developer or just getting started, setting up Cloudflare for your WordPress site can seem daunting. But don’t worry! In this step-by-step tutorial, we’ll break it down into easy-to-follow instructions that will have your site running faster and safer in no time. Imagine lightning-fast load times and enhanced protection from cyber threats, all while improving your site’s SEO. Sounds great, right? Let’s dive in and get your WordPress site optimized with Cloudflare!
Understanding the Benefits of Cloudflare for Your WordPress Site
When it comes to optimizing your WordPress site, leveraging Cloudflare can lead to significant improvements in performance and security. By acting as a reverse proxy, Cloudflare sits between your visitors and your server, providing a shield against various online threats while enhancing loading speeds.
Let’s break down some of the key benefits that Cloudflare brings to your WordPress site:
- Enhanced Security: Cloudflare protects your site from DDoS attacks, SQL injection, and other malicious threats. Its Web Application Firewall (WAF) automatically blocks harmful traffic, ensuring that your data and your users are safe.
- Improved Load Times: With its extensive Content Delivery Network (CDN), Cloudflare caches your static content across multiple global servers. This means that visitors get served from the nearest location, drastically reducing loading times.
- SSL Encryption: Implementing SSL is crucial for securing data. Cloudflare makes it simple to enable HTTPS, giving your users peace of mind while enhancing your site’s SEO.
- Analytics: Cloudflare provides valuable insights into your traffic patterns, allowing you to make informed decisions about your content and marketing strategies.
Additionally, the integration of Cloudflare with WordPress is seamless. Once set up, it works in the background, requiring minimal maintenance. You can easily manage settings directly from your WordPress dashboard, making it user-friendly even for those who aren’t tech-savvy.
Here’s a simple comparison table that highlights some of the features:
| Feature | Cloudflare | Without Cloudflare |
|---|---|---|
| Load Times | Faster | Slower |
| Security Measures | Advanced Protection | Standard |
| SSL Support | Free SSL | Paid SSL |
| Traffic Insights | Detailed Analytics | Basic Stats |
integrating Cloudflare with your WordPress site not only enhances security but also significantly boosts performance. Given its myriad of features and the ease of set-up, it’s an essential tool for anyone looking to elevate their online presence.

Creating Your Cloudflare Account Made Easy
Creating your Cloudflare account is a straightforward process that can significantly enhance the performance and security of your WordPress site. Follow these easy steps to get started:
- Visit the Cloudflare Website: Head over to cloudflare.com and click on the “Sign Up” button at the top right corner.
- Enter Your Email and Password: Fill in your email address and choose a strong password. Make sure to use a combination of letters, numbers, and special characters to keep your account secure.
- Accept the Terms of Service: Review Cloudflare’s terms and privacy policy, then click on the checkbox to accept them before proceeding.
- Verify Your Email: After registering, check your inbox for a verification email from Cloudflare. Click the confirmation link to activate your account.
Once your account is verified, you can log in and start configuring your settings. Here’s what to do next:
- Add Your Website: On your Cloudflare dashboard, click “Add a Site” and enter your WordPress URL.
- Select a Plan: Cloudflare offers several plans, including a free option that is perfect for most WordPress users. Choose the plan that best suits your needs.
- Change Your Domain’s Nameservers: Cloudflare will provide you with two nameservers. Update your domain’s DNS settings at your registrar to point to these nameservers.
After you’ve set up your nameservers, it may take some time for the changes to propagate. In the meantime, you can explore additional settings in your Cloudflare dashboard:
| Feature | Description |
|---|---|
| DNS Management | Control your DNS records directly within Cloudflare. |
| Firewall Settings | Protect your site from malicious traffic. |
| Performance Settings | Optimize loading times with caching options. |
| SSL/TLS Configuration | Ensure secure connections with automated SSL setup. |
With your account set up, you’re now ready to start benefiting from Cloudflare’s powerful features. Take your time to familiarize yourself with the dashboard and explore all the options available to enhance your WordPress site.
Configuring Basic Cloudflare Settings for Optimal Performance
Once you’ve signed up and added your WordPress site to Cloudflare, the next step is to configure some basic settings that will help enhance performance. The goal is to leverage Cloudflare’s robust features while ensuring that your website operates at its best.
1. Optimize Caching Settings
Caching is crucial for improving your site’s load times. Cloudflare offers several caching options that you can tweak:
- Cache Level: Set this to “Standard” to cache static content like images and scripts while still fetching dynamic content as needed.
- Browser Cache TTL: Adjust this to a higher value (such as 1 month) to instruct browsers to cache your static files longer, reducing repeated requests.
- Always Online: Enable this feature to serve a cached version of your site if your server goes down.
2. Enable Auto Minify
Minifying your CSS, JavaScript, and HTML can significantly reduce file sizes and improve loading times. To enable this:
- Head to the Speed section in the Cloudflare dashboard.
- Locate the Auto Minify option and select the file types you want to minify.
Keep in mind that while minification can speed things up, you should test your site afterward to ensure everything is functioning correctly.
3. Use Brotli Compression
Enabling Brotli compression can further reduce the size of your files for faster downloads. To activate it:
- In the Network tab, find the Brotli setting and toggle it on.
This compression technique works well with modern browsers and can make a noticeable difference in performance.
4. Configure Firewall Rules
A properly configured firewall can improve both security and performance. Consider adding rules for:
- Blocking Bad Bots: Set up rules to limit requests from known malicious IPs.
- Rate Limiting: Implement rate limiting to protect against DDoS attacks, ensuring your site remains accessible.
5. Set Up SSL/TLS
securing your site with SSL/TLS is essential not just for security but also for performance. Cloudflare offers flexible SSL options:
Choose the right SSL mode based on your server’s configuration:
| SSL Mode | Description |
|---|---|
| Off | No encryption; not recommended. |
| Flexible | Encrypts visitor connections; not server to Cloudflare. |
| Full | Encrypts both connections; requires SSL on your server. |
| Full (Strict) | Encrypts both connections; requires a valid SSL certificate on your server. |
Choosing “Full (Strict)” is generally the best option for the highest security if your server has a valid SSL certificate.
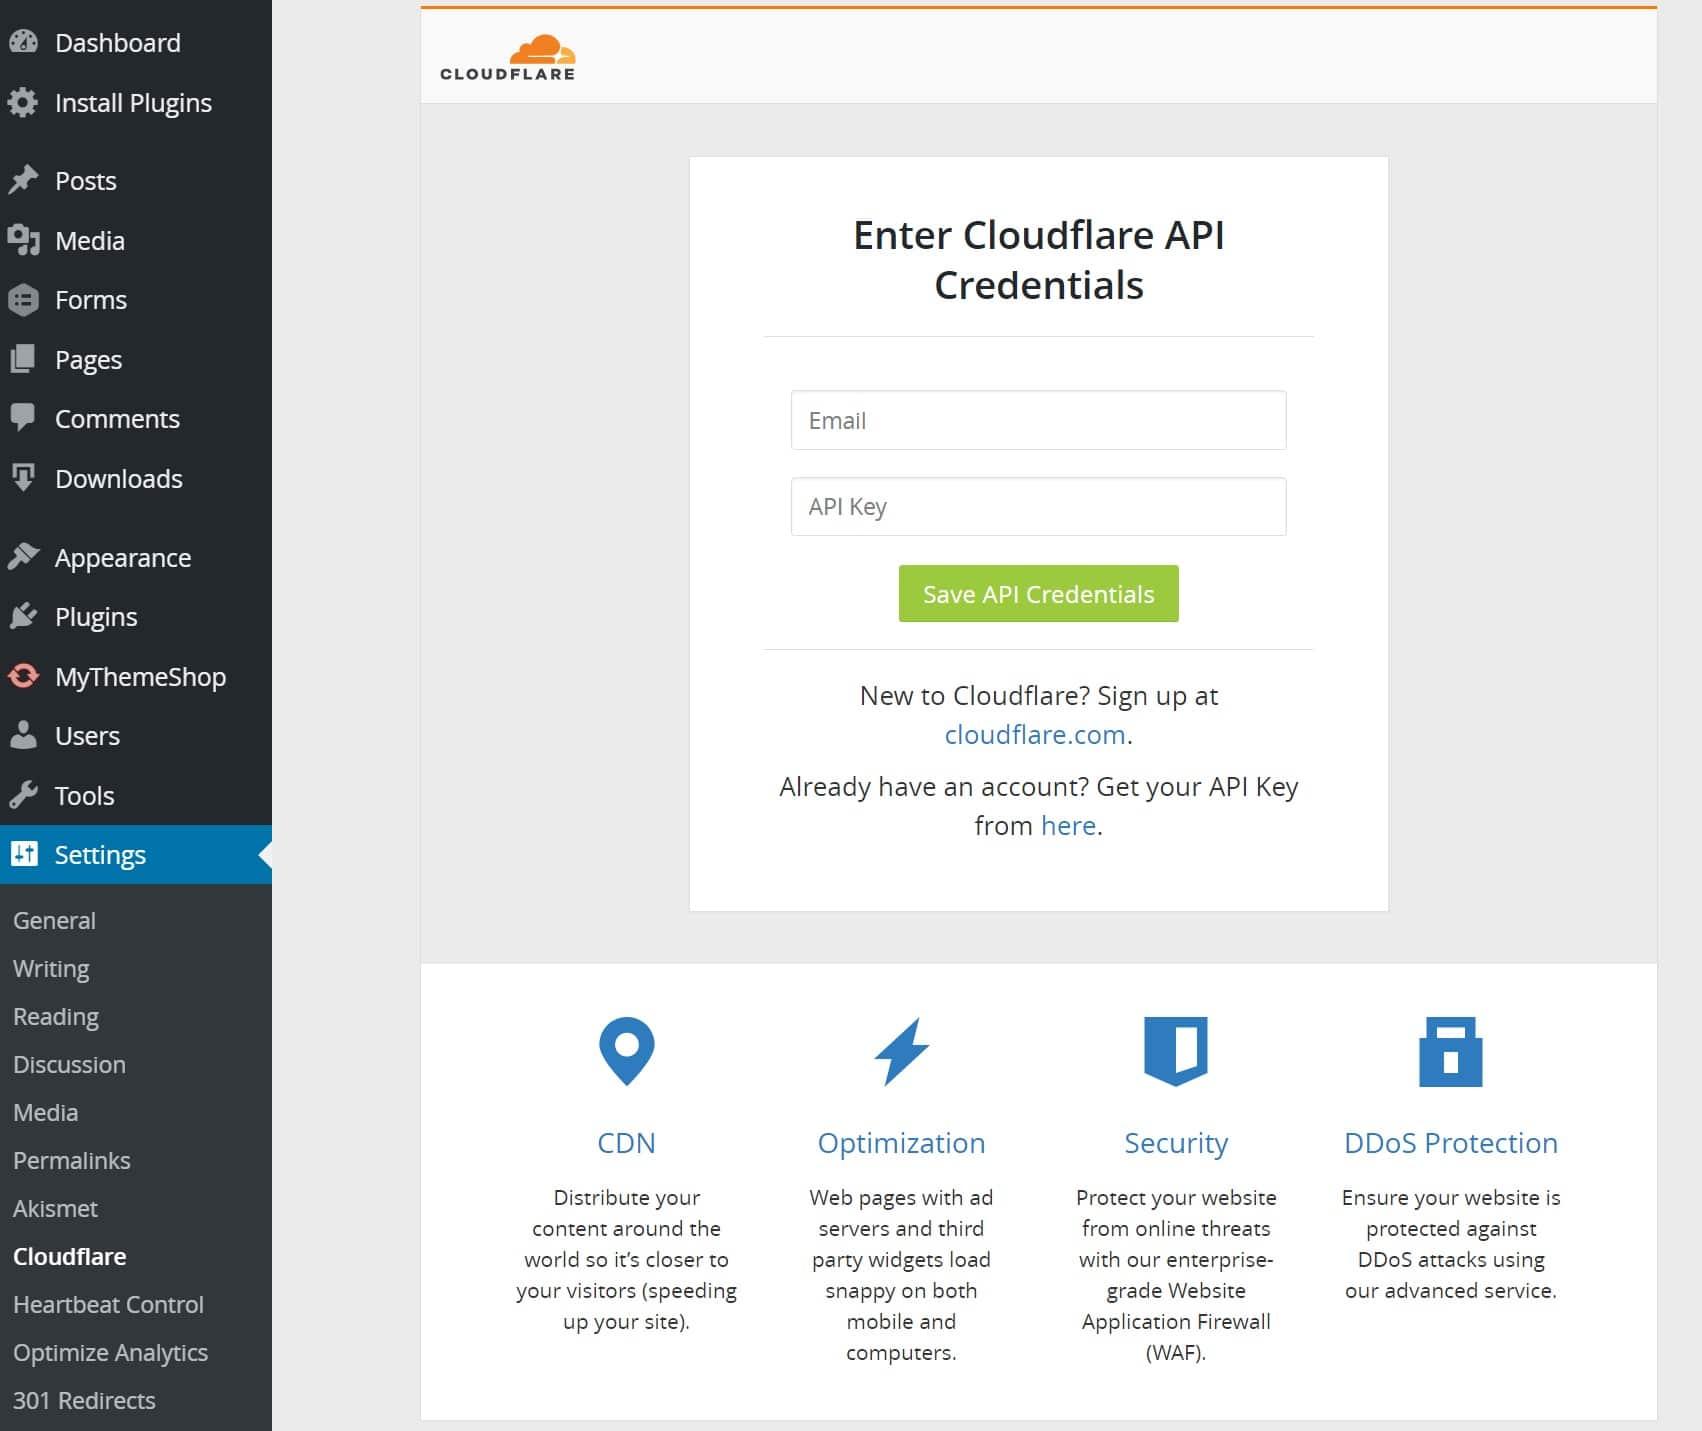
How to Install the Cloudflare Plugin on Your WordPress Site
Installing the Cloudflare plugin on your WordPress site is a straightforward process that can significantly enhance your website’s performance and security. By following these simple steps, you can integrate Cloudflare seamlessly into your WordPress environment.
Step 1: Access Your WordPress Dashboard
First things first, log in to your WordPress admin panel. This is where all the magic happens! Once you’re in, head over to the left-hand menu and look for the Plugins section.
Step 2: Add New Plugin
Click on Add New. This will take you to the Plugin installation page. In the search bar, type Cloudflare. You should see the Cloudflare plugin in the search results. It will usually be the first option.
Step 3: Install the Plugin
Next to the plugin name, click on the Install Now button. Once the plugin is installed, the button will change to Activate. Click that to enable the plugin on your site.
Step 4: Configure the Plugin
After activation, you’ll find a new Cloudflare option in your WordPress dashboard menu. Click on it to start configuring the plugin. Here, you’ll need to enter your Cloudflare account details. If you don’t have an account yet, visiting the Cloudflare website to create one is a must.
Step 5: Sync with Cloudflare
Once you’ve logged in, the plugin will guide you through the syncing process. This includes choosing your domain and adjusting settings such as caching, security levels, and performance optimizations.
Step 6: Test Your Configuration
After you’ve configured everything, it’s crucial to test your site to ensure that everything is working correctly. You can do this by checking your website speed and ensuring no features are broken. Use tools like Google PageSpeed Insights or GTmetrix to analyze your site’s performance.
Quick Reference Table
| Step | Action |
|---|---|
| 1 | Log in to WordPress Dashboard |
| 2 | Go to Plugins > Add New |
| 3 | Search and Install Cloudflare Plugin |
| 4 | Activate Cloudflare Plugin |
| 5 | Configure Plugin with Cloudflare Account |
| 6 | Test Your Site’s Performance |
With these steps, you are well on your way to harnessing the full power of Cloudflare on your WordPress site. Enjoy enhanced speed and security while giving your visitors a remarkable experience!
Setting Up SSL for Enhanced Security and Trust
In today’s digital landscape, having a secure website is not just a luxury; it’s a necessity. Setting up SSL (Secure Sockets Layer) for your WordPress site through Cloudflare can significantly enhance your site’s security and instill trust among your visitors. SSL encrypts data transferred between the web server and the browser, ensuring that sensitive information such as passwords and credit card numbers are protected from prying eyes.
To get started, you first need to enable SSL in your Cloudflare account. Here’s how:
- Log in to your Cloudflare account and select the website for which you want to set up SSL.
- Navigate to the SSL/TLS tab in the dashboard.
- Select the preferred SSL mode:
- Flexible: Encrypts traffic between your visitors and Cloudflare, but not between Cloudflare and your origin server.
- Full: Encrypts traffic between both your visitors and Cloudflare, and Cloudflare and your origin server, assuming your server has an SSL certificate.
- Full (Strict): Similar to Full, but requires a valid SSL certificate on your server.
| SSL Mode | Description |
|---|---|
| Flexible | Basic encryption; not secure between Cloudflare and origin server. |
| Full | Secure connection; requires SSL at origin. |
| Full (Strict) | Highest security; requires a valid SSL certificate at origin. |
Once you’ve made your selection, Cloudflare will automatically issue an SSL certificate for you. However, to ensure that your website is fully secured, you’ll need to adjust a few settings:
- Enable Always Use HTTPS to redirect all HTTP traffic to HTTPS, ensuring all visitors are using a secure connection.
- Activate Automatic HTTPS Rewrites to help fix mixed content issues by automatically rewriting URLs to HTTPS.
- Consider implementing HSTS (HTTP Strict Transport Security), which tells browsers to always connect via HTTPS, further securing your site against attacks.
After configuring these settings, it’s essential to test your website to ensure everything is working correctly. Use online tools like SSL Labs to check your SSL configuration and identify any potential issues. Regularly monitor your SSL certificate’s status to avoid any lapses in security.
By taking these steps, you not only enhance your website’s security but also boost credibility with your users—an essential factor in today’s competitive online environment. With Cloudflare’s SSL in place, you can focus on growing your business while ensuring that your visitors feel safe and secure on your site.
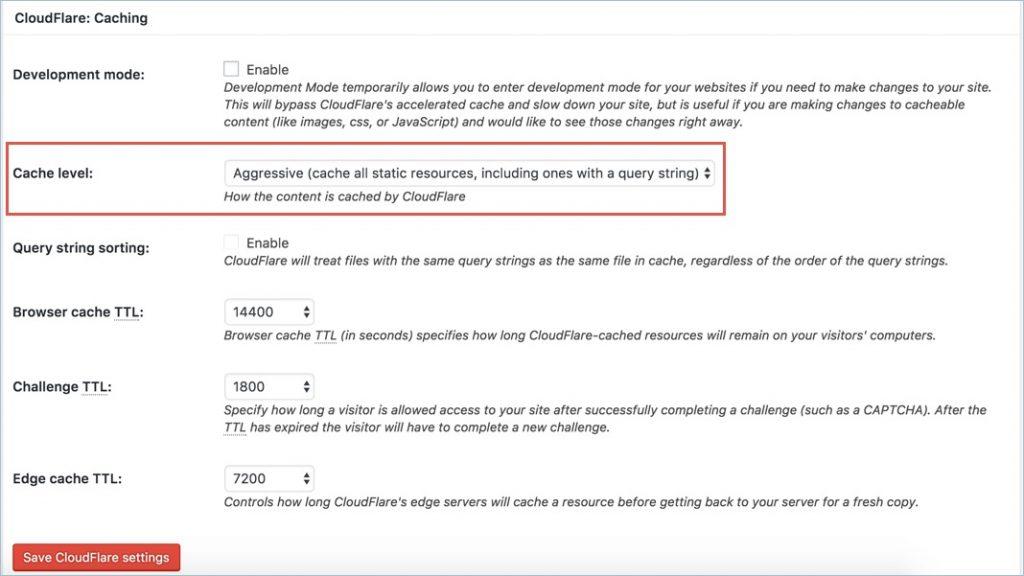
Optimizing Your Cloudflare Cache Settings for Faster Loading Times
When it comes to enhancing your website’s performance, cache settings play a crucial role. With Cloudflare, you have a powerful tool at your disposal to optimize these settings and significantly reduce loading times. The key is understanding how to configure these options to meet your specific needs.
First, navigate to the Caching section in your Cloudflare dashboard. Here, you’ll find essential options such as:
- Cache Level: Choose between Standard, No Query String, and Ignore Query String to determine how Cloudflare caches your content.
- Browser Cache TTL: Set how long browsers should cache your resources. A longer duration can improve load times for returning visitors.
- Always Online: This feature serves a cached version of your site if your server goes down, ensuring uptime and access.
Next, consider implementing Custom Caching Rules. By specifying which files or pages should be cached, you can prioritize the most important assets for your users. For instance, you might want to cache images and CSS files for a more streamlined experience.
Additionally, don’t overlook the importance of Minification. In the optimization settings, enable CSS, JavaScript, and HTML minification to reduce file sizes without sacrificing quality. This can lead to faster load times and improved user experience.
For a more detailed overview of your cache performance, consider using the Caching Analytics feature. This will provide insights into cache hit rates, allowing you to fine-tune your settings. A higher cache hit rate means less load on your server and faster delivery of content to your visitors.
| Setting | Description | Impact on Performance |
|---|---|---|
| Cache Level | Adjusts the caching method for your content | Optimizes load times based on user needs |
| Browser Cache TTL | Time to live for browser cache | Improves repeat visit loading speeds |
| Always Online | Serves cached pages when your site is down | Enhances site reliability |
| Minification | Reduces file sizes of static assets | Boosts loading times and performance |
By taking the time to optimize your Cloudflare cache settings, you’ll not only improve your site’s loading speeds but also enhance the overall user experience. This, in turn, can lead to higher engagement and better SEO rankings. So dive into those settings and start making smart adjustments today!

Integrating Cloudflare Firewall to Protect Your Site
When it comes to safeguarding your WordPress site, integrating Cloudflare’s Firewall is a game-changer. The robust security features offered by Cloudflare not only enhance your site’s performance but also act as a formidable barrier against potential threats. Here’s how you can easily integrate this powerful tool.
First, navigate to your Cloudflare account dashboard. If you haven’t set up your website on Cloudflare yet, doing so is straightforward: simply add your site, and Cloudflare will scan your DNS records. Once you’re in the dashboard, follow these steps to enable the Firewall:
- Access the Firewall Settings: Click on the “Firewall” tab in the Cloudflare dashboard.
- Adjust Security Level: Set your desired security level. Options range from “Essentially Off” to “I’m Under Attack!” Choose based on your site’s current threat landscape.
- Enable Web Application Firewall (WAF): If you have a Pro plan or higher, activate the WAF to protect against SQL injection, cross-site scripting, and other common vulnerabilities.
Moreover, you can take advantage of Cloudflare’s IP Access Rules. This feature allows you to block, challenge, or whitelist specific IP addresses or countries. For example, if you notice repeated attacks from particular locations, you can set rules to block those IPs entirely:
| Action | Description |
|---|---|
| Block | Deny access from specified IPs or regions. |
| Challenge | Require users to complete a CAPTCHA before accessing. |
| Whitelist | Allow specific IPs or countries unfettered access. |
don’t forget to review and configure the Firewall Rules. This feature gives you the power to create customized firewall rules based on your website’s specific needs. For instance, you can set rules that block certain user agents or request methods that appear suspicious.
By leveraging Cloudflare’s Firewall in these ways, you’re not just adding a layer of protection; you’re creating a resilient defense system that grows smarter and more effective over time. This proactive approach will significantly reduce your site’s vulnerability and enhance your visitors’ experience, ultimately contributing to better SEO and user retention.
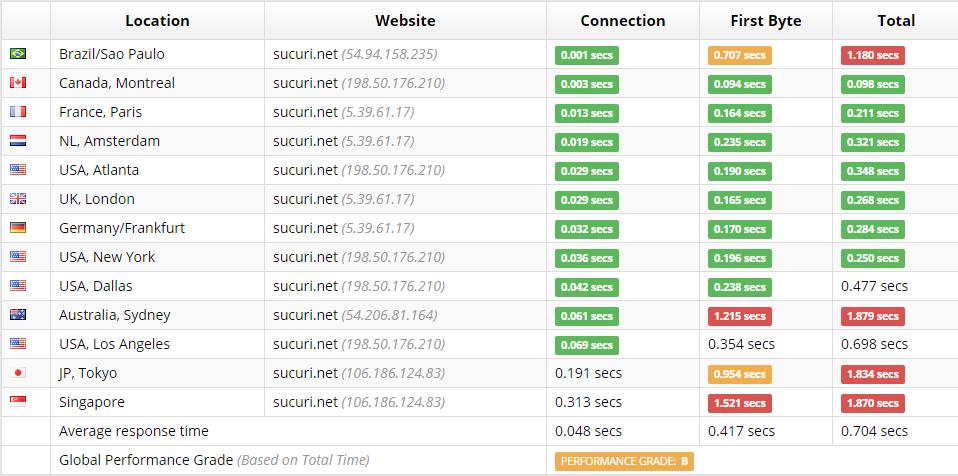
Testing Your Sites Performance After Cloudflare Setup
After successfully setting up Cloudflare for your WordPress site, it’s time to evaluate how this powerful tool is affecting your site’s performance. Testing your website’s speed and functionality is crucial to ensure you’re fully leveraging Cloudflare’s CDN and security features. Here are some effective methods to gauge your site’s performance post-setup.
Utilize Performance Testing Tools
There are several online tools that can effectively measure your site’s speed and overall performance. Consider using:
- GTmetrix: This tool provides detailed insights into your site’s loading time and offers suggestions for improvements.
- Pingdom: A user-friendly tool that shows how quickly your site loads and provides a performance grade.
- WebPageTest: Ideal for more technical users, it allows you to test your site from different locations and browsers.
Analyze Key Metrics
When testing your site’s performance, focus on the following key metrics:
- Page Load Time: The time it takes for your site to fully load; aim for under 3 seconds.
- Time to First Byte (TTFB): This measures the time it takes for a user’s browser to receive the first byte of data from your server.
- Request Count: Fewer requests can lead to faster loading times; check how Cloudflare optimizes this.
Monitor Your Site’s Uptime
Uptime monitoring tools such as StatusCake or UptimeRobot can help you keep track of your site’s availability. After enabling Cloudflare, it’s essential to ensure that your site remains accessible at all times. Set alerts to notify you if your site goes down, which can be crucial for maintaining user trust and SEO rankings.
Compare Performance Before and After
Conducting a comparison analysis is beneficial. Before implementing Cloudflare, record your site’s performance metrics. After you’ve configured Cloudflare, run the same tests. This will provide clear evidence of how much improvement has occurred. Consider using a simple table to demonstrate the differences:
| Metric | Before Cloudflare | After Cloudflare |
|---|---|---|
| Page Load Time | 5.2 seconds | 2.8 seconds |
| TTFB | 1.5 seconds | 0.8 seconds |
| Request Count | 50 requests | 30 requests |
By following these steps, you can effectively assess the enhancements Cloudflare brings to your WordPress site. Regular testing ensures that you maintain optimal performance and offer a seamless experience for your visitors.

Troubleshooting Common Issues with Cloudflare and WordPress
When integrating Cloudflare with your WordPress site, you may encounter a few common issues. Understanding these problems and how to troubleshoot them can save you time and frustration. Here are some typical issues and their solutions:
- SSL Configuration Problems: If you notice mixed content warnings or SSL errors, double-check your SSL settings in Cloudflare. Make sure to set the SSL option to Full (Strict) for better security. Also, ensure that your WordPress site is set to use HTTPS in the settings.
- Cache Issues: Sometimes, changes made to your WordPress site may not reflect immediately due to caching. Clear your Cloudflare cache through the dashboard under the Caching tab and select Purge Everything. Additionally, consider using a caching plugin like WP Rocket or W3 Total Cache that works well with Cloudflare.
- Firewall Blocking: If legitimate users are being blocked from accessing your site, review your Cloudflare Firewall settings. Adjust the security level to Low or allow specific IP addresses if necessary. Be careful with the Bot Fight Mode as it may block good bots.
- CDN Issues: If your images or static files are not loading, make sure that you have enabled the Automatic HTTPS Rewrites option in Cloudflare. This can help ensure that all resources are loaded over HTTPS.
If you experience issues with the Cloudflare plugin for WordPress, you might want to try disabling other plugins temporarily to identify any conflicts. Sometimes, security plugins may interfere with Cloudflare’s functionality. After identifying the conflicting plugin, you can either adjust its settings or reach out to the plugin developer for assistance.
Here’s a quick reference table to summarize potential issues and their fixes:
| Issue | Solution |
|---|---|
| Mixed Content Warnings | Set SSL to Full (Strict) and update site URLs to HTTPS. |
| Changes Not Reflecting | Purge Cloudflare cache and clear browser cache. |
| Blocked Users | Adjust Firewall settings and security level. |
| Static Files Not Loading | Enable Automatic HTTPS Rewrites. |
keep in mind that documentation and customer support from both Cloudflare and WordPress can be invaluable resources. Their communities often provide solutions to unique problems that you might face. Don’t hesitate to reach out for help or consult online forums and guides.
Conclusion: Enjoying a Faster, More Secure WordPress Experience with Cloudflare
In today’s digital landscape, ensuring a swift and secure experience for your WordPress site is essential. Utilizing Cloudflare is one of the most effective ways to achieve that. With its extensive network of data centers across the globe, Cloudflare can significantly enhance your site’s loading speed, making it a breeze for visitors to access your content. This speed not only improves user experience but also positively impacts your search engine rankings.
Security is another critical aspect that Cloudflare excels in. By acting as a shield between your website and potential threats, it helps to prevent attacks such as DDoS and malicious bot traffic. This robust level of protection means you can focus more on creating great content rather than constantly worrying about security breaches. Here are some key features that contribute to a safer WordPress environment:
- Web Application Firewall (WAF): Blocks malicious traffic before it reaches your server.
- SSL Encryption: Encrypts data transferred between your site and its visitors, boosting trust and security.
- Bot Management: Identifies and mitigates harmful bots, allowing legitimate traffic to flow freely.
Integrating Cloudflare with your WordPress site is straightforward, allowing you to start reaping these benefits quickly. Once set up, you’ll notice an immediate improvement in page load times, especially for users located far from your server. Additionally, the real-time analytics provided by Cloudflare help you monitor your traffic and security status effectively.
Consider this simple comparison table to illustrate the advantages of using Cloudflare:
| Feature | Without Cloudflare | With Cloudflare |
|---|---|---|
| Page Load Time | Slow | Fast |
| Security Level | Moderate | High |
| Uptime Reliability | Occasional Downtime | 99.9% Uptime |
Ultimately, Cloudflare is not just a tool; it’s an investment in your website’s future. Whether you run a personal blog or a large e-commerce platform, the benefits of speed and security are universally applicable. By leveraging Cloudflare’s capabilities, you can ensure that your visitors enjoy a seamless and secure browsing experience, leading to increased engagement and higher conversion rates.
Make the smart choice for your WordPress site today and embrace the advantages that Cloudflare brings to the table. With just a few steps, you can transform your website into a faster, more secure hub, setting the stage for growth and success in the ever-competitive online space.
Frequently Asked Questions (FAQ)
Q&A: How to Set Up Cloudflare for WordPress (Step-by-Step Tutorial for 2025)
Q1: Why should I consider using Cloudflare for my WordPress site?
A1: Great question! Cloudflare is a powerful tool that enhances your website’s performance, security, and reliability. By using Cloudflare, you can speed up your site with its CDN (Content Delivery Network), protect it from malicious traffic, and improve your SEO rankings. Plus, it offers free plans that are perfect for small to medium-sized WordPress sites.
Q2: Is it complicated to set up Cloudflare for my WordPress site?
A2: Not at all! This step-by-step tutorial is designed to make the process as smooth as possible. Even if you’re not tech-savvy, you’ll find the setup easy to follow. Just grab your laptop, and let’s get started!
Q3: What do I need before I set up Cloudflare?
A3: Before diving in, make sure you have a few essentials: your WordPress site’s URL, access to your domain registrar (where you purchased your domain), and a Cloudflare account (which is free to create). Having these on hand will speed things up!
Q4: Can Cloudflare really improve my site’s speed?
A4: Absolutely! Cloudflare caches your site’s static content on servers around the globe, so when visitors request your site, they get the data from the nearest location. This dramatically reduces load times. A faster site means happier visitors and lower bounce rates!
Q5: What about security? How does Cloudflare help?
A5: Cloudflare is like a security blanket for your website. It offers features like DDoS protection, a web application firewall (WAF), and SSL certificates, which encrypt data transferred between your site and its users. With these protections in place, you can sleep better knowing your site is shielded from cyber threats.
Q6: Will using Cloudflare affect my existing WordPress plugins?
A6: Generally, Cloudflare plays nicely with most WordPress plugins. However, if you’re using caching plugins, you may need to adjust their settings to avoid conflicts. Don’t worry; we’ll cover all that in the tutorial!
Q7: How do I know if Cloudflare is working properly with my site?
A7: Great question! After you’ve completed the setup, you can check if Cloudflare is active by using their diagnostic tools or simply visiting your site to see if it loads faster. Plus, Cloudflare provides analytics on your dashboard that shows you how much bandwidth you’re saving!
Q8: Can I revert back if I don’t like Cloudflare?
A8: Yes! If you find that Cloudflare isn’t quite for you, you can deactivate it at any time. Just update your DNS settings at your domain registrar to point back to your original settings, and you’re good to go. It’s all about finding what works best for you!
Q9: What if I run into issues during the setup?
A9: No worries! Our tutorial will include troubleshooting tips for common issues. Additionally, Cloudflare has a robust support community and documentation that can help guide you through any hiccups you encounter.
Q10: Is there anything else I should know before I start?
A10: Just remember that patience is key! Once you set everything up, give it some time for changes to propagate across the internet. And don’t hesitate to revisit our tutorial whenever you need a refresher. You’ve got this!
We hope this Q&A clears up any questions you have about setting up Cloudflare for your WordPress site. Ready to boost your website’s performance and security? Let’s dive into the tutorial!
To Conclude
And there you have it! Setting up Cloudflare for your WordPress site in 2025 is not just a task; it’s a game changer. With the steps we’ve covered, you’re well on your way to enhancing your site’s performance, boosting its security, and ultimately creating a better experience for your visitors.
If you’ve followed along, pat yourself on the back! You’ve taken a significant step toward optimizing your site. Remember, the benefits of using Cloudflare don’t stop at speed and security; it’s also about scalability and reliability as your site grows.
So, why wait? Dive in and implement these changes today! And if you ever hit a snag or have any questions, don’t hesitate to reach out. The community is here to support you.
Happy optimizing, and here’s to a faster, safer, and more robust WordPress site! Cheers to your online success!


