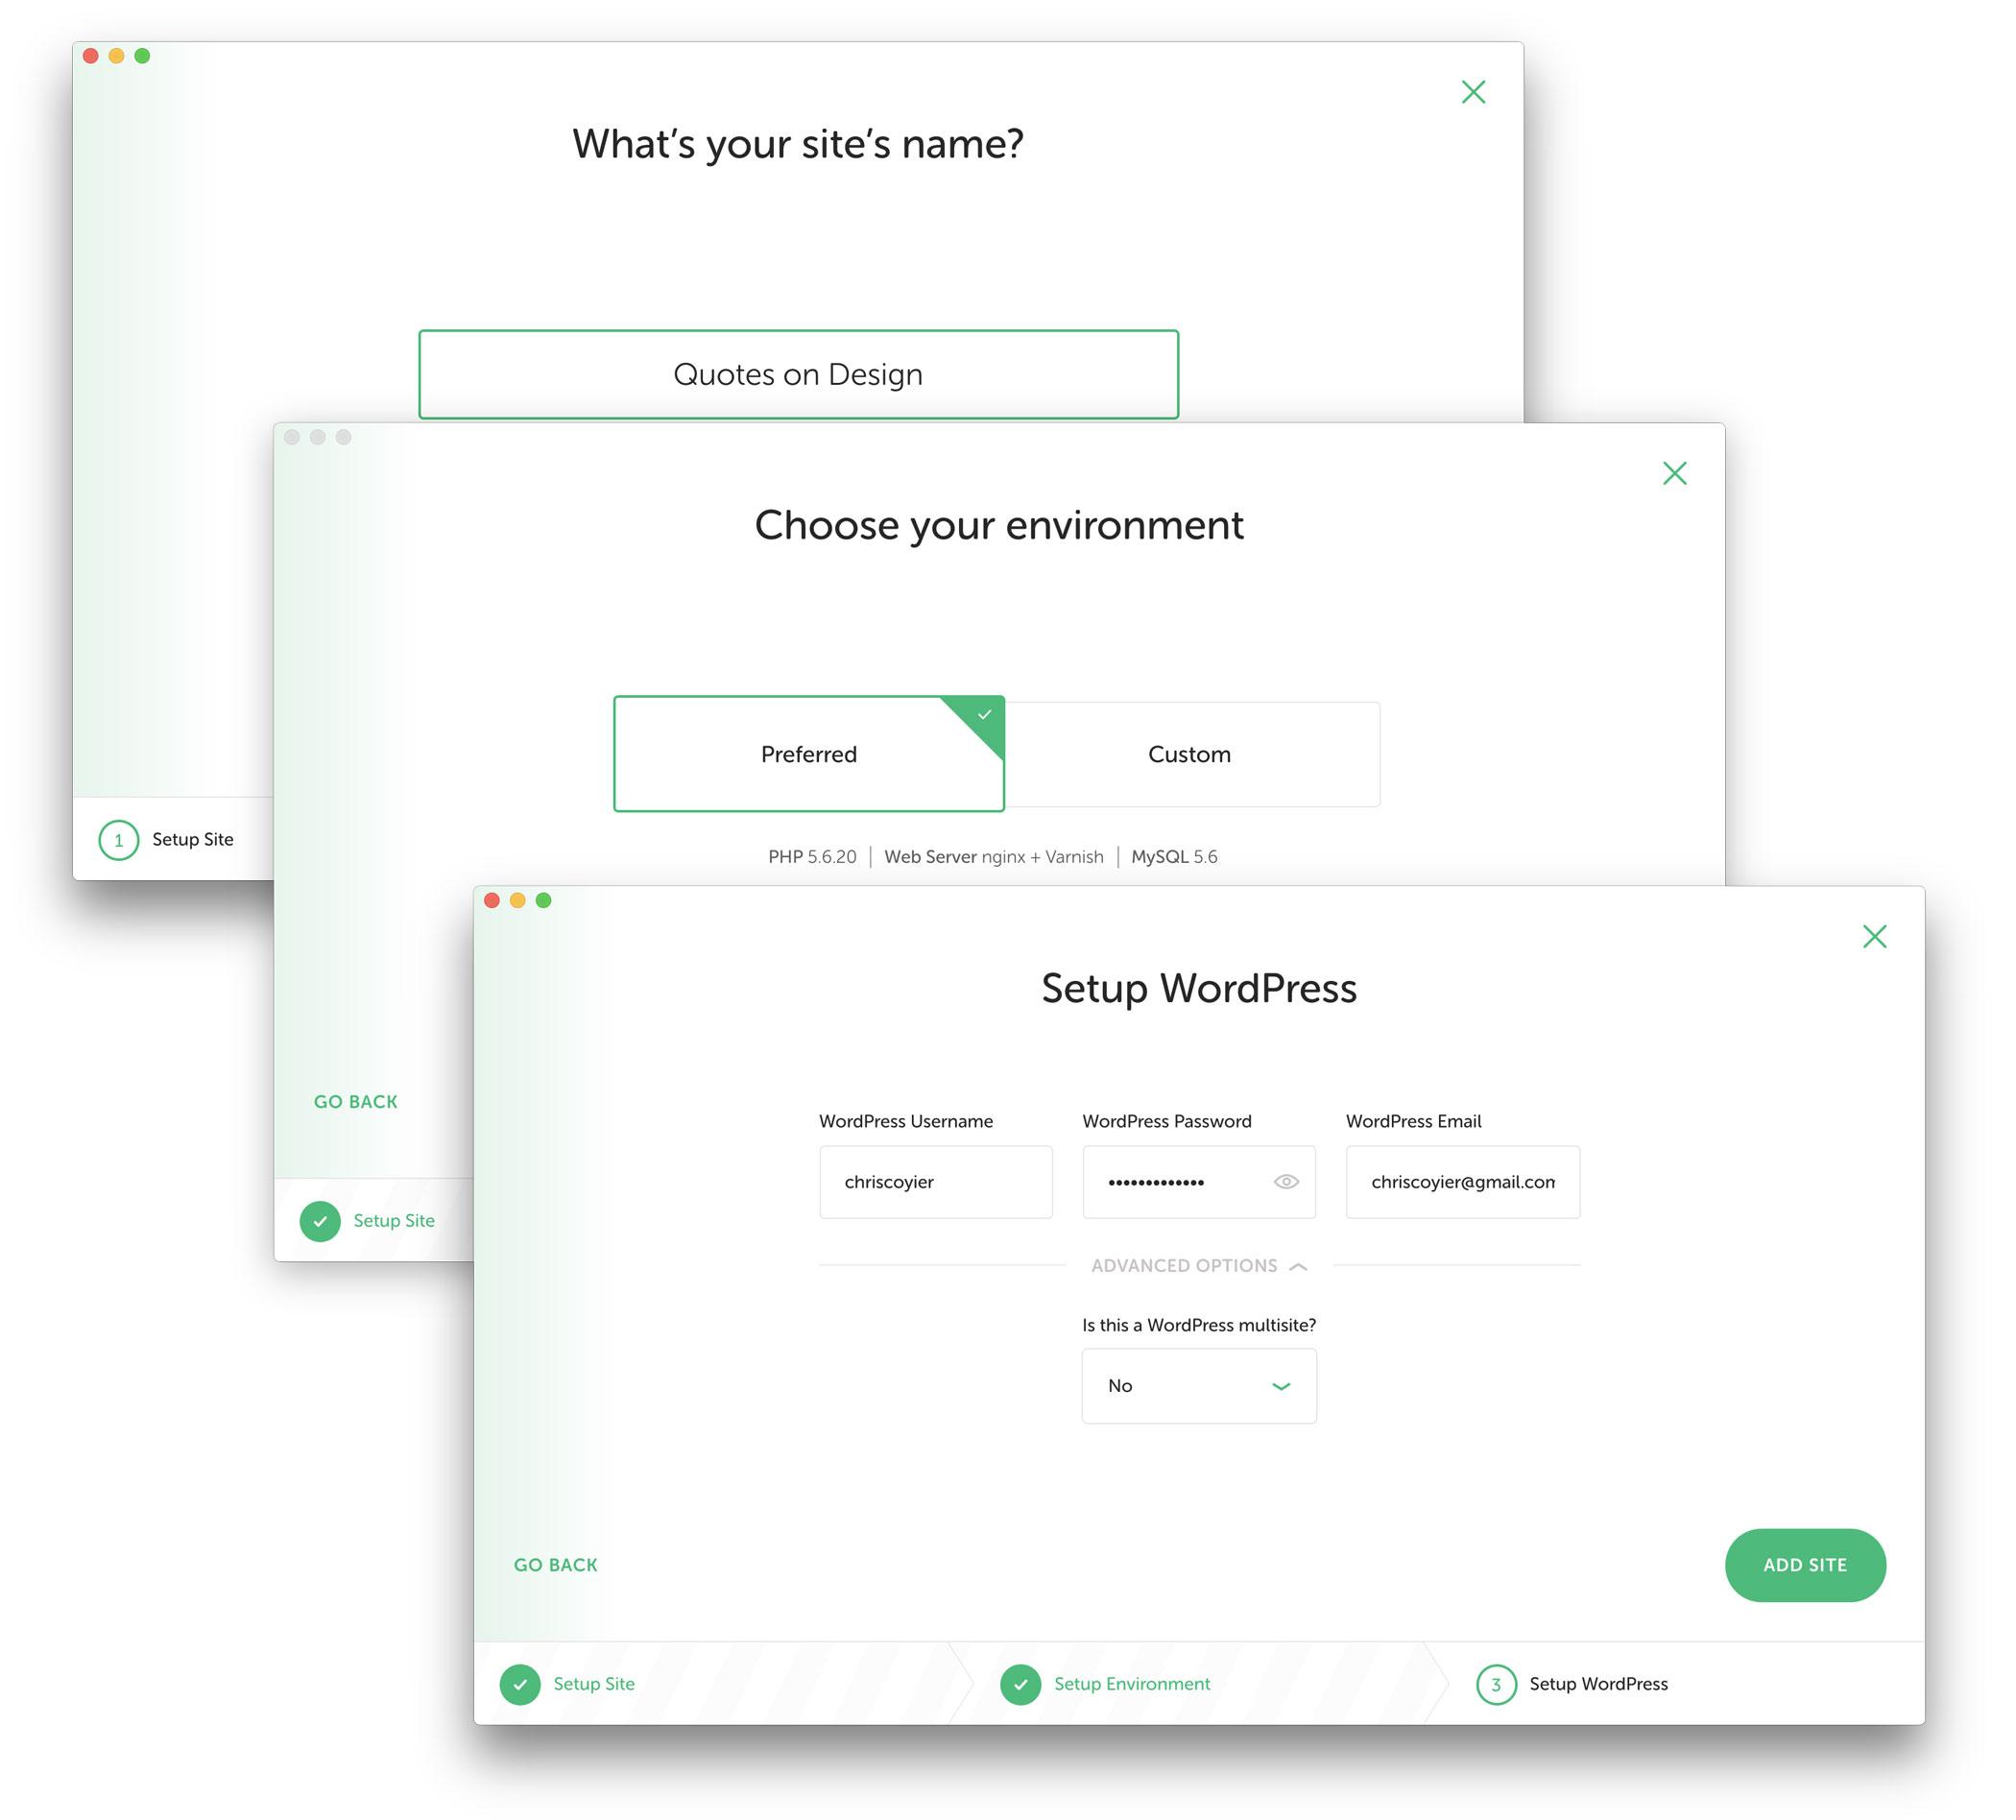
Ready to kickstart your web development journey? Installing WordPress on XAMPP locally is the perfect way to create a test environment without the hustle of online hosting. Let’s dive in and get your WordPress site up and running in no time!
How to Install WordPress on XAMPP Locally – Beginner’s Guide
Are you eager to dive into the world of web development but don’t know where to start? If you’ve been dreaming of building your own website with WordPress but feel overwhelmed by the process, you’re in the right place! In this beginner’s guide, we’ll walk you through the simple steps to install WordPress on XAMPP locally, allowing you to create and customize your site right from the comfort of your own laptop. Imagine having a fully functional site without the need for a live server—sounds tempting, right? Whether you’re looking to showcase your portfolio, start a blog, or even launch an online store, mastering this local setup is the perfect first step. So grab a cup of coffee, roll up your sleeves, and let’s get started on your journey to becoming a WordPress wizard!
Getting Started with XAMPP: Your Local Development Environment Made Easy
Installing WordPress locally using XAMPP is a game-changer for anyone looking to build a website without the need for a live server. This setup not only allows you to experiment with themes and plugins but also provides a safe space to learn and grow your skills without the pressure of going public. Let’s dive into the step-by-step process to make your local development journey smooth and enjoyable.
Step 1: Setting Up XAMPP
Before you can install WordPress, you need to have XAMPP running on your machine. Follow these simple steps:
- Download XAMPP: Visit the official XAMPP website and download the installer for your operating system.
- Install XAMPP: Run the installer and follow the on-screen instructions. Make sure to include Apache and MySQL during the installation process.
- Start the Services: Open the XAMPP Control Panel and click on the ‘Start’ buttons next to Apache and MySQL.
Step 2: Create a Database for WordPress
WordPress requires a database to store all your site’s content. Here’s how to set it up:
- Open your web browser and navigate to http://localhost/phpmyadmin.
- Select the Databases tab at the top.
- In the Create database field, enter a name for your database (e.g., wordpress_db) and click Create.
Step 3: Download WordPress
Now it’s time to grab the latest version of WordPress:
- Visit the WordPress.org website and download the latest zip file.
- Unzip the downloaded file and move the wordpress folder into the C:xampphtdocs directory.
- Rename the folder to something simple, like mywebsite.
Step 4: Configure WordPress
Now that WordPress is in place, it’s time to configure it to connect with your database:
- In your browser, navigate to http://localhost/mywebsite.
- You’ll be prompted to choose a language and then proceed to the setup screen.
- Fill in the database information:
| Field | Value |
|---|---|
| Database Name | wordpress_db |
| Username | root |
| Password | (leave blank) |
| Database Host | localhost |
| Table Prefix | wp_ |
Step 5: Complete Installation
Once the database configuration is set, click Submit, then run the installation. Follow the prompts to set your site title, username, password, and email. Once everything is filled out, click Install WordPress to finalize the process.
Step 6: Log in and Explore!
Now that your installation is complete, you can log into your new local WordPress site. Just head to http://localhost/mywebsite/wp-admin, enter your credentials, and start exploring the world of WordPress development. Customize your site, add plugins, or simply experiment with different layouts. The possibilities are endless!
Downloading and Setting Up XAMPP: A Step-by-Step Walkthrough
To kick things off, the first step in your journey to setting up WordPress locally on XAMPP is downloading the XAMPP package. Head over to the XAMPP official website. Depending on your operating system—Windows, macOS, or Linux—select the appropriate version and hit the download button. You’ll have a zip file in your downloads folder before you know it!
Once the download is complete, it’s time to install XAMPP. Simply locate the downloaded file and execute it. Follow the installation prompts, making sure to select components like Apache and MySQL, which are essential for running WordPress. Don’t worry about the other components; you can keep them unchecked to simplify your setup.
After the installation is done, launch the XAMPP Control Panel. You’ll see a user-friendly interface displaying the services that XAMPP provides. To get WordPress up and running, start the Apache and MySQL modules by clicking the respective Start buttons. If you see green indicators, congratulations! You’re halfway there!
Next, it’s time to get WordPress itself. Visit the WordPress download page and grab the latest version. This will also be a zip file. Once downloaded, extract its contents and move the entire folder to the htdocs directory inside your XAMPP installation folder. Typically, you can find this folder at C:xampphtdocs on Windows or /Applications/XAMPP/htdocs on macOS.
Now, let’s set up a database for your WordPress site! Open your web browser and type localhost/phpmyadmin in the address bar. In the phpMyAdmin interface, click on the Databases tab. Create a new database by entering a name (for example, wordpress_db) and clicking Create. Remember this name; you’ll need it later.
With your database ready, navigate to localhost/wordpress (replace ‘wordpress’ with the name of your WordPress folder if you renamed it). You’ll be greeted with the WordPress installation wizard. Choose your language, and on the next screen, fill in the database details:
| Field | Value |
|---|---|
| Database Name | wordpress_db |
| Username | root |
| Password | (leave blank) |
| Database Host | localhost |
| Table Prefix | wp_ |
Once you hit the Submit button, WordPress will check the database connection. If everything is correct, you’ll proceed to the next setup screen. Follow the remaining prompts to finalize your installation—fill in your site title, username, password, and email address. You’ll be all set to dive into the world of WordPress on your local machine!
Preparing Your Computer for WordPress: Essential System Requirements
Before diving into the installation process of WordPress using XAMPP, it’s crucial to ensure your computer meets the necessary system requirements. This preparation will not only smooth out the installation process but also enhance your experience when running WordPress locally.
First, check your operating system. WordPress is compatible with various platforms, so whether you’re using Windows, macOS, or Linux, you’ll be set as long as your system is up-to-date. Make sure your OS supports the latest versions of PHP and MySQL, as these are fundamental for running WordPress effectively.
Next, consider the following essential software components:
- XAMPP: This is your local server solution. Ensure you download the latest version that includes Apache, MySQL, PHP, and Perl.
- PHP: WordPress runs on PHP, so you’ll need at least version 7.4 or higher for optimal performance.
- MySQL: A database is essential for storing your WordPress content, and MySQL version 5.6 or higher is recommended.
Additionally, let’s explore the hardware requirements:
| Component | Recommended Specs |
|---|---|
| Processor | Dual-core 2.0 GHz |
| RAM | 4 GB or more |
| Storage | At least 10 GB free space |
| Internet Connection | Stable broadband for downloading updates and plugins |
having a decent web browser is essential. While most modern browsers will work, using the latest versions of Chrome, Firefox, or Safari will provide you with the best experience when accessing and managing your WordPress installation.
By ensuring your computer meets these requirements, you’ll create a stable environment for developing and testing your WordPress site. This preparation phase is crucial for avoiding potential roadblocks and ensuring a seamless experience as you navigate through the world of WordPress development.
Downloading WordPress: Where to Find the Latest Version
To kick off your journey with WordPress on XAMPP, the first step is to snag the latest version of the software. This ensures that you’re working with the most up-to-date features and security enhancements. Luckily, finding WordPress is a breeze!
You can download the latest version of WordPress directly from the official WordPress website. This site is the primary source for the software, ensuring that you receive a clean and verified copy. Here’s what you can expect during the download process:
- No registration required: You can download WordPress without creating an account.
- Stable releases: The website offers the latest stable version, which is ideal for beginners.
- Additional resources: The site also provides documentation and support forums to help you get started.
Once you’re on the download page, you’ll see a big, attractive button that says “Download WordPress.” Clicking that will start the download of a .zip file containing everything you need to install WordPress locally on your machine.
After downloading, make sure to extract the .zip file. You can do this by right-clicking on the file and selecting “Extract All.” This will create a folder with all of WordPress’s core files, ready for installation. Now, you’re just a few steps away from setting up your local WordPress site!
Lastly, keep an eye on version updates after your installation. WordPress regularly pushes updates to enhance performance and security, so staying informed is key. You can check for updates directly in your WordPress dashboard once you’ve set it up locally.
Creating a Database for WordPress: Simple Steps to Follow
Setting up a database for your local WordPress installation is a crucial step that ensures your site runs smoothly. If you’re using XAMPP, the process is straightforward. Here’s how to create a database that will serve your WordPress site perfectly.
First, you’ll need to access the phpMyAdmin interface, which is included with XAMPP. You can do this by following these steps:
- Open your web browser.
- Go to http://localhost/phpmyadmin.
- You’ll see the phpMyAdmin dashboard, where you can manage your databases.
Once you’re in phpMyAdmin, creating a new database is a breeze. Here’s a step-by-step guide:
- Click on the Databases tab at the top of the page.
- In the “Create database” field, enter a name for your new database. It’s best to keep it simple, like wordpressdb.
- Select utf8generalci from the collation dropdown for compatibility.
- Click the Create button, and voila! Your database is ready for WordPress.
Now that you’ve created the database, you can easily integrate it with your WordPress installation. During the WordPress setup, you’ll be prompted to enter your database name, username, and password. Use the following details:
| Detail | Value |
|---|---|
| Database Name | wordpressdb |
| Username | root |
| Password | (leave blank) |
| Host | localhost |
After filling in these details, continue with the WordPress installation process. Ensure that you double-check your inputs to avoid connection errors. If everything is set up correctly, you’ll be able to navigate to your local WordPress site in just a few clicks, ready to customize and create fantastic content.
creating a database for WordPress on XAMPP is a simple yet essential step in your development journey. With just a few clicks, you can set the foundation for a thriving website. Happy blogging!

Configuring WordPress: Editing Settings for a Smooth Installation
After successfully installing XAMPP and WordPress, the next vital step is to configure the settings for a seamless experience. Proper configuration not only enhances the functionality of your website but also optimizes it for performance. Let’s dive into the essential settings you should consider adjusting.
First, navigate to the WordPress Dashboard by visiting http://localhost/your-site-name/wp-admin. Here, you’ll find the general settings under the Settings menu. Key areas to focus on include:
- Site Title: This is your website’s name, which will appear in search results.
- Tagline: A brief description of your site, which helps clarify its purpose.
- WordPress Address (URL): Ensure this points to your local setup, typically
http://localhost/your-site-name. - Site Address (URL): This is also usually the same as the WordPress Address.
Next, let’s look at Permalink Settings. This option is crucial for SEO and usability. To configure it:
- Go to Settings > Permalinks.
- Choose the Post name option for a clean and descriptive URL structure.
- Click Save Changes to apply the changes.
Another essential setting is the Reading Settings. This allows you to determine how your site’s content is displayed. You can configure:
- Homepage display: Select either a static page or your latest posts.
- Blog pages show at most: Limit the number of posts displayed on your blog page.
- Search engine visibility: Ensure this option is unchecked so that your local site can be indexed.
Lastly, don’t overlook the Discussion Settings. Here, you can manage how visitors interact with your posts. Consider these options:
- Default article settings: Enable or disable comments and pings.
- Other comment settings: Customize moderation options and notifications.
Taking time to set these configurations will pave the way for a more efficient development process. Make sure to revisit these settings as your site evolves, ensuring it continues to meet both your needs and those of your visitors.

Installing WordPress on XAMPP: A Beginner-Friendly Guide
Installing WordPress on XAMPP is a fantastic way to create a local development environment. This allows you to experiment with themes, plugins, and settings without affecting a live website. In just a few simple steps, you can have your very own WordPress site up and running on your workstation. Let’s break down the process!
First things first, you’ll need to download and install XAMPP. This software package includes Apache, MySQL, PHP, and Perl, making it a powerful solution for running web applications locally. Follow these steps:
- Visit the XAMPP official website.
- Select the appropriate version for your operating system.
- Run the installer and follow the on-screen instructions.
Once XAMPP is installed, launch the control panel and start the Apache and MySQL services. This step is crucial as it establishes the local server and database needed for WordPress.
Next, download the latest version of WordPress from the WordPress.org website. After downloading, extract the files and place them in the htdocs folder within your XAMPP installation directory (typically found at C:xampphtdocs). Create a new folder, perhaps named mywordpresssite, and paste the WordPress files there.
Now, it’s time to set up your database. Open your web browser and navigate to http://localhost/phpmyadmin. This is where you can manage your databases. Follow these steps:
- Click on the Databases tab.
- Enter a name for your database (for example, wordpress_db).
- Click Create.
With the database ready, it’s time to configure WordPress. In your browser, go to http://localhost/mywordpresssite. You’ll see the WordPress installation wizard. Choose your language and click Continue. When prompted for your database information, use the following details:
| Field | Value |
|---|---|
| Database Name | wordpress_db |
| Username | root |
| Password | (leave blank) |
| Database Host | localhost |
| Table Prefix | wp_ |
After entering the database details, click Submit. If everything is correct, you’ll see a success message. Follow the prompts to finalize your installation, including setting up your site title, username, password, and email address.
Congratulations! You’ve successfully installed WordPress on XAMPP. You can now access your local WordPress site at http://localhost/mywordpresssite and start customizing it to your heart’s content. Whether you’re a budding developer or just looking to play around, this local setup is an excellent way to get comfortable with WordPress.

Troubleshooting Common Installation Issues: Tips for Success
Troubleshooting Common Installation Issues
Installing WordPress on XAMPP can sometimes lead to a few hiccups, but don’t worry! Here are some common issues and solutions to ensure a smooth installation process.
Check Your XAMPP Services: Before diving into WordPress installation, ensure that Apache and MySQL services are running in the XAMPP Control Panel. Without these services active, your local server won’t function. Here’s what to look out for:
- Open the XAMPP Control Panel.
- Look for the green indicators next to Apache and MySQL.
- If they are red, click the “Start” buttons next to each.
Database Connection Issues: A common installation roadblock is database connection errors. This tends to occur if the database hasn’t been created or credentials are incorrect. Follow these steps to resolve the issue:
- Access phpMyAdmin via
http://localhost/phpmyadmin. - Create a new database by entering a name in the “Create database” field.
- Ensure you input the correct database name in your
wp-config.phpfile:
| Setting | Value |
|---|---|
| DB_NAME | YourDatabaseName |
| DB_USER | root |
| DB_PASSWORD | (leave empty) |
| DB_HOST | localhost |
File Permissions: Incorrect file permissions can prevent WordPress from accessing necessary files. Ensure that your WordPress directory has the proper permissions:
- Right-click on the WordPress folder in your XAMPP
htdocsdirectory. - Select ”Properties” and navigate to the “Security” tab.
- Make sure the user has read and write permissions.
Clear Browser Cache: Sometimes, your browser may cache old data, causing issues with the installation. After making any changes, clear your cache or use an incognito window to view your progress.
By addressing these common installation issues, you’ll be well on your way to successfully setting up WordPress on XAMPP. Remember, patience is key, and each challenge is just a stepping stone to becoming a WordPress pro!

Exploring Your Local WordPress Site: What’s Next After Installation
Congratulations on successfully installing WordPress on XAMPP! Now that you have your local WordPress site up and running, it’s time to dive deeper and explore its features. Understanding the next steps can help you maximize your experience and get the most out of your new site.
First things first, let’s familiarize ourselves with the WordPress dashboard. This is your control center, where all the magic happens. Here are some key areas to focus on:
- Posts: Create, edit, and manage your blog posts.
- Pages: Set up static content like your About and Contact pages.
- Media: Upload images, videos, and other files to enhance your site’s content.
- Appearance: Choose and customize themes to define your site’s look.
- Plugins: Extend your site’s functionality with additional features.
Next, consider customizing your site’s appearance. The Themes section allows you to select from many free and premium themes. After choosing one, you can personalize it further through the Customize option. Don’t hesitate to experiment with colors, fonts, and layouts until it feels just right.
Another crucial step is to install essential plugins. Here’s a shortlist of plugins to consider:
- Yoast SEO: Enhance your site’s search engine optimization.
- Contact Form 7: Easily create and manage contact forms.
- WooCommerce: If you’re considering an online store, this is a must-have.
- Akismet: Protect your site from spam comments.
You might also want to set up basic site settings. Navigate to the Settings section in your dashboard to configure options such as:
| Setting | Description |
|---|---|
| Site Title | Your site’s name that appears in the header and search engines. |
| Timezone | Select your timezone for accurate post scheduling. |
| Permalinks | Choose how your URLs will look for better SEO. |
don’t forget to explore the Settings > Permalinks option to ensure your URLs are clean and user-friendly. This will help with SEO and make your links easier to share. Choose the Post name option for a straightforward structure.
As you explore and customize your local WordPress site, remember that the possibilities are endless. Don’t be afraid to test things out! With a bit of creativity and exploration, you’ll soon have a site that truly reflects your vision.
Enhancing Your Local Setup: Recommended Plugins and Themes for Beginners
Once you’ve set up your local WordPress environment using XAMPP, the next step is to enhance your website with the right plugins and themes. This is where you can truly start to make your site your own and create an engaging experience for your visitors. Here are some top recommendations that are beginner-friendly and easy to use.
Themes:
- Astra: A lightweight and highly customizable theme that’s perfect for beginners. Astra is compatible with all major page builders and comes with pre-built templates to kickstart your design.
- OceanWP: This theme offers a great balance of flexibility and performance. With its responsive layout and various demo sites, it suits any niche and allows for easy customization.
- GeneratePress: Known for its speed and usability, GeneratePress is a fantastic choice for those who want to ensure their site runs smoothly. It’s highly compatible with popular plugins and maintains a clean aesthetic.
Plugins:
- Yoast SEO: This essential plugin helps optimize your website for search engines. Its user-friendly interface guides you through improving your on-page SEO.
- Elementor: A powerful drag-and-drop page builder that allows you to create stunning pages without any coding knowledge. Perfect for beginners wanting to customize their site layout easily.
- Contact Form 7: A simple yet effective plugin for creating contact forms. It’s incredibly flexible and allows users to manage multiple forms with ease.
- WP Super Cache: Speed is crucial for user experience, and this plugin helps you improve loading times by generating static HTML files from your dynamic WordPress site.
Here’s a quick comparison table to summarize the pros of each recommended plugin:
| Plugin | Key Feature | Best For |
|---|---|---|
| Yoast SEO | SEO Optimization | Improving Visibility |
| Elementor | Drag-and-Drop Builder | Customizing Layouts |
| Contact Form 7 | Form Management | User Interaction |
| WP Super Cache | Speed Optimization | Enhancing Performance |
By selecting the right themes and plugins, you can significantly enhance the functionality and aesthetics of your local WordPress setup. These tools will not only make your site visually appealing but also improve user experience, helping you build a strong foundation for your online presence. Dive into these suggestions and watch your local website transform!
Frequently Asked Questions (FAQ)
Q&A: How to Install WordPress on XAMPP Locally – Beginner’s Guide
Q1: Why should I install WordPress on XAMPP locally?
A1: Great question! Installing WordPress on XAMPP locally allows you to create a safe sandbox environment for experimenting and learning without affecting a live site. It’s perfect for beginners who want to test themes, plugins, or even custom code without any risk. Plus, it’s completely free! You get to learn at your own pace while having the freedom to break things and fix them without any stress.
Q2: What do I need to get started with XAMPP and WordPress?
A2: You’ll need a few things to get going:
- XAMPP: This is your local server environment. You can download it for free from the official Apache Friends website.
- WordPress: Grab the latest version from wordpress.org.
- A web browser: To access your local site once it’s set up.
- A bit of time and patience: It’s a fun process, but it might take a little time for complete beginners to get fully set up.
Q3: How do I install XAMPP on my computer?
A3: Installing XAMPP is a breeze! Just download the installer from the XAMPP website, run it, and follow the prompts. During installation, you can choose which components to install. For WordPress, you only need Apache, MySQL, and PHP. Once installed, simply launch the XAMPP Control Panel and start the Apache and MySQL modules. Voila! You’re ready to go!
Q4: Once XAMPP is installed, how do I install WordPress?
A4: Here’s the fun part! After you have XAMPP running:
- Unzip the WordPress file you downloaded and move the entire WordPress folder to the
htdocsdirectory inside your XAMPP folder (usually found at C:xampphtdocs). - Rename the WordPress folder to whatever you’d like your local site to be called (e.g., “mywebsite”).
- Next, open your browser and type
http://localhost/phpmyadmin. Create a new database for your WordPress site (let’s call it “mydatabase”). - Now, go to
http://localhost/mywebsiteand follow the on-screen instructions to complete the WordPress installation. You’ll enter your database details, create an admin account, and set your site title. Easy peasy!
Q5: What if I encounter problems during installation?
A5: Don’t worry! It’s common to hit a few bumps along the way. If you can’t access your site, double-check that Apache and MySQL are running in the XAMPP Control Panel. If you run into database errors, make sure you’ve created the database correctly in phpMyAdmin. A quick search online can usually point you to the solution, or you can reach out to forums and communities – they’re super helpful!
Q6: Is it really worth it to set up WordPress locally?
A6: Absolutely! Setting up WordPress locally on XAMPP is not just about learning; it’s about creating a risk-free environment where you can unleash your creativity. Whether you’re building a blog, an online portfolio, or a business site, having a local version allows you to experiment without consequences. Plus, once you’re ready, you can easily move your site from local to live with the right tools. It’s a win-win!
Q7: What’s next after I’ve installed WordPress locally?
A7: Now the fun begins! Start exploring the WordPress dashboard, customize your theme, install plugins, and create content. Experiment with different layouts and functionalities. You might consider learning about website security and optimization next. And if you feel adventurous, think about moving your local site to a web host when you’re ready to go live!
Q8: Any final tips for beginners?
A8: Just enjoy the process! Don’t rush it, and give yourself the grace to make mistakes and learn from them. There’s a whole community out there ready to help you. And remember, practice makes perfect. The more you play around with WordPress, the more confident you’ll become. Happy blogging!
Future Outlook
And there you have it! You’re now equipped with everything you need to install WordPress on XAMPP like a pro. Congratulations on taking this important step into the world of web development! By setting up your local environment, you’re not only saving time and money but also gaining the freedom to experiment and build your dream website without any pressure.
Now, it’s time to unleash your creativity. Whether you’re planning to launch a personal blog, a portfolio, or even a small business site, having WordPress installed locally gives you the perfect playground to learn and grow. Don’t hesitate to dive deeper into themes, plugins, and customizations. The more you explore, the more confident you’ll become!
If you run into any bumps along the way, remember that you’re part of a vibrant community of WordPress enthusiasts, ready to lend a hand. So, keep experimenting, keep learning, and most importantly, have fun with it!
If you found this guide helpful, why not share it with a friend who’s also interested in web development? And be sure to check back for more tips and tricks to enhance your WordPress journey. Happy blogging!

New Providers
Enjoy The Speed Of Downloading & Uploading With 1GBPS Port
Affordable Dedicated Servers & Colocation Services. Services: Dedicated Servers Colocation Private Cabinet Colocation DDoS Protection
Up to 85% off hosting + website builder
Latest News
- 8 Best WooCommerce Dropshipping Plugins for 2026 (Free + Paid)July 9, 2026 15
- How to Make a Website Template: A Step-by-Step GuideJuly 8, 2026 22
- 10 Best Coming Soon WordPress Plugins for 2025 (Compared)July 8, 2026 22
- How to Create a Personal Web Page: 7+ Simple StepsJuly 7, 2026 24
- 9 Best WordPress Countdown Timer Plugins in 2026July 7, 2026 21

We specialize in providing Web hosting reviews. Where you can search for potential hosts.