Ready to launch your own website? Installing WordPress is easier than you think! Whether you prefer the simplicity of a one-click install or the hands-on approach via manual setup, we’ve got you covered. Let’s dive into these two methods and get you online!
Step-by-Step How to Install WordPress (2 Methods)
Are you ready to launch your very own website but don’t know where to start? You’re not alone! With so many options out there, installing WordPress can feel like a daunting task. But fear not—whether you’re a tech novice or a seasoned pro, we’ve got you covered. In this article, we’ll walk you through two straightforward methods to install WordPress, each designed to get you up and running in no time. From the simplicity of one-click installs to the more hands-on approach of manual installation, you’ll find the perfect fit for your skills and needs. So grab a cup of coffee, roll up your sleeves, and let’s dive into the exciting world of WordPress together! Your website journey awaits!
Understanding the Benefits of Installing WordPress Yourself
Installing WordPress yourself can seem intimidating at first, but the rewards are well worth the effort. Taking the DIY route not only enhances your understanding of the platform, but it also offers several compelling benefits that can set you on the path to success.
One of the most significant advantages of self-installation is the control it gives you over your website. By managing the installation process, you can customize settings according to your specific needs and preferences. You can choose the correct database name, user, and password, allowing for enhanced security and performance tailored just for you.
Furthermore, when you install WordPress by yourself, you gain a deeper understanding of its functionality, which can be incredibly beneficial when troubleshooting issues down the line. If a problem arises, you’ll be equipped with the knowledge to diagnose and resolve it efficiently, rather than relying on third-party assistance. This hands-on experience builds your confidence and makes you more adept at managing your site.
Another key benefit is the cost-effectiveness of self-installation. While there are many professional services available that can handle the setup for you, these can quickly add up. By taking the initiative to install WordPress on your own, you can save those funds for other essential aspects of your website, such as premium themes, plugins, or marketing efforts.
Additionally, self-installation opens the door to timely updates and maintenance. With a firm grasp on your site’s setup, you can make updates as soon as they become available, ensuring that your site remains secure and up-to-date. Staying proactive about your WordPress installation means you can avoid potential vulnerabilities that outdated software can introduce.
Lastly, installing WordPress yourself can foster a sense of achievement. There’s something incredibly rewarding about knowing you took the initiative to create your website from the ground up. This accomplishment not only boosts your confidence but can also inspire you to learn more about web development and digital marketing, further enhancing your online presence.
while self-installation may require a bit of time and effort, the benefits of enhanced control, cost savings, in-depth knowledge, timely updates, and personal satisfaction make it an invaluable investment for anyone serious about building a successful WordPress website.
Choosing the Right Method for Your Needs
When it comes to installing WordPress, selecting the method that aligns with your specific needs can make a significant difference in your experience and outcome. There are two primary methods to consider: the automatic installation and the manual installation. Understanding the characteristics and advantages of each can help you make an informed decision.
Automatic Installation: This method is perfect for beginners or those who prefer a hassle-free approach. Most web hosting services offer a one-click installation feature that streamlines the process, allowing you to set up WordPress in minutes. Here are a few reasons why this might be the right choice for you:
- Ease of Use: Ideal for users without technical expertise.
- Speed: Get your site up and running quickly.
- Less Error-Prone: Minimizes the risk of installation errors.
On the other hand, if you have some technical skills or want more control over the installation process, the manual installation method may be more appropriate. It gives you the opportunity to customize your setup from the ground up. Here’s what you should consider:
- Customization: Provides greater flexibility in configuration.
- Learning Experience: A chance to understand how WordPress works behind the scenes.
- Control: Allows you to choose your own database settings and configuration options.
To help you visualize the differences further, here’s a simple comparison:
| Criteria | Automatic Installation | Manual Installation |
|---|---|---|
| Technical Skill Required | Low | Medium to High |
| Time to Install | Minutes | 30+ Minutes |
| Level of Customization | Basic | Advanced |
| Risk of Errors | Low | Higher |
Ultimately, the best method for you depends on your comfort level with technology and your specific requirements. If you’re looking for a straightforward, quick setup, go for the automatic installation. However, if you’re eager to dive deeper into the workings of WordPress and tailor the installation to your liking, the manual method is the way to go. Think about what you value most in your WordPress experience to make the right choice.
Preparing Your Hosting Environment for a Smooth Installation
Setting up your hosting environment correctly is crucial for a successful WordPress installation. Before diving into the installation process, take a moment to ensure that your hosting plans meet the necessary requirements. This will save you headaches down the line and ensure your site operates smoothly from the get-go.
Key Requirements for WordPress Hosting:
- PHP Version: Ensure your server runs PHP version 7.4 or greater, as this is essential for optimal performance.
- MySQL or MariaDB: Your database should be MySQL version 5.7 or greater, or MariaDB version 10.3 or greater.
- HTTPS Support: Having an SSL certificate is not just a best practice; it’s becoming a requirement for many users and search engines.
Next, check your hosting control panel for any pre-installed features. Some hosting providers offer one-click installations that simplify the process significantly. If your host has this feature, it could save you time and let you focus on creating content instead of wrestling with installation issues.
It’s also important to consider performance optimization features. Look for hosts that provide:
- Caching solutions to improve load times.
- Content Delivery Networks (CDNs) for enhanced global performance.
- Scalable resources that can grow as your site traffic increases.
Additionally, make sure to configure your domain settings properly. This involves pointing your domain to your hosting server’s nameservers, ensuring that visitors will land on your website without hiccups. If you’re unfamiliar with how to do this, your hosting provider usually offers guidance or tutorials to assist you.
consider setting up a backup solution before installation. This step is often overlooked, but it’s vital. Many hosting providers include backup options, or you can use WordPress plugins to automate the process. Here’s a quick comparison of some popular backup options:
| Backup Plugin | Features | Free Version |
|---|---|---|
| UpdraftPlus | Scheduled backups, cloud storage integration | Yes |
| BackupBuddy | Site migration, restoration options | No |
| Duplicator | File backups, site cloning | Yes |
With a well-prepared hosting environment, you’re setting the stage for a seamless WordPress installation experience. All it takes is a little planning and attention to detail, and soon you’ll be ready to unleash your website on the world!
Step-by-Step Guide to One-Click WordPress Installation
One-click installations have revolutionized the way we set up websites, making the process faster and simpler than ever before. With just a few clicks, you can have a fully functional WordPress site running in no time. Here’s how you can easily navigate through this hassle-free method.
First, you’ll want to choose a hosting provider that offers one-click WordPress installation. Some popular options include:
- Bluehost – Known for its beginner-friendly interface and excellent customer support.
- SiteGround – Offers superior performance and customer service.
- HostGator – Provides a robust set of features for a reasonable price.
Once you’ve selected your hosting provider, follow these straightforward steps:
- Log into your hosting account.
- Navigate to the control panel (cPanel).
- Look for the “WordPress Installer” or “Softaculous Apps Installer” option.
- Select WordPress from the list of available applications.
- Click the “Install Now” button to start the installation process.
During the installation, you will need to provide some basic information, including:
| Field | Description |
|---|---|
| Site Name | Your website’s name, which will be displayed in the header. |
| Admin Username | A unique username for logging into your WordPress admin area. |
| Password | Choose a strong password to secure your site. |
| Email Address | Provide an email for account recovery and notifications. |
After completing the necessary fields, review your selections and click on “Install.” In a few moments, your WordPress site will be up and running. You’ll receive a confirmation email with details on how to access your new site.
That’s it! Now you can log in to your WordPress dashboard and start customizing your new site. With themes, plugins, and countless customization options at your fingertips, you’re just a few clicks away from creating a stunning online presence. Happy blogging!
Mastering the Manual Installation of WordPress
Installing WordPress manually might seem daunting at first, but with the right guidance, it can be a straightforward process. The beauty of manual installation lies in the control it gives you over your website. Let’s dive into the simple steps to get your WordPress site up and running.
Preparing Your Environment
Before you begin, make sure you have the following essentials in place:
- Web Hosting: Choose a reliable hosting provider that supports PHP and MySQL.
- Domain Name: Register a domain name that reflects your brand or blog’s purpose.
- FTP Client: Download an FTP client like FileZilla to upload files to your web server.
- Database Setup: Create a MySQL database and user for your WordPress installation via your hosting control panel.
Downloading and Uploading WordPress
Now that you have everything prepared, follow these steps:
- Go to the WordPress.org download page and download the latest version of WordPress.
- Unzip the downloaded file on your computer.
- Using your FTP client, connect to your web server and navigate to the root directory (usually
public_htmlorwww). - Upload the contents of the unzipped WordPress folder to your server.
Configuring wp-config.php
Next, you’ll need to configure the wp-config.php file:
- In the root directory where you uploaded WordPress, find
wp-config-sample.php and rename it towp-config.php. - Open the
wp-config.phpfile and fill in your database details:
| Field | Your Information |
|---|---|
| Database Name | your_database_name |
| Database User | your_database_user |
| Database Password | your_database_password |
| Database Host | localhost |
Running the Installation
With your database configured, it’s time to run the installation:
- Open your web browser and go to
http://yourdomain.com/wp-admin/install.php. - Follow the on-screen instructions to choose your language and fill in your site information.
- Set your username, password, and email address. Make sure to use a strong password!
Final Steps
After completing the installation, you’ll see a success message with a link to log in to your new WordPress site. Just remember to:
- Secure your site: Consider implementing security plugins.
- Customize your settings: Adjust your permalink structure and other preferences.
- Install a theme: Choose a theme that fits your style and needs.
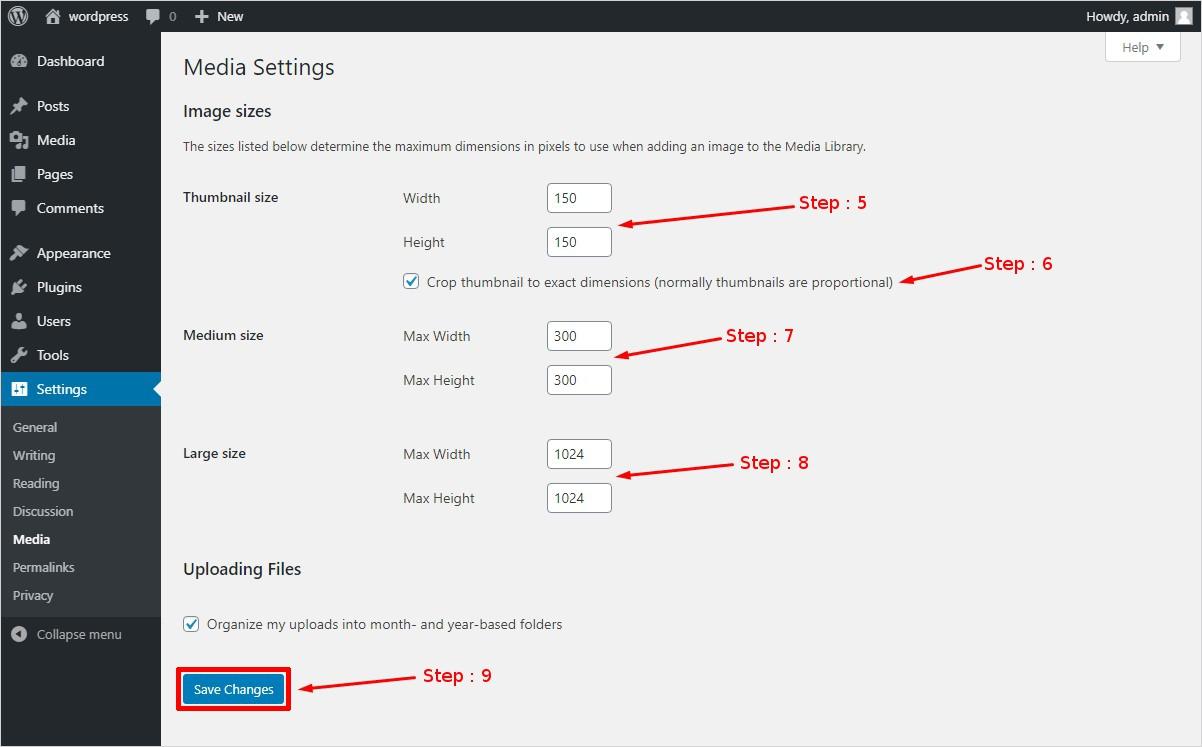
Configuring Your WordPress Settings for Optimal Performance
Once you’ve successfully installed WordPress, it’s time to dive into the settings that will enhance your website’s performance. A well-optimized WordPress site not only improves user experience but also boosts your SEO rankings. Let’s explore some essential adjustments you can make right away!
General Settings
The first place to start is the General Settings section found in your WordPress dashboard. Here you can adjust key elements:
- Site Title and Tagline: Make sure your site title is catchy and relevant, while your tagline should succinctly describe your site’s purpose.
- Timezone: Set your timezone to ensure posts are published at the correct local time.
- Membership: If you’re running a membership site or community, enable this option to allow users to register.
Reading Settings
Your Reading Settings play a crucial role in how your content is displayed. Here’s what you should focus on:
- Homepage Display: Choose between displaying your latest posts or a static page to give your audience a clear navigation path.
- Search Engine Visibility: Ensure this box is unchecked so search engines can index your site. Don’t hide from potential visitors!
- Feed Settings: Modify how many posts show in the feed and whether to display full text or a summary.
Discussion Settings
Engagement is key, and your Discussion Settings can help manage comments effectively:
- Default Article Settings: You might want to allow comments on new posts by default. However, consider disabling this for older posts to reduce spam.
- Email Notifications: Decide if you want notifications for comments and moderation, which can help you stay engaged.
Permalinks
Optimizing your Permalinks structure is vital for SEO. Navigate to Settings > Permalinks and choose a user-friendly option, like the Post Name setting. This makes URLs more readable and helps search engines understand your content better.
Performance Optimization
don’t overlook performance settings. Consider these adjustments:
- Caching Plugins: Install a caching plugin to speed up your site by storing static files.
- Image Optimization: Reduce image sizes without sacrificing quality to enhance loading times.
- Content Delivery Network (CDN): Integrating a CDN can significantly reduce latency by serving your content from multiple locations worldwide.
| Setting | Best Practice |
|---|---|
| Site Title | Keep it under 60 characters |
| Time Zone | Match it with your audience’s location |
| Permalinks | Use ‘Post Name’ structure for SEO |
| Caching | Implement a caching plugin |
By configuring these settings, you’ll lay a solid foundation for your WordPress site’s success. A well-optimized platform not only enhances performance but also keeps your visitors coming back for more!
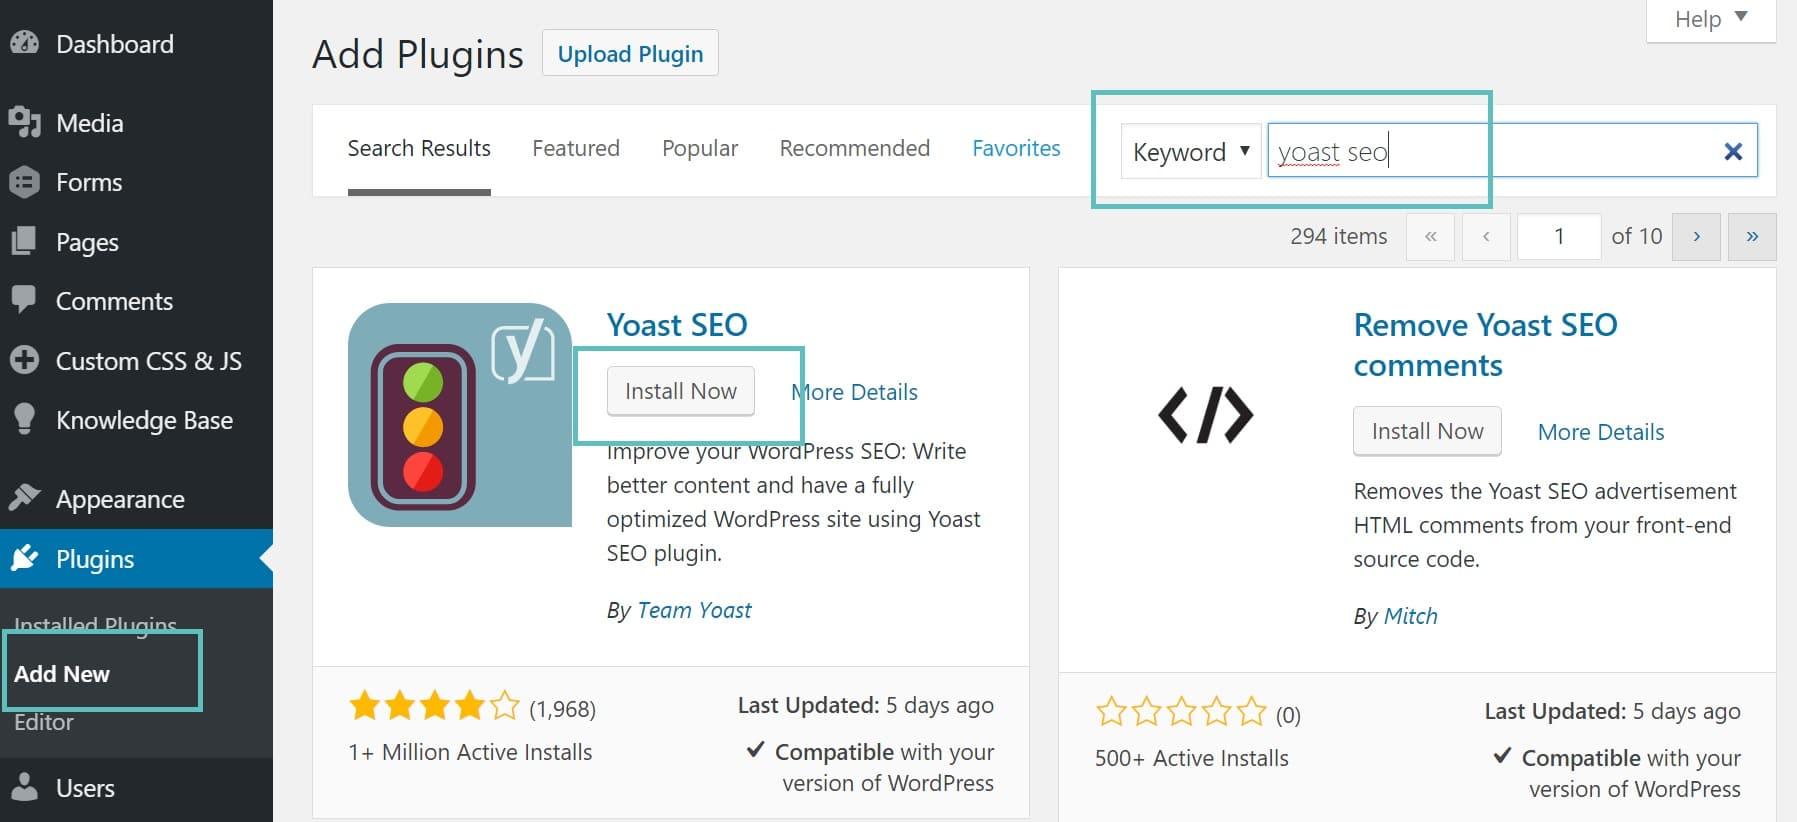
Essential Plugins to Enhance Your WordPress Experience
Once you’ve successfully installed WordPress, the next step is to enhance your site’s functionality with the right plugins. These tools can help you optimize your site, improve user experience, and boost your search engine rankings. Here are some must-have plugins that every WordPress user should consider:
- Yoast SEO - This powerful plugin helps you optimize your site’s content for search engines. With features like keyword optimization, readability analysis, and XML sitemaps, it’s a game-changer for driving traffic.
- WooCommerce – If you plan on running an online store, WooCommerce is indispensable. It turns your WordPress site into a fully functional e-commerce platform, complete with payment processing, inventory management, and shipping options.
- Elementor – For those who want to design beautiful pages without coding, Elementor is the way to go. This drag-and-drop page builder allows you to create stunning layouts and customize your site’s appearance effortlessly.
- WP Super Cache – Speed is crucial for user experience and SEO. This plugin generates static HTML files from your dynamic WordPress blog, which significantly improves loading times.
- Akismet Anti-Spam – Protect your site from spam comments. Akismet automatically checks comments and filters out the ones that look like spam, saving you the hassle of moderation.
Choosing the right plugins can be the difference between a mediocre website and a high-performing one. To help you decide which plugins to install, here’s a simple comparison table that highlights their key features:
| Plugin Name | Primary Function | Best For |
|---|---|---|
| Yoast SEO | Search Engine Optimization | Bloggers and businesses |
| WooCommerce | E-Commerce | Online stores |
| Elementor | Page Building | Designers and developers |
| WP Super Cache | Website Speed | All WordPress users |
| Akismet | Spam Protection | Blogs and forums |
When implementing these plugins, always consider compatibility with your existing themes and other plugins. Regularly update them to benefit from the latest features and security improvements. Investing time in selecting and managing your plugins can lead to a more robust and efficient website, ultimately contributing to your online success.
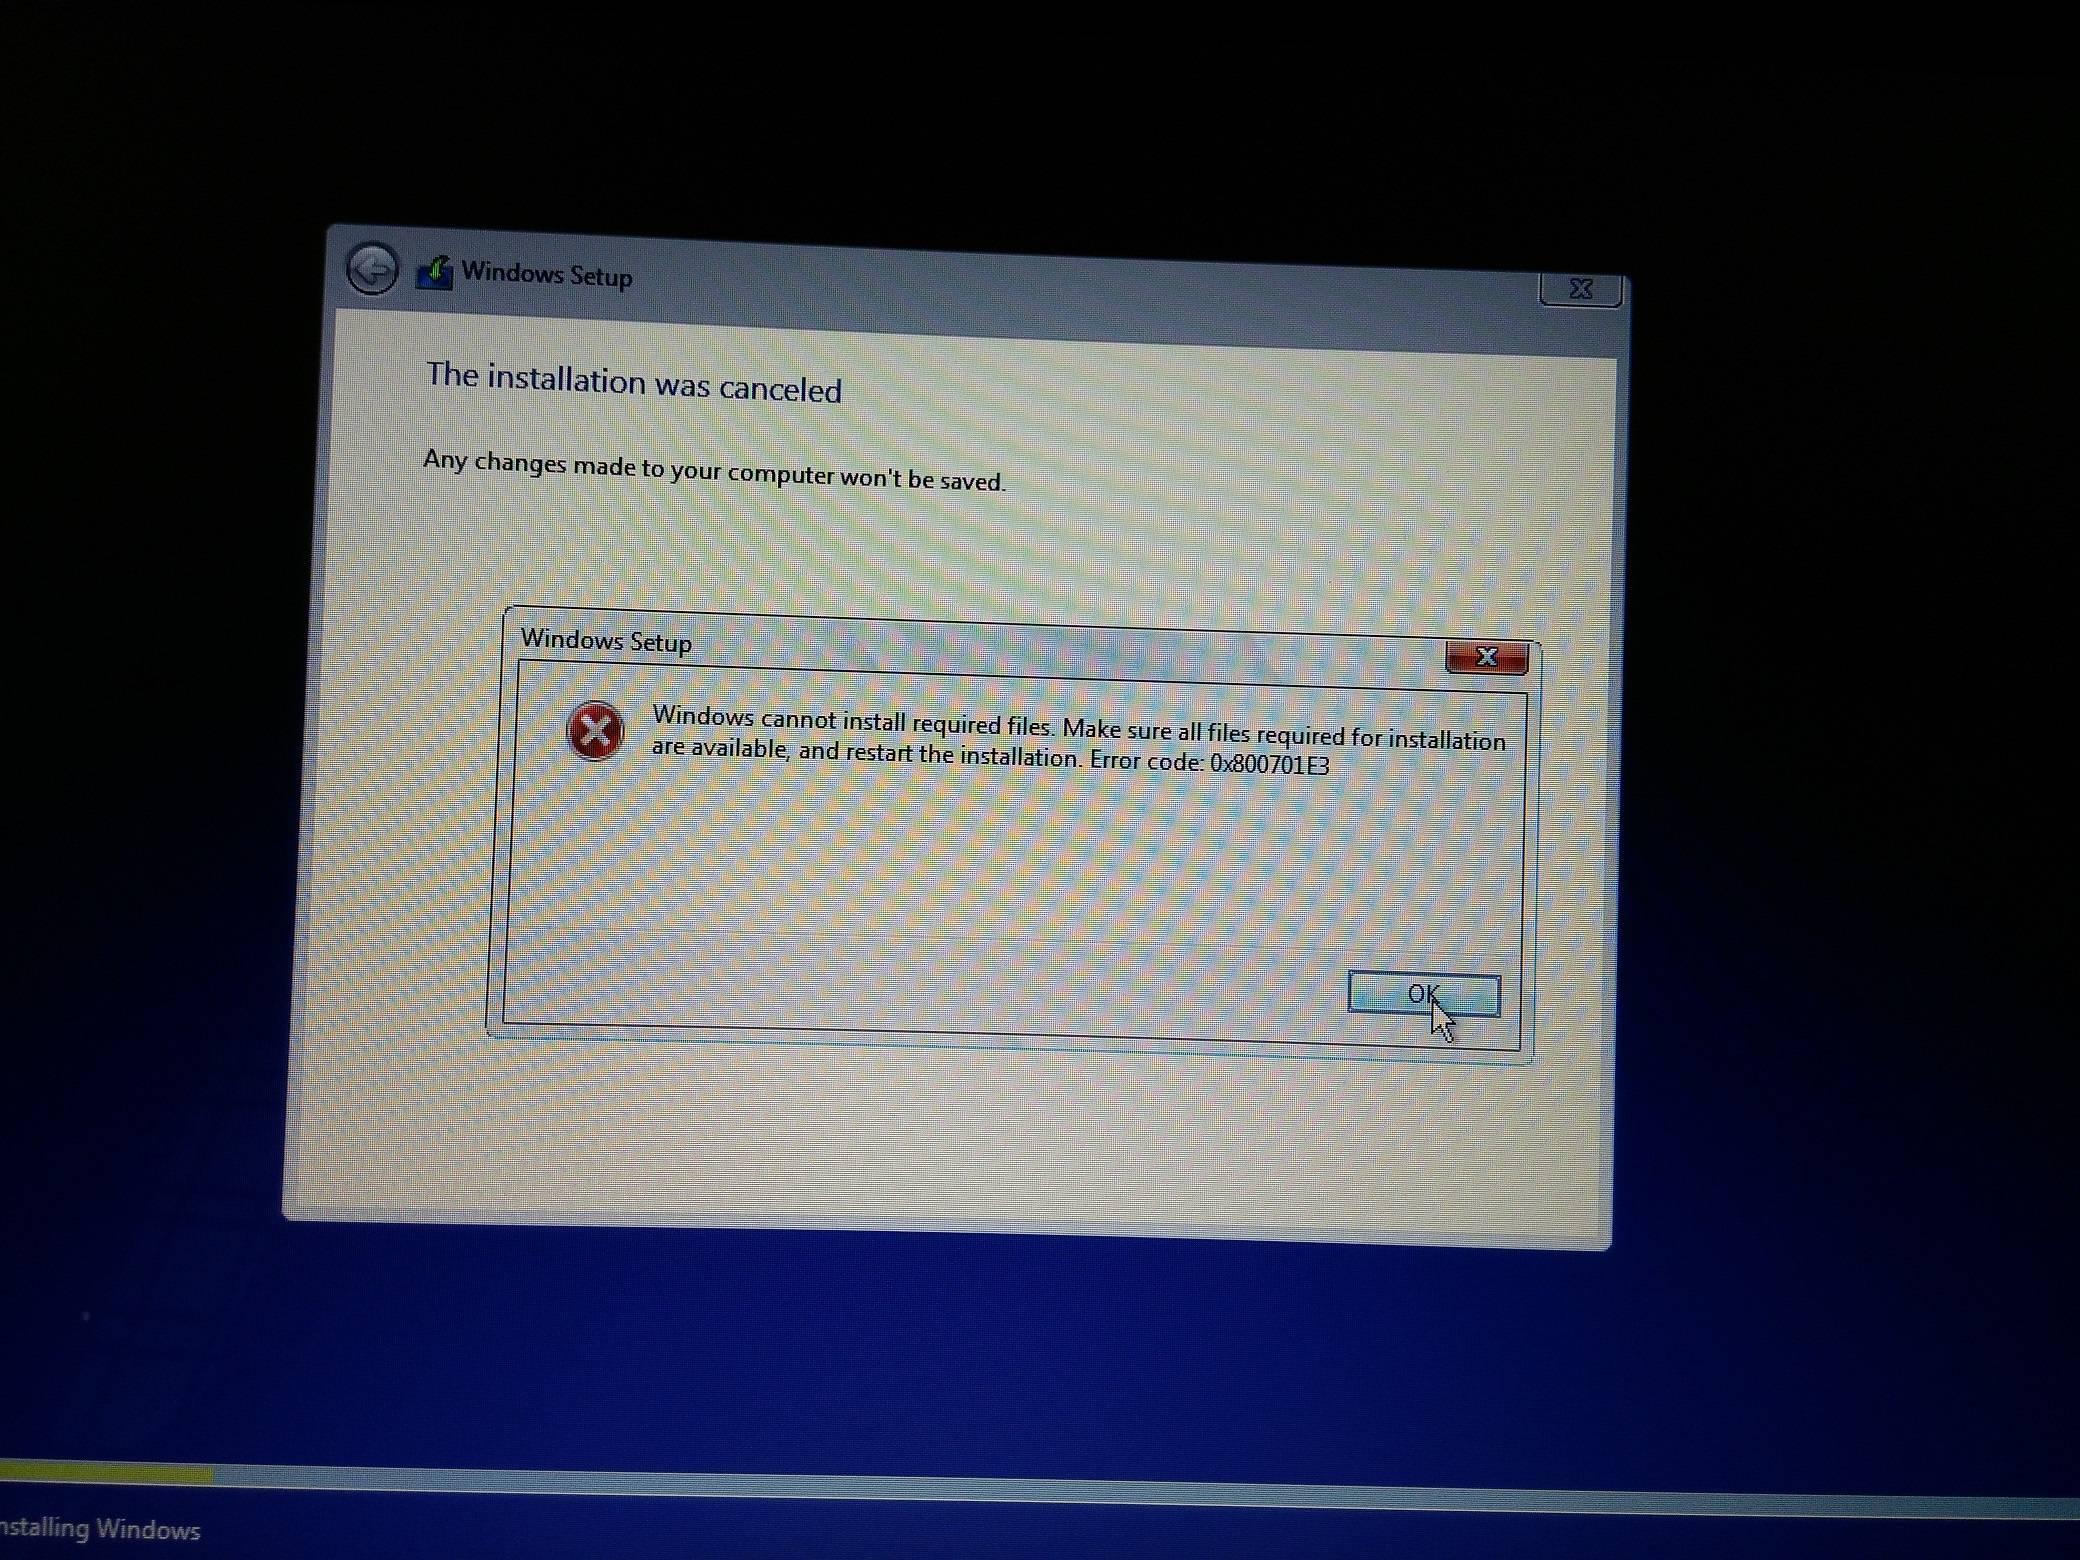
Troubleshooting Common Installation Issues
Encountering hiccups during your WordPress installation can be frustrating, but don’t worry – most issues have straightforward solutions. Here are some common problems you might face and how to resolve them:
- Database Connection Error: This often occurs when your database credentials are incorrect. Double-check your
wp-config.phpfile to ensure that the database name, username, password, and host are accurately entered. - White Screen of Death: If you see a blank screen, it could be a sign of a PHP error or memory limit issue. Try increasing the memory limit by adding
define('WP_MEMORY_LIMIT', '256M');to your wp-config.phpfile. - File Permissions Issues: Incorrect file permissions can hinder the installation. Make sure your directories are set to
755and files to644. You can change them via your FTP client or hosting control panel.
If you’re still stuck, let’s dive into some specific scenarios:
| Issue | Solution |
|---|---|
| 404 Errors After Installation | Go to Settings > Permalinks and re-save your settings to refresh the .htaccess file. |
| Installation Timeout | Try increasing the maximum execution time in your server settings or contact your hosting provider for assistance. |
| Theme or Plugin Conflicts | Temporarily disable plugins or switch to a default theme to identify the conflict. |
Remember, you’re not alone in this. Many users have faced similar issues, and the WordPress community is always ready to help. Forums, support groups, and documentation are all valuable resources at your fingertips. Don’t hesitate to reach out if you need further assistance!
With a little patience and perseverance, you can conquer any installation challenge. Happy blogging!
Final Touches: Customizing Your WordPress Site for Success
Now that you have successfully installed WordPress, it’s time to make your site truly yours. Customizing your WordPress site is not only about aesthetics; it’s about functionality, user experience, and branding. Let’s dive into some effective strategies to personalize your site for maximum impact.
1. Choose the Right Theme
Your theme sets the tone for your entire website. Consider the following when selecting a theme:
- Responsiveness: Ensure your theme is mobile-friendly.
- Customizability: Look for themes that offer customization options without extensive coding.
- Reviews and Ratings: Check user feedback to gauge reliability and support.
2. Install Essential Plugins
Plugins can enhance your site’s functionality. Here are some must-have plugins to consider:
- Yoast SEO: Optimize your site for search engines.
- Wordfence Security: Protect your site from threats.
- WPForms: Create custom forms easily.
| Plugin Name | Functionality | Benefits |
|---|---|---|
| Yoast SEO | SEO Optimization | Improved search rankings |
| Wordfence Security | Site Protection | Enhanced security and peace of mind |
| WPForms | Form Creation | User engagement through easy contact forms |
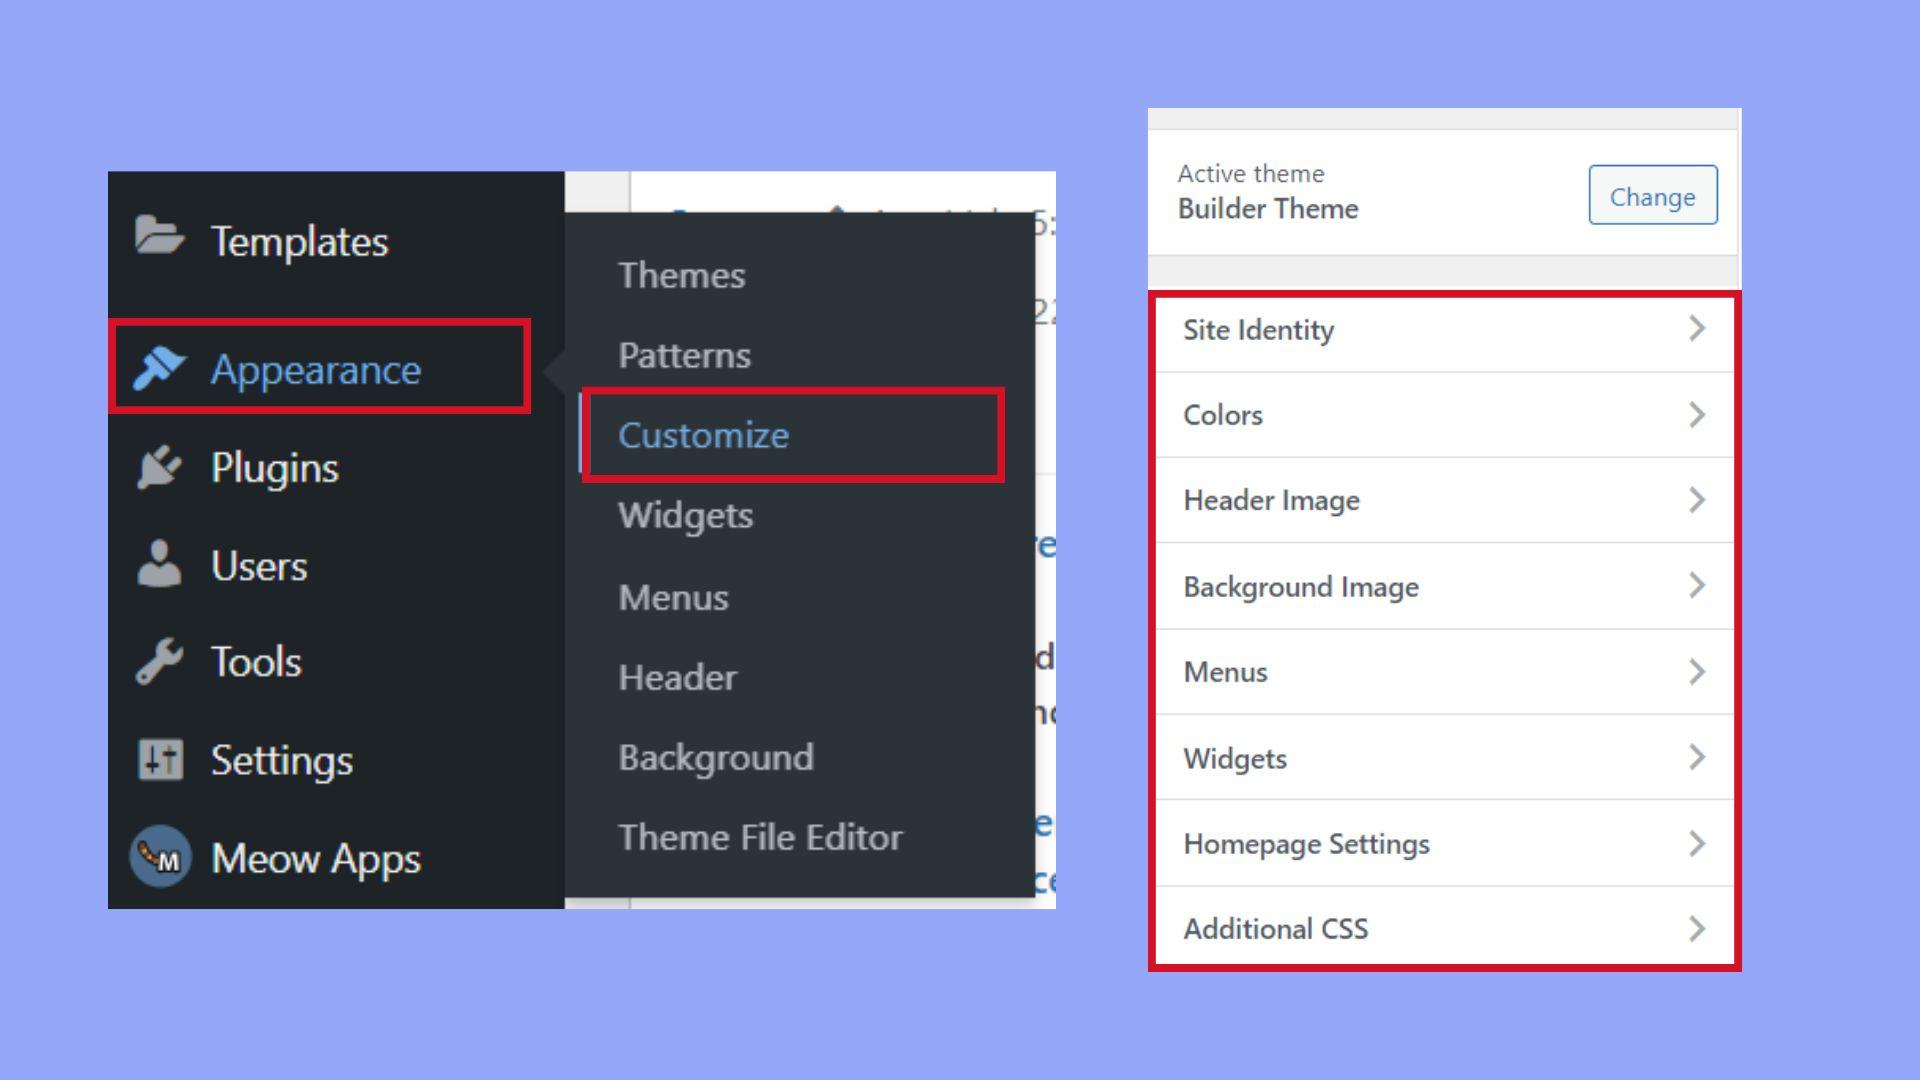
3. Customize Your Menus and Widgets
Menus and widgets play a crucial role in site navigation and interactivity. Take the time to:
- Create clear navigation menus that guide visitors.
- Add widgets to your sidebar or footer for additional information.
- Utilize custom links to direct visitors to important sections.
4. Enhance Your Branding
Your site should reflect your brand identity. Consider these branding elements:
- Logo: Upload a professional logo that represents your business.
- Color Scheme: Choose a color palette that aligns with your brand.
- Typography: Select fonts that enhance readability and style.
By focusing on these areas, you can create a WordPress site that not only looks great but also functions seamlessly. Customizing your site is an ongoing process, so don’t hesitate to keep refining it as your brand evolves and your audience grows!
Embracing the WordPress Community for Ongoing Support
Engaging with the WordPress community can be one of the most rewarding experiences for anyone embarking on their website journey. When you install WordPress, you’re not just setting up a platform; you’re joining a vibrant ecosystem filled with enthusiastic developers, bloggers, and creators who are eager to share their knowledge and support one another.
One of the best aspects of the WordPress community is the myriad of resources available to you. You can tap into:
- Online forums: Platforms like the WordPress support forum or Reddit are great places to ask questions and share experiences.
- Meetups and WordCamps: Local meetups and larger WordCamps offer opportunities to network, learn, and even collaborate on projects.
- Social media groups: Join Facebook or LinkedIn groups dedicated to WordPress where members regularly post tips and tricks.
- Official documentation: The comprehensive WordPress Codex and Developer Resources provide in-depth guides on all aspects of the platform.
Furthermore, contributing to the community is a fantastic way to enhance your skills. Whether it’s writing tutorials, developing plugins, or translating themes, participation not only helps others but also solidifies your own knowledge. By giving back, you can build a reputation and forge connections that can lead to future opportunities.
Here’s a quick overview of some benefits of being active in the WordPress community:
| Benefit | Description |
|---|---|
| Networking | Connect with like-minded individuals and professionals in your field. |
| Continued Education | Stay updated on the latest trends and tools through shared knowledge. |
| Support System | Access a wealth of advice and troubleshooting help from experienced users. |
| Collaboration | Find potential partners for projects or even contribute to open-source initiatives. |
the WordPress community is an invaluable asset for anyone looking to make the most out of their WordPress experience. From seeking help during the installation process to finding inspiration for your next project, there’s always someone willing to lend a hand. So, don’t hesitate—dive in and explore all that this incredible community has to offer!
Frequently Asked Questions (FAQ)
Q&A: Step-by-Step Guide to Installing WordPress (2 Methods)
Q1: Why should I choose WordPress for my website?
A1: Great question! WordPress powers over 40% of all websites on the internet. It’s user-friendly, highly customizable, and has a huge community for support. Whether you’re starting a blog, an online store, or a portfolio, WordPress offers the flexibility and features you need to succeed.
Q2: What are the two methods to install WordPress?
A2: We’ve got you covered! The two most popular methods to install WordPress are:
- Manual Installation: This method involves downloading WordPress, uploading it to your web server, and configuring it yourself. It gives you complete control over the installation process.
- One-Click Installation: Many hosting providers offer a simple one-click installation option. This is perfect for beginners who want to get started quickly without dealing with the technical details.
Q3: Which method should I choose?
A3: It really depends on your comfort level! If you’re tech-savvy and enjoy a hands-on approach, manual installation could be fulfilling. However, if you want a smooth, hassle-free experience, the one-click installation is the way to go. Trust me, you’ll be up and running in no time!
Q4: What do I need before I start the installation?
A4: Before diving into the installation, you’ll need a few things:
- A Domain Name: This is your website’s address (like www.yoursite.com).
- Web Hosting: This is where your website’s files will be stored. Choose a reliable host that offers good customer support.
- FTP Client: If you’re going the manual route, you’ll need an FTP client like FileZilla to upload files to your server.
Q5: What’s the first step for manual installation?
A5: First, you need to download the latest version of WordPress from the official website. Once you have it, unzip the files and prepare to upload them to your hosting account via FTP. Don’t worry; we’ll guide you through each step!
Q6: Is one-click installation really that easy?
A6: Absolutely! Most hosting providers have a user-friendly dashboard where you can find the WordPress installation option. Just click, follow the prompts, and voilà! You’ll have a fresh WordPress site ready to customize.
Q7: What should I do after installing WordPress?
A7: Once you have WordPress installed, the fun begins! You can choose a theme, install plugins to enhance functionality, and start creating content. It’s your playground, so let your creativity shine!
Q8: Any tips for ensuring a smooth installation?
A8: Definitely! Here are a few tips:
- Make sure your hosting plan meets WordPress’s requirements.
- Keep your WordPress, themes, and plugins updated to ensure security.
- Regularly back up your site to avoid losing your hard work.
Q9: Where can I find help if I get stuck during installation?
A9: The WordPress community is fantastic! You can find countless tutorials, forums, and support groups online. Plus, your hosting provider often has customer support dedicated to helping with WordPress-related questions.
Q10: Ready to get started?
A10: Absolutely! Whether you choose manual installation or the one-click method, you’re on the path to creating an amazing website. Don’t hesitate—dive in and let WordPress help you share your story or business with the world!
To Wrap It Up
And there you have it—a simple, step-by-step guide to installing WordPress using two different methods! Whether you opted for the easy one-click installation or the more hands-on manual approach, you’ve just taken a significant step toward launching your very own website.
Now that you’ve set the foundation, it’s time to unleash your creativity! Explore themes, customize your design, and start crafting content that reflects your unique voice. Remember, the world of WordPress is vast and full of possibilities, so don’t hesitate to experiment and make it your own.
If you found this guide helpful, share it with friends or colleagues who might be looking to start their own projects. And if you encounter any bumps along the way or have questions, drop a comment below—we’re all in this together, and I’m here to help!
So, what are you waiting for? Dive in, have fun, and let your ideas flourish. Your WordPress journey is just beginning, and I can’t wait to see what you create! Happy building!

New Providers
Enjoy The Speed Of Downloading & Uploading With 1GBPS Port
Affordable Dedicated Servers & Colocation Services. Services: Dedicated Servers Colocation Private Cabinet Colocation DDoS Protection
Up to 85% off hosting + website builder
Latest News
- 8 Best WooCommerce Dropshipping Plugins for 2026 (Free + Paid)July 9, 2026 15
- How to Make a Website Template: A Step-by-Step GuideJuly 8, 2026 22
- 10 Best Coming Soon WordPress Plugins for 2025 (Compared)July 8, 2026 22
- How to Create a Personal Web Page: 7+ Simple StepsJuly 7, 2026 23
- 9 Best WordPress Countdown Timer Plugins in 2026July 7, 2026 21

We specialize in providing Web hosting reviews. Where you can search for potential hosts.