Tired of scrolling through endless images in your WordPress media library? Adding media folders is a game-changer! Organize your photos and files effortlessly, making it easier to find what you need. Let’s dive into how you can keep your library tidy!
How to Add WordPress Media Folders: Organize Your Media Library Better
Are you tired of sifting through endless images and files in your WordPress media library? You’re not alone! Many WordPress users find themselves overwhelmed by a chaotic media library, making it a challenge to locate that perfect image or video just when they need it. Fortunately, there’s a simple solution: organizing your media with folders! In this article, we’ll explore the incredible benefits of adding media folders to your WordPress site and walk you through the straightforward steps to get started. Whether you’re a blogging newbie or a seasoned pro, organizing your media library will save you time and frustration, allowing you to focus on what really matters—creating great content. So, let’s dive in and transform your media management experience!
Understanding the Importance of Media Organization in WordPress
When managing a WordPress site, you’ll likely accumulate a vast array of media files, from images and videos to PDFs and audio clips. Without proper organization, your media library can quickly become chaotic, making it difficult to locate the files you need when you need them. This is where an efficient media organization strategy comes into play. By implementing a structured system, you can enhance your workflow significantly.
Why is Media Organization Crucial?
Having a well-organized media library can save you time and frustration. Here are some compelling reasons to prioritize media organization:
- Improved Efficiency: Quickly find files without scrolling through endless lists.
- Better Searchability: With organized folders, searches yield faster and more accurate results.
- Streamlined Workflows: Collaborating with team members becomes easier when everyone knows where files are stored.
- Faster Site Performance: A cleaner, better-organized media library can contribute to improved site speed.
One of the most effective ways to organize your WordPress media library is by creating folders. While WordPress does not support media folders out of the box, there are several plugins designed to help you categorize and manage your media files seamlessly.
How to Approach Media Organization
When organizing your media, consider the following strategies:
- Use Descriptive File Names: Rename files to reflect their content, making them easier to identify.
- Create Folders for Different Media Types: Group images, videos, documents, and audio files in separate folders.
- Implement Consistent Naming Conventions: Establish a naming pattern to maintain uniformity across your media files.
For those who manage a large volume of media files, consider using a table to summarize your folder structure. Below is a simple layout you might adopt:
| Folder Name | Contents | Purpose |
|---|---|---|
| Images | JPEG, PNG, GIF | All site images, blog post graphics |
| Videos | MP4, AVI | Promotional videos, tutorials |
| Documents | PDF, DOCX | Resource guides, downloadable content |
| Audio | MP3, WAV | Podcasts, background music |
By categorizing your media in this way, you not only make file retrieval easier but also create a more user-friendly experience for site visitors who may be searching for specific resources. Remember, the effort you put into organizing your media library today will pay off in the long run, as it lays the foundation for a more efficient, effective site.
Exploring the Limitations of the Default Media Library
While the default media library in WordPress provides a basic solution for managing your images, videos, and documents, it often falls short when it comes to organization and efficiency. Users frequently find themselves sifting through a clutter of media files, which can lead to frustration and wasted time. Let’s take a closer look at these limitations and why a more structured approach is essential for an effective media management experience.
- Inadequate Sorting Options: The default media library offers limited sorting capabilities. Users can filter by date or type, but this does not accommodate the complexities of larger projects or extensive libraries.
- No Folders or Subfolders: Without the ability to create custom folders, media files can quickly become disorganized. This lack of hierarchy makes it challenging to locate specific files when you need them.
- File Overload: As your website grows, so does your media library. An overwhelming number of files can slow down the loading times of your site and complicate the editing process.
- Duplication Issues: Uploading the same file multiple times can lead to confusion. The default library does not alert you when a file already exists, resulting in a messy library filled with duplicates.
Moreover, when managing a team or collaborating with others, the challenges of the default setup become even more apparent. Different users may have varied organizational preferences, and without a structured system, collaboration can become chaotic.
Consider these common scenarios:
| User Role | Organization Challenge |
|---|---|
| Content Creator | Struggles to find specific images for articles |
| Designer | Requires easy access to brand assets |
| Manager | Needs oversight of all uploaded media for branding consistency |
Clearly, the default media library does not cater to diverse needs, making it imperative to explore enhanced solutions. By adding media folders, you can categorize files into distinct groups based on project, type, or purpose, allowing for a seamless workflow. Imagine being able to access your media files in just a few clicks instead of scrolling through endless lists!
Investing in a media management plugin or a folder system can transform your media experiences. With features like drag-and-drop functionality, batch uploads, and the ability to create custom taxonomies, you’ll not only save time but also enhance your productivity. So, why settle for clutter when you can create a streamlined and efficient media library that works for you?
Choosing the Right Plugin for Media Folder Management
When it comes to enhancing your WordPress media library, selecting the right plugin for managing your media folders can make all the difference. A good plugin not only organizes your files but also improves your workflow, allowing you to focus on creating great content rather than searching for images or videos. Here are some key factors to consider:
- User Interface: Look for plugins that offer a clean and intuitive interface. You want something that feels seamless within your existing WordPress setup.
- Features: Ensure the plugin includes features like drag-and-drop uploading, bulk actions, and folder permissions to help streamline your media management.
- Compatibility: Check if the plugin is compatible with other tools you use, such as SEO plugins or page builders. This ensures a smooth integration without conflicts.
- Performance: A well-optimized plugin should not slow down your website. Look for user reviews that mention speed and performance to gauge its efficiency.
- Support and Updates: Choose a plugin that comes with reliable support and regular updates. This is crucial for ongoing security and compatibility with new WordPress versions.
To give you a clearer picture, consider the following table comparing some popular media folder management plugins:
| Plugin Name | Key Features | Price |
|---|---|---|
| FileBird | Drag-and-drop, Folder management, Shortcode support | Free / Premium |
| Media Library Assistant | Custom taxonomies, Bulk management, Shortcode support | Free |
| WP Media Folder | Drag-and-drop, Google Drive integration, Cloud storage | Premium |
When evaluating your options, be sure to read user reviews and explore demo versions if available. It’s also wise to consider how the plugin aligns with your specific media management needs. For instance, if you frequently work with large files or require collaboration with team members, you might prioritize plugins that support cloud storage or team permissions.
Additionally, think about the long-term implications. The right choice today should also cater to your future needs as your media library grows. A scalable solution helps avoid the hassle of migrating to a new system down the line.
Lastly, consider your budget. While some plugins offer free versions, the premium features might be worth the investment for enhanced functionality and support. Compare the costs against the benefits each plugin offers to make an informed decision.
Step-by-Step Guide to Setting Up Media Folders
Organizing your media library is crucial for maintaining efficiency in your WordPress website. With a structured approach to media folders, you can locate and manage your files effortlessly. Here’s how to get started with setting up media folders using a plugin.
First, you’ll need to install a reliable media folder plugin. There are several options available, but a popular choice is FileBird. It allows you to create a hierarchy of folders and subfolders, making it easier to categorize your media files. To install the plugin:
- Go to your WordPress dashboard.
- Navigate to Plugins > Add New.
- Search for “FileBird” in the search bar.
- Click on Install Now and then Activate.
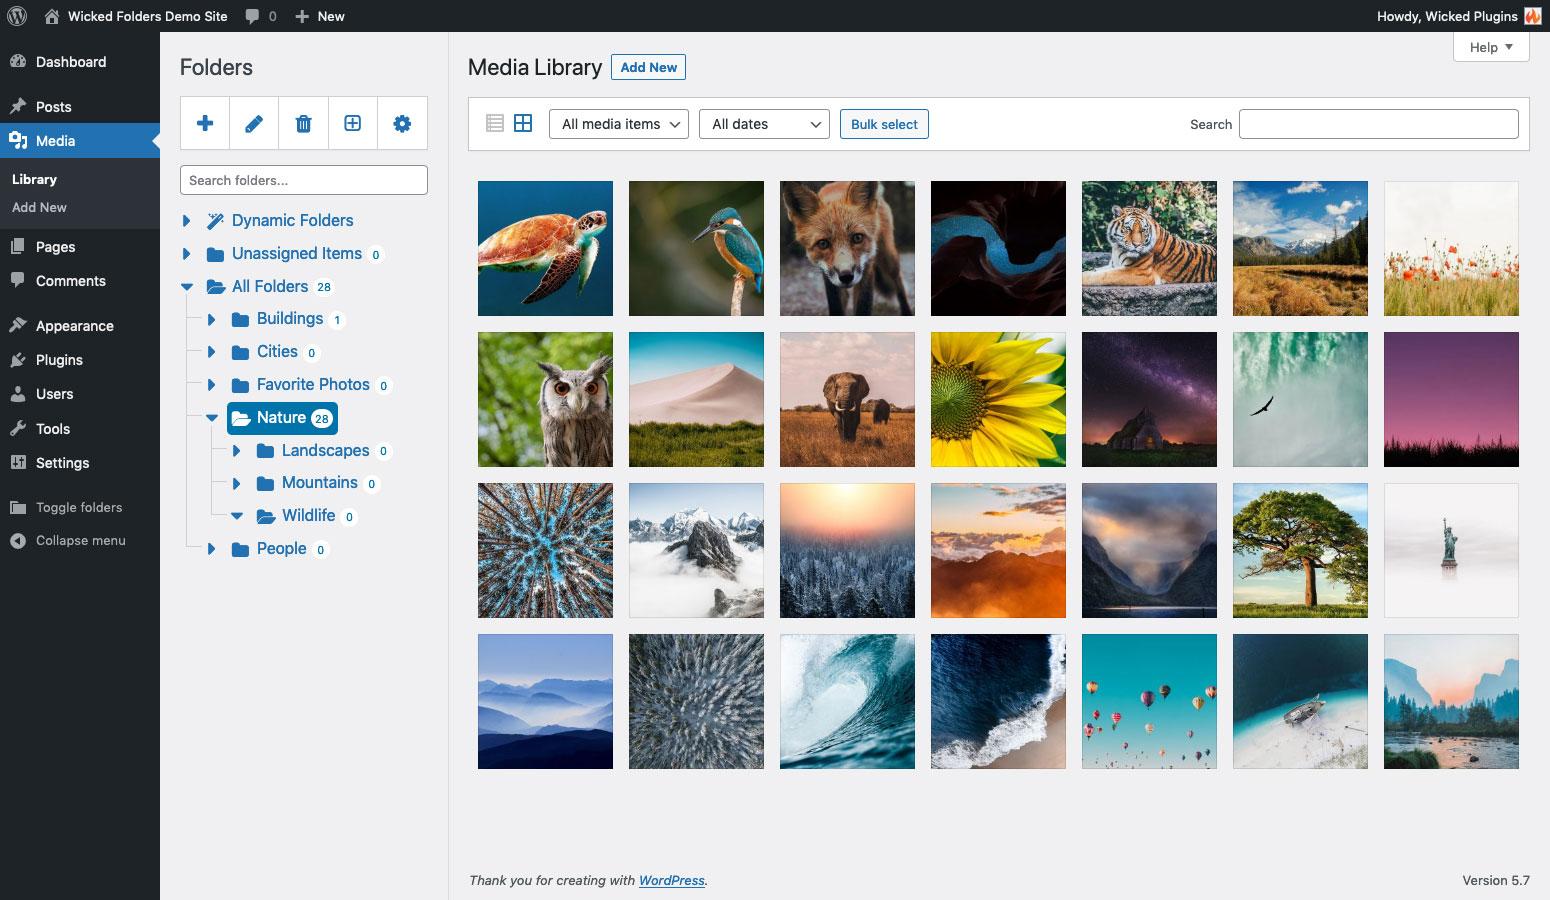
Once your plugin is activated, you can start creating folders. Head over to your media library by clicking on Media > Library. You should see a new option for folders. Here’s how to create your first folder:
- Click on the New Folder button.
- Name your folder based on the type of media you’ll store, like “Images”, “Videos”, or specific project names.
- Hit Enter to create the folder.
After creating folders, organize your existing media files. Simply drag and drop images, videos, or documents into their respective folders. This not only declutters your library but also helps you quickly find files when you need them.
If you have a large number of media files, consider using the Bulk Actions feature. Select multiple files and use the “Move to Folder” option to streamline your sorting process:
| Action | Description |
|---|---|
| Move to Folder | Select multiple files and sort them into a chosen folder. |
| Delete | Remove unwanted files directly from your library. |
| Rename | Update file names for better clarity and organization. |
As you continue adding new media, remember to sort them immediately into folders. This habit will save you time and prevent a messy media library down the line. Plus, you can always adjust folder names and structures as your needs evolve.
Lastly, don’t forget to regularly review your media library. Remove any outdated or unused files to keep everything tidy. A well-maintained media library not only enhances your workflow but also ensures that your website remains professional and visually appealing.
![]()
Best Practices for Naming and Categorizing Your Media
Organizing your media library in WordPress goes beyond simply creating folders; it starts with a thoughtful approach to naming and categorizing your files. Proper naming conventions can save you time and frustration in the long run, making it easier to locate and manage your media assets.
Use Descriptive Filenames: Instead of generic names like “IMG_1234.jpg,” opt for more descriptive filenames that capture the essence of the file. For example, “sunset-beach-vacation.jpg” not only helps you remember the content but also optimizes for search engines. This is especially crucial for images that could be used across multiple posts or pages.
Incorporate Keywords: Including relevant keywords in your media filenames can enhance your SEO efforts. Think about the terms your audience might use to search for that media. For instance, if it’s an image of a chocolate cake, consider naming it ”decadent-chocolate-cake-recipe.jpg” to align with search intent.
Create a Consistent Naming Structure: Establish a naming structure that you can stick with across all your media. This could involve using project names, dates, or specific categories. For example, “category-projectname-date.jpg” keeps your media organized and allows for easier sorting. Consistency ensures that you and anyone else contributing to your site can navigate the media library effortlessly.
Categorize by Type and Purpose: When creating folders or categories, think about the types of media you use. Consider organizing your files into categories such as:
- Images
- Videos
- Audio Files
- Documents
This categorization allows for quick access and prevents media from getting lost among unrelated files.
| File Type | Suggested Categories |
|---|---|
| Images | Photos, Graphics, Icons |
| Videos | Tutorials, Promotions, Events |
| Audio | Podcasts, Music, Sound Effects |
| Documents | Reports, Whitepapers, Guides |
Regularly Review and Clean Your Library: Make it a habit to regularly assess your media library. Delete any files that are outdated or no longer serve a purpose. This not only keeps your library clean but also enhances site performance by reducing clutter.
Utilize Tags for Enhanced Searchability: In addition to folders, consider using tags within WordPress. Tags can add another layer of organization by allowing you to group media based on topics or themes, making it even easier to find what you need when you’re in a pinch.
By implementing these strategies, you will enhance the organization of your media library significantly. Well-named and categorized media not only improves your workflow but also enhances the overall user experience on your website.
How to Easily Move and Organize Existing Media Files
Managing your media library in WordPress can often feel overwhelming, especially if you’ve accumulated a vast number of files over time. Luckily, reorganizing and moving your existing media files is not only feasible but can also enhance your workflow and ensure a more efficient content management experience. Here’s how you can easily move and organize your media files effectively.
First things first, it’s essential to identify your organizational needs. Consider categorizing your media files based on the type of content you create. Here are some common folder structures that can help:
- Images – Organize by categories such as Blog Posts, Social Media, and Stock Photos.
- Videos – Separate folders for Tutorials, Webinars, and Promotional Content.
- Documents – Group files like E-books, Guides, and Whitepapers.
Once you have a structure in place, you can use WordPress plugins to assist with the moving and organizing process. Plugins like Media Library Organizer or FileBird provide intuitive interfaces that let you drag and drop files into your designated folders. This method not only streamlines the process but also saves you time.
If you prefer a more hands-on approach, you can manually move files to your new folder structure. Here’s how to do it:
- Go to the Media Library in your WordPress dashboard.
- Select the file you want to move, and click on the “Edit” option.
- In the edit screen, change the file URL and directory to match your new folder structure.
- Save your changes.
Remember to keep your file names consistent and descriptive. This practice not only aids in SEO but also makes searching for specific files much more manageable. For example, instead of generic names like “image1.jpg”, opt for “2023-spring-sale-banner.jpg”. This way, both you and your visitors can easily identify what the file is about.
For bulk moving or renaming, consider using the Bulk Media Register feature available in some plugins. This feature allows you to quickly edit multiple files at once, saving you time and ensuring consistency across your media library.
After you’ve successfully reorganized your files, it’s vital to regularly maintain your media library. Schedule a monthly or quarterly clean-up session to delete any unused or outdated files. Not only will this keep your library clutter-free, but it will also improve your website’s loading speed and performance.
| Folder Type | Example Files | Suggestions |
|---|---|---|
| Images | Blog-Post-Images Profile-Pictures | Use subfolders for events or campaigns. |
| Videos | Tutorials Interviews | Include a separate folder for highlights. |
| Documents | E-Books Case-Studies | Organize by publication year. |
Enhancing Your Workflow with Effective Media Folder Strategies
Managing a large collection of media files in WordPress can often feel overwhelming. Without a proper organization strategy, finding the right image or video when you need it can become a frustrating task. That’s where effective media folder strategies come into play. They not only streamline your workflow but also enhance your productivity.
Using plugins designed for media organization can truly revolutionize how you interact with your WordPress media library. Here are some key benefits:
- Improved Efficiency: Quickly locate files without having to sift through countless uploads.
- Better Collaboration: If you’re working with a team, a well-organized media library ensures that everyone can find what they need, when they need it.
- Enhanced SEO: Organizing media files can lead to better optimization, as you can tag and categorize content more effectively.
Consider implementing a clear folder hierarchy that mirrors your website’s structure. For instance, you might organize your media library by:
- Content Type: Images, Videos, Audio.
- Project or Campaign: Each folder designated for specific projects or marketing campaigns.
- Date: Organizing files by month or year can help in archiving older content.
When it comes to naming your files, consistency is key. A coherent naming strategy can save you time and reduce confusion. Adopting a format such as:
| File Type | Example Name |
|---|---|
| Image | projectname-date-description.jpg |
| Video | campaignname-type-description.mp4 |
| Audio | eventname-date-track.mp3 |
Additionally, regularly auditing your media library is crucial. Evaluate what’s working and what might need to be archived or deleted. A clean library helps maintain performance and reduces the load time of your website. Set a schedule for this audit—perhaps every few months—to ensure optimal organization.
Lastly, take advantage of tags and categories. Most media management plugins allow you to assign tags and categories to your media files, making it even easier to filter and search for specific items later. Make this a habit, and you’ll find that your ability to locate files improves dramatically.
Maintaining Your Media Library: Tips for Ongoing Organization
Keeping your media library organized isn’t just a one-time task; it’s an ongoing commitment that can significantly enhance your workflow and site performance. Here are some practical tips to ensure your media library remains tidy and efficient.
Implement a Clear Folder Structure
Before you start adding media items, think about a logical structure for your folders. You might consider organizing them by:
- Content type: Images, videos, audio files
- Project or campaign: Specific events, promotions, or themes
- Date: Year, month, or even season to easily locate time-sensitive materials
Use Descriptive Filenames
When uploading files, don’t just settle for generic names like “image1.jpg.” Instead, use descriptive filenames that include relevant keywords. This not only aids in organization but also boosts SEO. For example, use 2023-summer-sale-banner.jpg instead of banner1.jpg.
Regularly Audit Your Media Library
Set a schedule for periodic audits of your media library. During these audits, check for:
- Duplicate files that can be deleted
- Outdated images or media that no longer serve a purpose
- Tags and metadata that need updating for better searchability
Utilize Plugins for Enhanced Organization
Many WordPress plugins can help you manage your media library more effectively. Consider using:
| Plugin Name | Features |
|---|---|
| Media Library Assistant | Bulk management, enhanced search options |
| WP Media Folder | Drag-and-drop folder creation, easy organization |
Stay Consistent
Consistency is key! Make it a habit to organize your media as you upload it. If you create a new folder for each project, ensure you do the same every time. This will save you time and frustration in the long run.
Backing Up Your Media Library
always back up your media library. Use plugins that can automatically back up your entire site, including your media files. This way, in case of any mishap, you can restore your organized library without losing precious files.
Troubleshooting Common Issues with Media Folders
When working with media folders in WordPress, you might encounter a few common issues that can hinder your workflow. Understanding these problems and their solutions can save you time and frustration. Here are some potential issues and how to troubleshoot them:
- Media not appearing in folders: If your media files are not showing up in the designated folders, ensure that the plugin you are using to manage your media folders is properly configured. Check the settings and make sure that the folders are correctly created and that files have been assigned to them.
- Plugin conflicts: Sometimes, additional plugins can conflict with your media folder plugin. To troubleshoot, deactivate other plugins one by one while checking the media library to see if the issue resolves itself. This can help you pinpoint the conflicting plugin.
- File permissions: If you’re unable to upload or access media files, it might be a file permission issue. Ensure that your ‘wp-content/uploads’ directory has proper permissions. Typically, it should be set to 755 for folders and 644 for files.
- Missing images or broken links: If images appear broken or are missing from folders, verify the URL paths in your media settings. Sometimes, moving files or changing folder structures can disrupt these links. You may need to update the URLs in your database or use a plugin to assist with the process.
For some users, media folders may seem overwhelming, especially if you’re managing a large library. Here’s a simple troubleshooting table that summarizes steps for common issues:
| Issue | Possible Solution |
|---|---|
| Media not showing | Check folder settings and media assignment. |
| Plugin conflicts | Deactivate plugins one by one to identify conflicts. |
| Upload errors | Verify file permissions for upload folders. |
| Broken links | Update media URLs in settings or database. |
Furthermore, it’s essential to keep your WordPress installation and all plugins updated. Outdated software can often lead to unexpected issues, including problems with media folders. Regular updates not only enhance functionality but also improve security.
If all else fails, consider reaching out to the support forum related to your media folder plugin. The community can often provide insight or solutions that you may not have considered. Sharing your specific issue, along with steps you’ve already taken, can help others assist you more effectively.
By addressing these common issues head-on, you can ensure that your media library remains organized and efficient, allowing you to focus on creating and sharing your content without unnecessary distractions.
Unlocking the Full Potential of Your WordPress Media Library
Managing a growing media library in WordPress can feel overwhelming, especially if you have a plethora of images, videos, and documents. Without a well-structured organization system, finding what you need can become a task in itself. This is where media folders come into play, helping you achieve a clutter-free, efficient library that boosts your productivity and creativity.
Imagine being able to locate your files in seconds rather than sifting through endless lists. By creating folders, you can categorize your media into logical sections, making it easier to navigate. Here are a few strategies to consider for organizing your media library:
- By Content Type: Create separate folders for images, videos, audio files, and documents. This method allows for quick access to specific formats.
- By Project or Campaign: If you’re working on multiple projects, dedicate folders for each project. This ensures that all relevant media is housed in one spot, simplifying collaboration.
- By Date: Organizing media by year, month, or even day can be beneficial for time-sensitive materials or for tracking the evolution of your work.
- By Category or Topic: If your website covers various topics, set up folders for each category to streamline content creation.
Implementing folders is a breeze with plugins specifically designed for WordPress media management. These plugins not only allow you to create folders, but they also offer features such as drag-and-drop functionality, making it easy to organize your existing media. Popular options include:
- Media Library Assistant: This versatile plugin helps enhance the media library with additional organization tools.
- FileBird: A straightforward plugin that allows you to create and manage folders effortlessly.
- WP Media Folder: Offers advanced features for organizing your media without clutter.
Using folders enhances not just your organizational skills, but also the performance of your website. When files are easy to locate, it speeds up the content creation process, allowing you to focus on what truly matters—creating engaging content for your audience. And remember, a tidy media library can also improve your site’s overall loading speed.
Consider the long-term benefits of maintaining a well-organized media library. Investing a little time in setting up your folders now can save you countless hours in the future. Besides, a well-structured library reflects professionalism and dedication, qualities that can enhance your brand’s image.
Ultimately, the goal is to make your WordPress experience as seamless as possible. By unlocking the full potential of your media library through thoughtful organization, you empower yourself to produce high-quality content without the headache of chaos. Don’t let a disorganized library stifle your creativity; take control now and reap the rewards of a streamlined workflow.
Frequently Asked Questions (FAQ)
Q&A: How to Add WordPress Media Folders: Organize Your Media Library Better
Q: Why should I consider organizing my WordPress media library with folders?
A: Great question! As your WordPress site grows, so does your media library. Without any organization, it can become overwhelming to find images, videos, or documents. By adding folders, you can categorize your media—think of it like having different drawers for different types of files. This not only saves time but also enhances your workflow and productivity.
Q: Isn’t it enough to just rely on the default media library?
A: While the default media library is functional, it lacks the organizational tools that can really streamline your process. Without folders, you’re stuck scrolling through a long list of files, making it easy to overlook or misplace media. Using folders adds structure, making it much easier to locate what you need when you need it.
Q: How can I add folders to my WordPress media library? It sounds complicated.
A: It’s actually quite simple! You can use plugins like “FileBird” or “Media Library Organizer” that allow you to create folders seamlessly. Once installed, these plugins provide an intuitive drag-and-drop interface, so you can create folders and move files around in just a few clicks. Trust me, once you start using them, you’ll wonder how you ever managed without!
Q: Are there any drawbacks to using media folders in WordPress?
A: While the benefits far outweigh any drawbacks, it’s worth noting that adding plugins can sometimes slow down your site if not managed properly. However, if you choose a well-reviewed plugin and keep your site optimized, you’ll enjoy all the advantages of organized media without any significant downsides.
Q: Can I create subfolders within my main folders?
A: Absolutely! Many of the media folder plugins allow you to create subfolders, which means you can further refine your organization. For example, if you have a main folder for “Images,” you can create subfolders for “Blog Posts,” “Social Media,” and “Product Images.” This hierarchical structure can make your media library even more efficient!
Q: Will my media organization affect my website’s performance?
A: Not at all! Organizing your media files into folders won’t negatively impact your website’s performance. In fact, a well-organized media library can enhance your site’s overall efficiency, as it makes it easier to manage your assets. Just remember to keep your images optimized for web use to ensure fast loading times.
Q: What are some best practices for organizing my media library?
A: Start by categorizing your media based on your content strategy. Use clear and descriptive names for your folders and files. Regularly review and clean up your media library to remove any outdated or unnecessary files. And don’t forget to leverage tags and descriptions to make searching even easier!
Q: I’m convinced! Where can I learn more about using media folders in WordPress?
A: Awesome! You can check out the resources available on the WordPress.org plugin repository for specific plugins, or look for tutorials and guides online that walk you through the process step-by-step. There’s a wealth of knowledge out there that can help you become a media organization pro in no time!
Q: Any final tips before I dive in?
A: Just remember that organizing your media is an ongoing process. Don’t feel like you have to do everything at once—take it step by step. Start small, create a few folders, and gradually build on them. Soon enough, you’ll have a beautifully organized media library that makes managing your content a breeze! Happy organizing!
Concluding Remarks
And there you have it! By adding media folders to your WordPress setup, you’re not just tidying up your media library—you’re taking a crucial step towards enhancing your workflow and productivity. Imagine being able to find that perfect image or video without the hassle of scrolling through endless files. By organizing your content, you can spend less time searching and more time creating.
So, why not give it a try? Whether you’re managing a personal blog, an online store, or a portfolio, the benefits of a well-organized media library are undeniable. With just a few simple steps, you can transform the way you manage your media, making it easier to focus on what really matters—delivering great content to your audience.
If you have any questions or need further assistance as you embark on this organizational journey, feel free to drop a comment below or reach out. Happy organizing, and here’s to a more streamlined media library!
New Providers
Enjoy The Speed Of Downloading & Uploading With 1GBPS Port
Affordable Dedicated Servers & Colocation Services. Services: Dedicated Servers Colocation Private Cabinet Colocation DDoS Protection
Up to 85% off hosting + website builder

We specialize in providing Web hosting reviews. Where you can search for potential hosts.